Jump to content
SAU Community

Recommended Posts

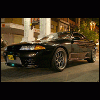
Hi i have owned this car for 4 years now and have decied its time to move on so its up for sale.

R32 GTR 1989 model

190k kms on the tacho about 20k kms on the engine and most parts

black in colour

Price 30k

engine

87mm Arias forged pistons

P.A.R billet rods with 7/16 rod bolts

ACL race bearing

Crank balanced,grub screwed and JUN crank collar

block acid bath, decked and oil returns bored out.

Head rebuilt fitted with bronze value guides.

Metal head gasket.

Modified sump larger and fitted with tomei sump baffles.

Covers have been coated by Craved and new R34 Nur centre plate.

JJR catch can

SARD 800cc injectors

SARD FPR

Tomei 260in/out cams

HKS cam gears

Gates timming belt

N1 oil pump

N1 water pump

Nismo oil cap

Nismo harmonic balancer

Nismo fuel pump

Nismo AFMs

Nismo engine mounts

Ms/k&n air pods

Apexi power FC

Turbo

HKS 2530 turbos currently tuned to 21psi

HKS dump pipes

JJR front pipes

high flow cate

kakimoto exhaust

Cooling

JJR 40mm radiator

JJR silcon radiator hoses

JJR cooler piping

JJR 100mm inter cooler

JJR oil cooler(not fitted)

Nismo radiator cap

Handling

GAB coilovers

Cusco strut brace front and rear

Steering rack rebuilt 20k kms ago

exterior

18x10+18 WORKs XD9

Work blue wheel nuts

Nankang NSII 265/35 tyres

N1 front bar vents

QFM 750 brake pads

slotted discs

standard GTR brakes

Nismo fuel cap

Interior

Nismo gear knob

Nismo Steering wheel

Blitz ID III boost controler

Apexi 60mm boost gauge

MP3/CD stero

Think thats all i can think of right now sure i have forgot a few things .

There are some bad points car has a small dent on bonnet and drivers door plus a small tear in drivers seat and non work AC.

Im in no hurry to sell this car i may keep it as the next thing to do is respray it and it wuld be perfect

No silly offers price is 30k i dont care what others are selling for, car Ran 11.693@116mph on the 19/11 probly could do a little better but who knows.

Was one of the top cars on the skid pan last Texi and has only been to wakefield once with no timing.

Oil is change every 5000kms by DART Automotive who built the engine. Car was Tuned 500kms ago by Unigroup was tuned for power under the curve not peak power.

Also have some other parts like HKS twin exhuast and 17s.

Plates dont come with the Car tho if you want them Pm me an offer.

Contact via PM, [email protected] no Mob number as i work shift work will give my number to anyone who ask for it.

post-9955-1228114433_thumb.jpg

post-9955-1228114379_thumb.jpg

post-9955-1228114831_thumb.jpg

post-9955-1228114975_thumb.jpg

post-9955-1228114493_thumb.jpg

post-9955-1228114677_thumb.jpg

post-9955-1228115288_thumb.jpg

post-9955-1228115514_thumb.jpg

Price 30k

Link to comment
https://www.sau.com.au/forums/topic/247256-heavily-modified-r32-gtr/
Share on other sites

This car makes some scary power!!!

I've seen the car go from pretty stock to a pretty rocket.

Who ever buys this is definately getting a bargain!!!! It's pretty much a new car!

Bumpity Bump.

This is an awesome car, have been in it many times and its so fast it absolutely scares the CRAP out of me. 30k is a bargain when you consider all the top quality parts and effort put into this build.

Id buy this in a second myself if I had a spare 30k lying around.

  • 3 months later...
car Ran 11.693@116mph on the 19/11 probly could do a little better but who knows.

this is a beautiful gtr - i ran an 11.1sec with 5kw less than what u have here just to give others a better idea of your cars capability

dart has always been my choice of mechanic :devil:

Create an account or sign in to comment

You need to be a member in order to leave a comment

Create an account

Sign up for a new account in our community. It's easy!

Register a new account

Sign in

Already have an account? Sign in here.

Sign In Now


  • Similar Content

  • Latest Posts

    • Hi, is the HKS  Tower Bar still available ? negotiable ? 🤔
    • From there, it is really just test and assemble. Plug the adapter cables from the unit into the back of the screen, then the other side to the car harness. Don't forget all the other plugs too! Run the cables behind the unit and screw it back into place (4 screws) and you should now have 3 cables to run from the top screen to the android unit. I ran them along the DS of the other AV units in the gap between their backets and the console, and used some corrugated tubing on the sharp edges of the bracket so the wires were safe. Plug the centre console and lower screen in temporarily and turn the car to ACC, the AV should fire up as normal. Hold the back button for 3 sec and Android should appear on the top screen. You need to set the input to Aux for audio (more on that later). I put the unit under the AC duct in the centre console, with the wifi antenna on top of the AC duct near the shifter, the bluetooth antenna on the AC duct under the centre console The GPS unit on top of the DS to AC duct; they all seem to work OK there are are out of the way. Neat cable routing is a pain. For the drive recorder I mounted it near the rear view mirror and run the cable in the headlining, across the a pillar and then down the inside of the a pillar seal to the DS lower dash. From there it goes across and to one USB input for the unit. The second USB input is attached to the ECUtec OBD dongle and the 3rd goes to the USB bulkhead connected I added in the centre console. This is how the centre console looks "tidied" up Note I didn't install the provided speaker, didn't use the 2.5mm IPod in line or the piggyback loom for the Ipod or change any DIP switches; they seem to only be required if you need to use the Ipod input rather than the AUX input. That's it, install done, I'll follow up with a separate post on how the unit works, but in summary it retains all factory functions and inputs (so I still use my phone to the car for calls), reverse still works like factory etc.
    • Place the new daughterboard in the case and mount it using the 3 small black rivets provided, and reconnect the 3 factory ribbon cables to the new board Then, use the 3 piggyback cables from the daughterboard into the factory board on top (there are stand offs in the case to keep them apart. and remember to reconnect the antenna and rear cover fan wires. 1 screw to hold the motherboard in place. Before closing the case, make a hole in the sticker covering a hole in the case and run the cable for the android unit into the plug there. The video forgot this step, so did I, so will you probably. Then redo the 4 screws on back, 2 each top and bottom, 3 each side and put the 2 brackets back on.....all ready to go and not that tricky really.      
    • Onto the android unit. You need to remove the top screen because there is a daughterboard to put inside the case. Each side vent pops out from clips; start at the bottom and carefully remove upwards (use a trim remover tool to avoid breaking anything). Then the lower screen and controls come out, 4 screws, a couple of clips (including 3 flimsy ones at the top) and 3 plugs on the rear. Then the upper screen, 4 screws and a bunch of plugs and she is out. From there, remove the mounting brackets (2 screws each), 4 screws on the rear, 2 screws top and bottom and 3 screws holding in the small plates on each side. When you remove the back cover (tight fit), watch out for the power cable for the fan, I removed it so I could put the back aside. The mainboard is held in by 1 screw in the middle, 1 aerial at the top and 3 ribbon cables. If you've ever done any laptop stuff the ribbon cables are OK to work with, just pop up the retainer and they slide out. If you are not familiar just grab a 12 year old from an iphone factory, they will know how it works The case should now look like this:
    • Switching the console was tricky. First there were 6 screws to remove, and also the little adapter loom and its screws had to come out. Also don't forget to remove the 2 screws holding the central locking receiver. Then there are 4 clips on either side....these were very tight in this case and needed careful persuading with a long flat screw driver....some force required but not enough to break them...this was probably the fiddliest part of the whole job. In my case I needed both the wiring loom and the central locking receiver module to swap across to the new one. That was it for the console, so "assembly is the reverse of disassembly"
×
×
  • Create New...