

Announcements
-
Similar Content
-
-
Latest Posts
-
 G.G.C. (Gibier German Cook) restaurant in Motomachi in Kobe: A tiny 2 floor restaurant that was founded in 1976. The original couple who owned/ran it retired and sold the business to a corporation who pretty much tried to keep it the same as it was. Lots of lesser known (to me anyway) German beers available. Venison with vegetables. The meat came from deer from Hokkaido. The chef told us that there's a whole industry around the use of all parts of the deer from the antlers to the hooves. Sure enough, directly accross the street from this restaurant is a shop that sells all manner of utensils, clothes and objet d'art all made from deer skin, bones and horns.... also owned by the same corporation. The venison was super tender 😋 Various decorations, a lot of which were quite old, no doubt from the original owners. A nice pilsner too which I'd never seen before. It's well worth a visit but check the opening hours, they're closed on Wednesdays, only open 11:30am - 3pm on Mondays and Tuedays, 11:30am-3pm for lunch and 5pm-11:30pm on Thursdays, Fridays and Saturdays, and 11:30am-3pm and 5pm-9pm on Sundays. Last order is 30mins before close.
 -
Yep around 2m long or thereabouts. I made another post in the photo diaries 17 years later lol. I swear it has not been that long!
-
 Full results via link below https://docs.google.com/spreadsheets/d/1inu1mRRO0WjV2-3vGYsjnmYggVOzmApWOby68GwPGcI/edit?usp=sharing
 -
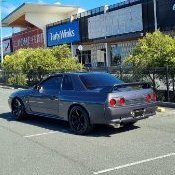
 Have I not posted since 2022 ? wow... Yes, it's pretty much finished mechanically. I'll probably sell it soon as the old man is 80 in November, so 99% he won't ever drive it again. I don't really need 3 GT-R's and I haven't driven any of them since September last year - correction, drove my 33 earlier this year on Australia day. All of them have been like this since then.
 -
 So, after talking to Tyson at Auto Tech Engineering about my "cunning plan", he suggested to "not piss money away on stuff that the car probably doesn't need" (the max IAT at the end of the 1/4 ever only seen around 30°C, which is in no way a issue, and as such, for what I use the car for I really don't need colder IAT anyway The whole point of the "upgrades" that I thought about doing was that my IAT started creeping up from 25°C to 30°C when cruising, then drop back down, then raise back up, rinsing and repeating, it has never done that before, so after talking to FI interchillers they assumed that it was the Bosch pump starting to fail, and if I was going to replace the pump....... I would do my usual thing of "while where in there" But, Tyson said he has seen similar things happen to IAT with failing or leaking AC compressors on other cars with interchillers, and as the AC compressor is 22 years old it is probably well on the way out anyway, and if a electric water pump fails it stays failed and doesn't just speed up and slow dow, but if a AC compressor starts to fail or is leaking, it will fluctuate and give a typical result to the IAT He said he could test the compressor and see how it is functioning and pressure test the whole system, but, as I do, I've just got them to order a new compressor to install to start with, and do a AC service and see if that fixes the issue That way, if it is the compressor, I wouldn't be spending lots of coin on something that wasn't the issue, and not actually needed, as the stage 2 kit, and pump, comes in at around $2k in parts alone, not including the plumbing and other parts that will be required or labour And apparently the Bosch pump I have is really reliable and well up to task for the flow/pressure requirements that I need to keep my intercooler and massive amounts of boost heat (7 psi LOL) under control giving a nice and cold IAT A big shout out to Tyson for this, not many people will talk a idiot out of wasting money on car modifications, and the saved car budget funding can be wasted elsewhere on things that I may, or may not, need, like a nice new leather SS interior with red stitching......maybe I can convince the Minister for War and Finances into a nice trip down to Victoria for a week away to see the sights (I'll explain that I will need a hire car once we're down there so we don't have to worry about the Commodore being parked up on the streets at night, and it just so happens there's a joint that I can store it during that time) $1680 for all of the interior trims, + installation cost (I'll ask for a quote to install the trim if the new compressor fixes the issue) https://leatherseats.com.au/products/leather-seats-trim-skins-kit-to-fit-vt-vx-vy-ser1-ss-green-black-diy-install
-


Recommended Posts
Create an account or sign in to comment
You need to be a member in order to leave a comment
Create an account
Sign up for a new account in our community. It's easy!
Register a new accountSign in
Already have an account? Sign in here.
Sign In Now