Jump to content
SAU Community

Recommended Posts

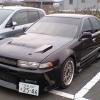
Bought this last year in Japan and now that Ive had my fun its time to part it out and move on, EVERYTHING is for sale that is on it.

Location: Adelaide

MORE PICTURES COMING!

sdc10477l.th.jpg

sdc10475.th.jpg

sdc10474m.th.jpg

sdc10473.th.jpg

sdc10472.th.jpg

sdc10469g.th.jpg

sdc10467y.th.jpg

sdc10466v.th.jpg

sdc10465k.th.jpg

sdc10464s.th.jpg

sdc10463c.th.jpg

Is part isn't listed just ask Ill update with a price/picture.

Edited by JiN_MaN
Link to comment
https://www.sau.com.au/forums/topic/300664-stripping-r32/
Share on other sites

Exterior:

BN Body Kit $650

sdc10530e.th.jpg

sdc10529o.th.jpg

sdc10528.th.jpg

Headlights $200 pair

sdc10524w.th.jpg

Indicators $70 pair

sdc10575i.th.jpg

Rear Brake Lights $100 pair

sdc10537.th.jpg

sdc10539w.th.jpg

Boot lid $70

sdc10541d.th.jpg

Mirrors $100 pair

sdc10544x.th.jpg

sdc10546s.th.jpg

Doors $400 pair, including glass, interior

sdc10548k.th.jpg

sdc10545.th.jpg

GTR Grill $100

sdc10531.th.jpg

GTR Bonnet $450 with GTR latch, needed for installing on GTS-T

sdc10473.th.jpg

Guards: $150 pair, Have been rolled and not heaps well, check pictures

sdc10527.th.jpg

sdc10526.th.jpg

Front reo *SOLD*

Rear reo $50

sdc10577b.th.jpg

Sunroof module $150

sdc10543i.th.jpg

FULL SET S15 rims, most have some rash of them, come with tyres but unsure how much tread left $400

sdc10479r.th.jpg

FULL SET Sparco 17" rims, unsure of offset and width, have 60-70% tyres all round $700

sdc10478q.th.jpg

Glass

Front $150

Rear $150

Rear Quarter $50 each

Door glass being sold with doors

Edited by JiN_MaN
Link to comment
https://www.sau.com.au/forums/topic/300664-stripping-r32/#findComment-4994217
Share on other sites

Interior:

Blitz Boost Controller S-SBC $300

Razo Turbo Timer + loom $30

sdc10562y.th.jpg

Big Clip on rear view mirror $30

sdc10558.th.jpg

Jap bucket seat $350

sdc10553a.th.jpg

R32 Sidemount rail $150

Rear seat *SOLD*

GTR passengers $300, also have GTR rear seat $150 or $375 together

Roof lining $50

A pillar plastic $30

Lower rear plastic *SOLD*

Upper rear plastic (around quarter windows) *SOLD*

Dash with all vents $125

Dash Cluster $70

sdc10549w.th.jpg

Dash cluster Surround $30

Nardi Wheel with Horn button (not pictured) $200

Centre console $30

Centre plastic around Cd player/Gearstick $50

Carpet $100

Genuine Skyline floor mats, all 5 $100

Engine Bay/Suspension/Underneath

HKS FMIC with all piping - GTR style $400

sdc10517j.th.jpg

sdc10514p.th.jpg

HKS POD $30

Engine, loom, AFM complete package but(NO TURBO), Compression test being done on Sunday. $800

sdc10512.th.jpg

sdc10518a.th.jpg

Gearbox $500

Turbo (upgraded, unsure on specs), Apexi SAFC, HKS remapped ECU, complete bolt on upgrade for RB20. $800

sdc10551.th.jpg

Nismo R32 GTR diff in housing $800

Tein Shocks and Spring, Damper adjustable, FANTASTIC suspension, $800 dont care if I dont sell I will keep them.

Aftermarket Radiator $150

sdc10568.th.jpg

TOMS 1.3 Bar radiator Cap $20

sdc10567c.th.jpg

SHELL

Complete stripped shell with probably many left over bits,

Fuel tank

Complete body loom

Probably all glass

$850 FIRM

Edited by JiN_MaN
Link to comment
https://www.sau.com.au/forums/topic/300664-stripping-r32/#findComment-4994219
Share on other sites

Sorry mate, wont separate, Dash is cheap take it all. Ill break the vents trying to get them out.

Ah no problem mate thanks anyway. It's not worth me bringing the whole dash to sydney its gana cost me about $90 to get it here. Thanks mate

Link to comment
https://www.sau.com.au/forums/topic/300664-stripping-r32/#findComment-4994857
Share on other sites

Will u take $190Aud for the sunroof assembly(glass, slide cover, rails, motor and all fasteners) shipped to L0S1B0 Ontario Canada. Payment via Paypal or Money Order.

Edited by Beacher1B0
Link to comment
https://www.sau.com.au/forums/topic/300664-stripping-r32/#findComment-5006597
Share on other sites

Sorry bud, I am still new and can't send PM's yet. Yeah interested in the front GTR seats and gb. How good was the box when you finished using it?

No probs mate, Ill talk to you in here then.

Gearbox was absolutely perfect late time it was driven. Couldn't fault it in anyway. From memory currently has 'Redline' oil in it and only 100km old

Link to comment
https://www.sau.com.au/forums/topic/300664-stripping-r32/#findComment-5013416
Share on other sites

Bonnet

Bonnet Latch

Grill

Nismo Diff

All Nismo Arms

Tein Suspension

Sunroof

All have a deposit paid.

thats a vertex kit bud just to let you know

Cheers bud, I fail at bodykits :geek:

how much would you sell the engine and box and all the parts to change mine from auto to manual

Pm me and we might be able to work something out

Link to comment
https://www.sau.com.au/forums/topic/300664-stripping-r32/#findComment-5013429
Share on other sites

Shell picked up and GONE!!!! :blink:

added to the sold list:

Radiator

Radiator Cap

Front reo

HKS FMIC

Moving home in 2 weeks, would be great to see all of this gone.

Edited by JiN_MaN
Link to comment
https://www.sau.com.au/forums/topic/300664-stripping-r32/#findComment-5015922
Share on other sites

Create an account or sign in to comment

You need to be a member in order to leave a comment

Create an account

Sign up for a new account in our community. It's easy!

Register a new account

Sign in

Already have an account? Sign in here.

Sign In Now


  • Similar Content

  • Latest Posts

    • Can I suggest you try EBC directly again and link them to as many competitor catalogues as you can to show their listing is incorrect, eg https://dba.com.au/product/front-4000-series-hd-brake-rotor-dba42304/ If you have access to an R33 GTST VIN and your VIN, you could also use a Nissan Parts lookup like Amayama to show them the part number is different between 33 GTST and 34 GTT which may get their attention
    • So i got reply from EBC and they just this site where you can clearly see those 296mm fronts on R34 GTT. I send them photos and "quotes" that 296mm are not for 34 GTT and they are too small. But it will be very hard to return them cuz nobody here knows 100% and they just copy those EBC catalogue :-D https://ebcbrakesdirect.com/automotive/nissan/skyline-r34
    • Hi, is the HKS  Tower Bar still available ? negotiable ? 🤔
    • From there, it is really just test and assemble. Plug the adapter cables from the unit into the back of the screen, then the other side to the car harness. Don't forget all the other plugs too! Run the cables behind the unit and screw it back into place (4 screws) and you should now have 3 cables to run from the top screen to the android unit. I ran them along the DS of the other AV units in the gap between their backets and the console, and used some corrugated tubing on the sharp edges of the bracket so the wires were safe. Plug the centre console and lower screen in temporarily and turn the car to ACC, the AV should fire up as normal. Hold the back button for 3 sec and Android should appear on the top screen. You need to set the input to Aux for audio (more on that later). I put the unit under the AC duct in the centre console, with the wifi antenna on top of the AC duct near the shifter, the bluetooth antenna on the AC duct under the centre console The GPS unit on top of the DS to AC duct; they all seem to work OK there are are out of the way. Neat cable routing is a pain. For the drive recorder I mounted it near the rear view mirror and run the cable in the headlining, across the a pillar and then down the inside of the a pillar seal to the DS lower dash. From there it goes across and to one USB input for the unit. The second USB input is attached to the ECUtec OBD dongle and the 3rd goes to the USB bulkhead connected I added in the centre console. This is how the centre console looks "tidied" up Note I didn't install the provided speaker, didn't use the 2.5mm IPod in line or the piggyback loom for the Ipod or change any DIP switches; they seem to only be required if you need to use the Ipod input rather than the AUX input. That's it, install done, I'll follow up with a separate post on how the unit works, but in summary it retains all factory functions and inputs (so I still use my phone to the car for calls), reverse still works like factory etc.
    • Place the new daughterboard in the case and mount it using the 3 small black rivets provided, and reconnect the 3 factory ribbon cables to the new board Then, use the 3 piggyback cables from the daughterboard into the factory board on top (there are stand offs in the case to keep them apart. and remember to reconnect the antenna and rear cover fan wires. 1 screw to hold the motherboard in place. Before closing the case, make a hole in the sticker covering a hole in the case and run the cable for the android unit into the plug there. The video forgot this step, so did I, so will you probably. Then redo the 4 screws on back, 2 each top and bottom, 3 each side and put the 2 brackets back on.....all ready to go and not that tricky really.      
×
×
  • Create New...