Jump to content
SAU Community

Recommended Posts

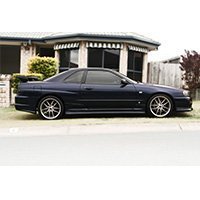
1998 Skyline R34 GT-T Impul Sides & Rear with Front Lip

99,XXX KMs, BP9 (Rare Dark Metallic Blue), 2 Door, Rego until Jun/Jul

South Side - Brisbane, QLD

$19,800

I've only owned this car since June 2011, but its time to say goodbye to my beloved R34 GT-T. My mates and family are telling me not to sell, but its time to be the family man! (First child due in August!!)

If you are looking for a R34 GT-T which has been immaculately looked after, then this is your chance to pick one up.

IMG_6239_rich.jpg

IMG_5872_rich.jpg

IMG_5874_rich.jpg

skyline_myhouse_front_1.jpg

skyline_myhouse_front_2.jpg

skyline_myhouse_front_3.jpg

skyline_myhouse_front_4.jpg

I have more photos available, just ask...

General Points of note

- As I said above, I purchased this car in June 2011 and I am selling it only 6 months later. I've only done 5,000km's! Which is a bit sad haha... I'm looking forward to being a Dad!

- This car is packing an Impul rear bumper and Impul side skirts along with a standard front lip. Why did I choose this? I love the Impul kit, but the front was just too low (80mm) and just 1 bump would make me cry! Low cars look nice - But 95% of them are cracked... Not exactly my taste.

- The car has QLD rego until June or July.

- An enclosed garage has kept this car out of the sun and bad QLD weather. My car is never driven in the rain (I hate messing up all the hard work keeping the body so shiny!). When it goes onto the streets, it never visits the City or Gold Coast - I keep her out of traffic and out of major crime areas (ie: GC).

- Visited the track twice - Once was a happy laps and breakfast with SAU and pushed her for only 1 lap. When I say 'pushed her' I don't think I red lined it once while on the track. The second time was for SAU SCC 2011 and my peak top speed would of been about 30km/hr - Because this was a for a photo shoot only. After my first track day she had the full 100,000km service completed.

- Everything my mechanic says/recommends is completed. He's looked after both my skylines and kept them in tip-top shape (Along with many other imports at his garage). He has recently completed the 100,000km service (At 97,000km) and said everything was in immaculate condition. I'll be taking her in at 100,000km's again just so I can see the services are in multiples of 5,000. Yes, some people tell me I have OCD.

- Paint Care: I start with a two bucket process wash using Nxt Gen soap then wiped dry. Auto Glym deep shine polish is then applied followed by two coats of Nxt Gen 2 wax. All of this is done using quality fabrics.

- Interior is kept replenished by fortnightly armour oils.

Modifications

I prefer and pay more for mechanically original cars. I prefer to see less 'play' under the bonnet. This way I know I'll have a car which is intended for use this way and will last longer. The only modification under the bonnet are Splitfire Coilpacks.

- 3 inch full HKS exhaust (Not very loud but cases a rumble in my garage!).

- 18 inch Work wheels (Rear are 265x35x18)

- Impul Sides and Rear with a Front Lip

- Has XENON headlights installed but using standard bulbs (For compliance).

- Quality tinting completed by Solar Style Window Tinting. This is the same quality tinting as what you would get with a brand new BMW - This is the guy that does it!

- Kenwood head unit USB/Aux input with quality front and rear speakers replaced - $800 worth of quality sound.

- Mongoose M80 alarm and 3 point immobiliser. Keyless entry with two remotes. Inbuilt Turbo Timer. Alarm is Aussie standards and thus a legal t-timer! Installed by Autobarn slacks creek.

Car is only serviced by Nigel at Mosleys Automotive in slacks creek using OEM parts only. When I purchased the car he changed a few things to make the car like new. Since then he has completed a 100,000km using all OEM parts. Everything was replaced - even the parts which he told me are still like new and don't need to be replaced. I like to do everything properly first time around.

I have never had any issues with the police. They see my car and leave me alone. The only time I have ever had police approach me in this car was to have a chat about it! They said they wish they had cars like this for undercover work and walked away.

I'm not sure if I have missed anything, but please feel free to send me a private message if you have any further questions.

This car is jump in and drive away... no need to fix and buy a heap of junk that many other skylines need!

Thanks for taking the time to read such a long post!

Cheers,

Richie

Link to comment
https://www.sau.com.au/forums/topic/390388-1998-r34-gtt-immaculate-qld/
Share on other sites

Was hoping you wouldn't find this thread haha... sorry man ><

Yen doesn't want me to sell, but I feel I need to get something which she will be able to drive as well as myself.

Found a few more photos as well:

post-50568-0-88466200-1328245829_thumb.jpg post-50568-0-85376800-1328245807_thumb.jpg post-50568-0-43204200-1328245851_thumb.jpg

I also forgot to mention something quite important... my mobile number 0421 185 272

Hehe... I'll be sure to catch a ride with you or one of the other SAU QLD members to the big meets!

Good interest after the 1st day of posting! Hopefully this sells almost as fast as my previous R33 (Sold in 24 hours) lol...

There was a guy on ebay who sold them (Really nice quality.. solid metal and has really nice reflections).

I just had a quick look and he isn't selling them anymore.I know he puts them up every few months, but he only has about 10 at a time.

This is a better photo of the badge (The one in the photos above wasn't the metal reflective one it has now).

post-50568-0-55786000-1328566316_thumb.jpg

From the few phone calls I've had, the same question is always asked: Can I see more photos of the interior?

I've gone out last night and taken some more photos. I've taken some close up's of the steering wheel so you can see the original wheel and the quality of it.

Sorry, I don't get to drive my car much so the interior is a tad dusty at the moment...

IMG_6761.jpg

IMG_6764.jpg

IMG_6766.jpg

IMG_6768.jpg

IMG_6769.jpg

:(

I've taken a deposit for the car... They are flying in to pick it up on the 3rd of March.. That gives me 3 weeks with my car :(

At that point I'll know 100% if the car is sold. The deposit is very solid though so looks like my girl is gone... :( :(

:( :( :(

Create an account or sign in to comment

You need to be a member in order to leave a comment

Create an account

Sign up for a new account in our community. It's easy!

Register a new account

Sign in

Already have an account? Sign in here.

Sign In Now


  • Similar Content

  • Latest Posts

    • Hi, is the HKS  Tower Bar still available ? negotiable ? 🤔
    • From there, it is really just test and assemble. Plug the adapter cables from the unit into the back of the screen, then the other side to the car harness. Don't forget all the other plugs too! Run the cables behind the unit and screw it back into place (4 screws) and you should now have 3 cables to run from the top screen to the android unit. I ran them along the DS of the other AV units in the gap between their backets and the console, and used some corrugated tubing on the sharp edges of the bracket so the wires were safe. Plug the centre console and lower screen in temporarily and turn the car to ACC, the AV should fire up as normal. Hold the back button for 3 sec and Android should appear on the top screen. You need to set the input to Aux for audio (more on that later). I put the unit under the AC duct in the centre console, with the wifi antenna on top of the AC duct near the shifter, the bluetooth antenna on the AC duct under the centre console The GPS unit on top of the DS to AC duct; they all seem to work OK there are are out of the way. Neat cable routing is a pain. For the drive recorder I mounted it near the rear view mirror and run the cable in the headlining, across the a pillar and then down the inside of the a pillar seal to the DS lower dash. From there it goes across and to one USB input for the unit. The second USB input is attached to the ECUtec OBD dongle and the 3rd goes to the USB bulkhead connected I added in the centre console. This is how the centre console looks "tidied" up Note I didn't install the provided speaker, didn't use the 2.5mm IPod in line or the piggyback loom for the Ipod or change any DIP switches; they seem to only be required if you need to use the Ipod input rather than the AUX input. That's it, install done, I'll follow up with a separate post on how the unit works, but in summary it retains all factory functions and inputs (so I still use my phone to the car for calls), reverse still works like factory etc.
    • Place the new daughterboard in the case and mount it using the 3 small black rivets provided, and reconnect the 3 factory ribbon cables to the new board Then, use the 3 piggyback cables from the daughterboard into the factory board on top (there are stand offs in the case to keep them apart. and remember to reconnect the antenna and rear cover fan wires. 1 screw to hold the motherboard in place. Before closing the case, make a hole in the sticker covering a hole in the case and run the cable for the android unit into the plug there. The video forgot this step, so did I, so will you probably. Then redo the 4 screws on back, 2 each top and bottom, 3 each side and put the 2 brackets back on.....all ready to go and not that tricky really.      
    • Onto the android unit. You need to remove the top screen because there is a daughterboard to put inside the case. Each side vent pops out from clips; start at the bottom and carefully remove upwards (use a trim remover tool to avoid breaking anything). Then the lower screen and controls come out, 4 screws, a couple of clips (including 3 flimsy ones at the top) and 3 plugs on the rear. Then the upper screen, 4 screws and a bunch of plugs and she is out. From there, remove the mounting brackets (2 screws each), 4 screws on the rear, 2 screws top and bottom and 3 screws holding in the small plates on each side. When you remove the back cover (tight fit), watch out for the power cable for the fan, I removed it so I could put the back aside. The mainboard is held in by 1 screw in the middle, 1 aerial at the top and 3 ribbon cables. If you've ever done any laptop stuff the ribbon cables are OK to work with, just pop up the retainer and they slide out. If you are not familiar just grab a 12 year old from an iphone factory, they will know how it works The case should now look like this:
    • Switching the console was tricky. First there were 6 screws to remove, and also the little adapter loom and its screws had to come out. Also don't forget to remove the 2 screws holding the central locking receiver. Then there are 4 clips on either side....these were very tight in this case and needed careful persuading with a long flat screw driver....some force required but not enough to break them...this was probably the fiddliest part of the whole job. In my case I needed both the wiring loom and the central locking receiver module to swap across to the new one. That was it for the console, so "assembly is the reverse of disassembly"
×
×
  • Create New...