Jump to content
SAU Community

Recommended Posts

Hi guys, thought id put together a bit of a build diary to keep track of the build. its something i didn't do with my other cars and i regret it now as i have no pics or a log of how they come together.

On that note, just a bit of my car history.

my first build was a 1989 nissan S13 silvia. the car started out life as a completely standard down to the factory wheels and airbox ca18det auto. by the time i come to sell it, it was rb25det powered, garrett gt3076r, externally gated, sub zero plenum, and all the other usual bolt ons making 277rwkw.

next was a 2006 bionic blue xr6 turbo ute. again it went from a stock vehicle to 382rwkw wearing a host of process west gear, external gate and so on.

during my time owning the ute i also had the dis-pleasure of owning a 1993 r32 gtr. unfortunately when i purchased the car it was to far gone to be recovered and i sold it at a loss.

somewhere amongst those cars i also owned another sr20det silvia and a d40 navara work car.

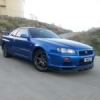
this brings me to now, and as of late 2012 i become the owner of a 2000 R34 GTR V-Spec.

this is me picking up the car, such a happy day

post-14389-0-77623100-1363613933_thumb.jpg

when i got back home i threw it on a local dyno to check it all out

post-14389-0-01763200-1363613984_thumb.jpg

couple of shots from a bit of a photo shoot

post-14389-0-68204200-1363614061_thumb.jpgpost-14389-0-75978900-1363614140_thumb.jpg

and now the fun starts

Adam

post-14389-0-39267400-1363614173_thumb.jpg

post-14389-0-32055900-1363614238_thumb.jpg

post-14389-0-42817700-1363614255_thumb.jpeg

Link to comment
https://www.sau.com.au/forums/topic/421911-r34-gtr-v-spec-build/
Share on other sites

So to add to the already fitted vi-pec ecu, mac valve boost controller, twin 3 to 3.5" exhaust, turbosmart fuel reg and tuned by godzilla motorsport...

Garrett -5 turbos

post-14389-0-64763400-1363688732_thumb.jpg

Hpi 3" dump pipes

post-14389-0-12453900-1363688786_thumb.jpg

I also grabbed a set of manifolds that are now in the more than capable hands of pro fabrication getting ported

post-14389-0-25677900-1363689929_thumb.jpeg

Edited by drag-on silvia

Create an account or sign in to comment

You need to be a member in order to leave a comment

Create an account

Sign up for a new account in our community. It's easy!

Register a new account

Sign in

Already have an account? Sign in here.

Sign In Now


  • Similar Content

  • Latest Posts

    • For once a good news  It needed to be adjusted by that one nut and it is ok  At least something was easy But thank you very much for help. But a small issue is now(gearbox) that when the car is stationary you can hear "clinking" from gearbox so some of the bearing is 100% not that happy... It goes away once you push clutch so it is 100% gearbox. Just if you know...what that bearing could be? It sounding like "spun bearing" but it is louder.
    • Yeah, that's fine**. But the numbers you came up with are just wrong. Try it for yourself. Put in any voltage from the possible range and see what result you get. You get nonsense. ** When I say "fine", I mean, it's still shit. The very simple linear formula (slope & intercept) is shit for a sensor with a non-linear response. This is the curve, from your data above. Look at the CURVE! It's only really linear between about 30 and 90 °C. And if you used only that range to define a curve, it would be great. But you would go more and more wrong as you went to higher temps. And that is why the slope & intercept found when you use 50 and 150 as the end points is so bad halfway between those points. The real curve is a long way below the linear curve which just zips straight between the end points, like this one. You could probably use the same slope and a lower intercept, to move that straight line down, and spread the error out. But you would 5-10°C off in a lot of places. You'd need to say what temperature range you really wanted to be most right - say, 100 to 130, and plop the line closest to teh real curve in that region, which would make it quite wrong down at the lower temperatures. Let me just say that HPTuners are not being realistic in only allowing for a simple linear curve. 
    • I feel I should re-iterate. The above picture is the only option available in the software and the blurb from HP Tuners I quoted earlier is the only way to add data to it and that's the description they offer as to how to figure it out. The only fields available is the blank box after (Input/ ) and the box right before = Output. Those are the only numbers that can be entered.
    • No, your formula is arse backwards. Mine is totally different to yours, and is the one I said was bang on at 50 and 150. I'll put your data into Excel (actually it already is, chart it and fit a linear fit to it, aiming to make it evenly wrong across the whole span. But not now. Other things to do first.
    • God damnit. The only option I actually have in the software is the one that is screenshotted. I am glad that I at least got it right... for those two points. Would it actually change anything if I chose/used 80C and 120C as the two points instead? My brain wants to imagine the formula put into HPtuners would be the same equation, otherwise none of this makes sense to me, unless: 1) The formula you put into VCM Scanner/HPTuners is always linear 2) The two points/input pairs are only arbitrary to choose (as the documentation implies) IF the actual scaling of the sensor is linear. then 3) If the scaling is not linear, the two points you choose matter a great deal, because the formula will draw a line between those two points only.
×
×
  • Create New...