
[Wa] '94 Black Pulsar Gti-R

Announcements
-
Similar Content
-
-
Latest Posts
-
 The turbo can’t be the issue. They’re proven to make much much power than you’re making. There is something in the setup that isn’t correct. - has the exhaust got any silly step downs? - what exhaust manifold?
 -
 Ok, just the way you wrote it made it look like you had the stagger the wrong way around
 -

By hoodedreeper · Posted
I was getting anxious with the DVLA not knowing if the paperwork is fine or not, so I rang them. No update had been given, but I was reassured that providing the box was ticked on the V750 then the application will go through fine. I've been checking the DVLA website pretty much every day, in the hope that it would have been done. Fast forward to Monday 29th and I was greeted with a new screen on the check, and it finally showed as Taxed and MOT'd, woohoo! The car was in desperate need of a clean, not knowing when this day was coming it was put off. As far as I was concerned I had another 3 weeks I'm not normally one for using snow foam, but I wanted to give it another try It hasn't cleaned up too bad considering it's 21 years old and lived on a boat for a number of weeks. The personalised number plate is J2 XBK, an illegally spaced number plate would have it read J2X BK. BK could either represent the colour black or Baker, which is my surname. I filmed the first drive, the Youtube link will be at the end. I used the same driving route I did with the 323F V6 when I had a new exhaust installed, heres a couple of photos A few more since then Youtube video can be viewed here: https://www.youtube.com/watch?v=TjkFHPzjGDw -

By TurboTapin · Posted
Kelford 246-A2. 262in/272ex. -

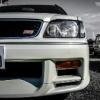
By Adam_ECR33 · Posted
Thank you, 100% the intent. New coils were due and the 17" sixers look/feel loads better than the stock wheels. The aero options are so spot on. Thanks for the warm welcome, all!
-


Recommended Posts
Create an account or sign in to comment
You need to be a member in order to leave a comment
Create an account
Sign up for a new account in our community. It's easy!
Register a new accountSign in
Already have an account? Sign in here.
Sign In Now