
Rb34 / 24U (Rb26 + 800Cc) - Project RB high deck engine (and related builds)
Announcements
-
Latest Posts
-
 I wouldn't worry about dissimilar metal corrosion, should you just buy/make a steel replacement. There will be thread tape and sealant compound between the metals. The few little spots where they touch each other will be deep inside the joint, unable to get wet. And the alloy block is much much larger than a small steel fitting, so there is plenty of "sacrificial" capacity there. Any bush you put in there will be dissimilar anyway. Either steel or brass. Maybe stainless. All of them are different to the other parts in the chain. But what I said above still applies.
 -
 You are all good then, I didn't realise the port was in a part you can (have!) remove. Just pull the broken part out, clean it and the threads should be fine. Yes, the whole point about remote mounting is it takes almost all of the vibration out via the flexible hose. You just need a convenient chassis point and a cable tie or 3.
 -
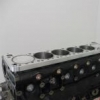
 ..this is the current state of that port. I appreciate the info help (and the link to the Earls thing @Duncan). Though going by that it seems like 1/4 then BSP'ing it and using a bush may work. I don't know where I'd be remote mounting the pressure sender... to... exactly. I assume the idea here is that any vibration is taken up by the semiflexible/flexible hose itself instead of it leveraging against the block directly. I want to believe a stronger, steel bush/adapter would work, but I don't know if that is engineeringly sound or just wishful thinking given the stupendous implications of a leak/failure in this spot. What are the real world risks of dissimilar metals here? It's a 6061 Aluminum block, and I'm talking brass or steel or SS adapters/things.
 -
And if you have to drill the oil block, then just drill it for 1/4" and tap it BSP and get a 1/8 to 1/4 BSP bush. The Nissan sender will go straight in and the bush will suit the newly tapped hole. And it will be real strong, to boot.
-
No it doesn't. It just needs an ezy-out to pull that broken bit of alloy out of the hole and presto chango - it will be back to being a 1/8" hole tapped NPT. as per @MBS206 recco. That would be for making what you had in alloy, in steel. If you wanted to do just that instead of remote mounting like @Duncan and I have been pushing. A steel fitting would be unbreakable (compared to that tragically skinny little alloy adapter). But remote mounting would almost certainly be 10x better. Small engineering shops abound all over the place. A lathe and 10 minutes of time = 2x six packs.
-

Recommended Posts
Create an account or sign in to comment
You need to be a member in order to leave a comment
Create an account
Sign up for a new account in our community. It's easy!
Register a new accountSign in
Already have an account? Sign in here.
Sign In Now