Jump to content
SAU Community

Recommended Posts

Hey guys, I can finally and very happily say I'm a stagea owner!

Just recently picked up a 1999 Bayside Blue RSfour w/leather in beautiful condition for $11k. 100,000km. I might post pictures when i get around to it.

Just had a couple of questions:

1. I've noticed i get a little bit of belt noise when idling, not sure how to describe the sound, it's like a slight rattle/whistle i guess? And also, I noticed this morning as I turned the stag on I got a loud squeal from the belt which lasted no longer than 2 seconds then dissapeared, it happened each time i started until i went for a little drive then it was gone. Also happened tonight so I assume its a temperature/cold belt thing - no worries during the middle of the day. I assume the two are linked? I'd love to get it sorted asap, have searched the forums but not found a solid answer.

2. Just out of interest is there a way to make the dash brighter? Not sure if i'm blind and missing a dial for it or they're just slightly duller than what I'm used to.

3. Once again just out of interest: So i'm obviously using 98 octane petrol(despite my bank accounts better interests :P). Is there a difference in the petrol from different servo's e.g Shell vs BP? Do you guys stick to the same or?

Cheers Guys, other than the little bit of belt noise i'm getting I'm absolutely loving my new purchase!!

Link to comment
https://www.sau.com.au/forums/topic/439218-questions-about-my-new-stagea/
Share on other sites

Hi let's see some pics!

Squealing belts are normally just loose or possibly worn.

There are a number of people supplying replacements for the dash lights in a number of colours as well as white. The brightness is not otherwise adjustable.

Cheers for that, I reckon I'll drop by my mechanic and see what he has to say.

Cool so I'm not blind ;) they're perfectly visible at night, I just turned them on during the day and wasn't sure if they were actually on.

Oh another question:

4. This is my first car with turbo, I don't plan on constantly thrashing the thing but out of interest, how long do you guys usually go/warmup before giving some more gas - I've been at least making sure oil temp >75c.

Also turbo timers, yay or nay? I've got one just not sure whether to use it or not.

Haha cheers again people!

White LED's wide spead (they have 5 little wedge LED's on the one bulb - search ebay, you'll see what I mean) for the dash. There is an orange filter, so if you want to put blue ones in, you'll have to disassemble the cluster to remove the filters.

Start engine, led idle for 30 sec or so, then light load till temp starts to come, then light boost till at normal operating temp.

Turbo timers? NAY! BIN IT!!!

If you install one, your giving a thief the three wires needed to start your car!

Just cruise before you get where you need to be, & if need be, just idle it for 15 or so seconds.

Has it had the 100k service - new belts, water pump etc? If not, book it in with Boostworx asap ;)

Don't hit boost until temperature gauge climbs off from cold. Just drive easy until temperature gauge is steady, ie first 5mins.

I've generally found Mobil 98 lasts a few kms longer than BP, dunno why, besides having Mobil in the tank every time I've had it dynotuned.

Going to do a tankfull of Shell vpower for my tune next Monday.... Will eventually report back to say if kms per litre is any different to Mobil. I rarely use Caltex 98. If I use United 100 I find the kms per litre is drastically reduced :/ ie 270km compared to 370km with Mobil. In stock form used to get 420kms, so it hasn't lost much when compared to power output being more than doubled.

Congrats on your purchase.

And I say no to turbo timer. Mine came with one, binned it.

(I've got blue dash led lights but never installed them...)

Thanks for that info guys, I've got a receipt from some work he got done 6000ks ago at Boostin OZ, not sure if this would qualify as 100k service. Here's what was done:

Complete timing belt kit and water pump, External Belts x3, cam and creak seals, water pump, pulleys and tensioner, external belts. On top of normal checkup service.

I'm assuming the squeal is a tension issue? after starting my car today while its been sitting around in about 25°C i still i got a nice 2sec squeal.

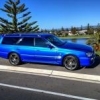
Also here's some pics of my new Pride and Joy:

IMG_1366.jpg

IMG_1365.jpg

IMG_1370.jpg

IMG_1368.jpg

IMG_1367.jpg

I'll swing past my local mechanic tomorrow and see what he says. Definitely want to get it sorted because i'm getting the whirring/whistle belt noise whenever idling. Doesn't sound mean at all ha!

Very purty mate, congrats.

and about fuel, There is'nt one fuel that better, seems some people get better on one vs another. I use BP ultimate as it seems to work best for my car, but atm using v power as theres a shortage. Best bet is to try them all and see for your self.

As silly as it sounds; an overtightened belt can slip too, the whirring may be an indicator.

Have a poke at the belts when the engine is cool; you might notice that one is vastly different to the others.

Looks great in Bayside Blue.

Hahaha cheers guys, yeah the color/paint made me fall in love instantly when I saw it!

Mechanic is checking belts tomorrow morning so we shall see.

This thing is amazing to drive! Only thing i miss from my Magna is Cruise control! haha

Create an account or sign in to comment

You need to be a member in order to leave a comment

Create an account

Sign up for a new account in our community. It's easy!

Register a new account

Sign in

Already have an account? Sign in here.

Sign In Now


  • Similar Content

  • Latest Posts

    • Hi, is the HKS  Tower Bar still available ? negotiable ? 🤔
    • From there, it is really just test and assemble. Plug the adapter cables from the unit into the back of the screen, then the other side to the car harness. Don't forget all the other plugs too! Run the cables behind the unit and screw it back into place (4 screws) and you should now have 3 cables to run from the top screen to the android unit. I ran them along the DS of the other AV units in the gap between their backets and the console, and used some corrugated tubing on the sharp edges of the bracket so the wires were safe. Plug the centre console and lower screen in temporarily and turn the car to ACC, the AV should fire up as normal. Hold the back button for 3 sec and Android should appear on the top screen. You need to set the input to Aux for audio (more on that later). I put the unit under the AC duct in the centre console, with the wifi antenna on top of the AC duct near the shifter, the bluetooth antenna on the AC duct under the centre console The GPS unit on top of the DS to AC duct; they all seem to work OK there are are out of the way. Neat cable routing is a pain. For the drive recorder I mounted it near the rear view mirror and run the cable in the headlining, across the a pillar and then down the inside of the a pillar seal to the DS lower dash. From there it goes across and to one USB input for the unit. The second USB input is attached to the ECUtec OBD dongle and the 3rd goes to the USB bulkhead connected I added in the centre console. This is how the centre console looks "tidied" up Note I didn't install the provided speaker, didn't use the 2.5mm IPod in line or the piggyback loom for the Ipod or change any DIP switches; they seem to only be required if you need to use the Ipod input rather than the AUX input. That's it, install done, I'll follow up with a separate post on how the unit works, but in summary it retains all factory functions and inputs (so I still use my phone to the car for calls), reverse still works like factory etc.
    • Place the new daughterboard in the case and mount it using the 3 small black rivets provided, and reconnect the 3 factory ribbon cables to the new board Then, use the 3 piggyback cables from the daughterboard into the factory board on top (there are stand offs in the case to keep them apart. and remember to reconnect the antenna and rear cover fan wires. 1 screw to hold the motherboard in place. Before closing the case, make a hole in the sticker covering a hole in the case and run the cable for the android unit into the plug there. The video forgot this step, so did I, so will you probably. Then redo the 4 screws on back, 2 each top and bottom, 3 each side and put the 2 brackets back on.....all ready to go and not that tricky really.      
    • Onto the android unit. You need to remove the top screen because there is a daughterboard to put inside the case. Each side vent pops out from clips; start at the bottom and carefully remove upwards (use a trim remover tool to avoid breaking anything). Then the lower screen and controls come out, 4 screws, a couple of clips (including 3 flimsy ones at the top) and 3 plugs on the rear. Then the upper screen, 4 screws and a bunch of plugs and she is out. From there, remove the mounting brackets (2 screws each), 4 screws on the rear, 2 screws top and bottom and 3 screws holding in the small plates on each side. When you remove the back cover (tight fit), watch out for the power cable for the fan, I removed it so I could put the back aside. The mainboard is held in by 1 screw in the middle, 1 aerial at the top and 3 ribbon cables. If you've ever done any laptop stuff the ribbon cables are OK to work with, just pop up the retainer and they slide out. If you are not familiar just grab a 12 year old from an iphone factory, they will know how it works The case should now look like this:
    • Switching the console was tricky. First there were 6 screws to remove, and also the little adapter loom and its screws had to come out. Also don't forget to remove the 2 screws holding the central locking receiver. Then there are 4 clips on either side....these were very tight in this case and needed careful persuading with a long flat screw driver....some force required but not enough to break them...this was probably the fiddliest part of the whole job. In my case I needed both the wiring loom and the central locking receiver module to swap across to the new one. That was it for the console, so "assembly is the reverse of disassembly"
×
×
  • Create New...