Jump to content
SAU Community

Recommended Posts

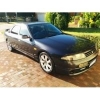
1999 Nissan Stagea RS4 Dayz Manual

Hey there ladies and gents, as per title selling a Series 2 RS4 manual swapped dayz edition. This is as good as they get before S2 factory manuals/260RS being a S2, GTR box, dayz kit and the RB25 NEO. It is still AWD. 

Bought with the intention of dailying it, but circumstances have changed so time to move it on.

Have spent lots of time and money on bringing this up to standard, bought it as a half completed manual conversion with a bunch of things needed. Heres the spill;

ENGINE
Stock RB25DET NEO w/ 160,000km
Splitfire Coilpacks
OEM Airbox (comes with a hectic pod filter if suits buyers taste)
Major service completed including timing belt, cam and crank seals, coolant flush, oil (castrol 10w-40), oil filter and sparkplugs
OEM exhaust 

DRIVETRAIN, BRAKES AND SUSPENSION
R32 GTR 5 speed gearbox
R32 GTR transfer case
Brand new single plate Exedy clutch (push type)
Gearbox oil drained and filled with Redline shockproof gear oil
Transfer case oil drained and filled with Nissan D-Matic (ATF)
Front and rear diffs drained and filled with Penrite 75w-90 gear oil
ATTESSA flushed, filled with Nissan D-matic and bled
R32 GTR Sumitomo front calipers & rotors
Adjustable height and rebound coilovers (unsure of brand)
Hardrace adjustable front upper control arms
Hardrace adjustable rear upper control arms

EXTERIOR & INTERIOR
Factory Dayz kit including front bar, side skirts, rear bar and spoiler. 
Non-sunroof
Wont come on the 8 MR BBS wheels, Will come on R33 GTST wheels with RWC tread. 
Factory manual centre console
R34 GTT Steering wheel with a Silvia airbag
OEM electric leather seats
OEM cargo net and privacy cover
New FitMyCar full set of floor mats
Fresh paint correction buff and polish, then sealed with autoglym wax
Aftermarket alarm, immobilizer and central locking

Thats pretty much it, only things to note is it does have the common stagea rust under the mirrors, the boot has a decent dent in it, and the drivers seat has a tear in it. There are inperfections here and there, and i have tried to take pictures of absolutely every one i can see. These are available to serious buyers, so there is no hidden surprises before inspecting. I have tried to reflect all this in the asking price. Asides from that its a clean and honest car. Happy for comp testing to be done for serious buyers only. Sold with no RWC or Rego.

*WONT COME WITH BBS’s, WILL COME WITH R33 GTST WHEELS*

Any questions please feel free to pm me.
 

located Eltham North

5CEC7853-D73F-45EB-B5B1-50506A55BD4F.jpeg

9B1FE2D3-42B5-4D3C-95A7-DAFFBE4CD67D.jpeg

52C67F19-E802-43E4-97A1-BA9D17D41C6B.jpeg

CCCC4553-538B-4F7E-95A1-95380F9EA014.jpeg

C0AB58EF-371F-406A-8ABF-F3D5802A2AA6.jpeg

FB62A5C2-F0BE-491A-B7C3-D7AF8A3E0D45.jpeg

71B92931-6956-4CC3-94FD-A0873ACB1793.jpeg

EEEB8B2B-ED5C-4D0D-8C13-1F438391BF66.jpeg

816E072A-C8D0-4C0C-8256-164AE66156EB.jpeg

F78964EF-4DB1-401E-BDFF-D2A5AA63F109.jpeg

E2BF5C56-03C7-4251-9754-5D429FEA1149.jpeg

B91F3075-3F59-4E94-A880-4F75F5C0997C.jpeg

9E6E642C-E4DC-4D42-82E1-DC45B39D1316.jpeg

54D9DBB5-674B-48A8-B4AD-8F96C39DD1DE.jpeg

On 27/05/2020 at 6:33 PM, MikeCrawley said:

where's the price ? admin told me I had to include price in my classified ad.

Let me know how much you want for it

Hey mate so sorry, was a copy and paste from my fb ad. 
price is $10,000.

Create an account or sign in to comment

You need to be a member in order to leave a comment

Create an account

Sign up for a new account in our community. It's easy!

Register a new account

Sign in

Already have an account? Sign in here.

Sign In Now


  • Similar Content

  • Latest Posts

    • So stock ECU does not like anything above 10 psi?  That Nistune one is just for "try" if it will be any different, I know it need to be tune for that. I know but YOU may know about these problem but i/we dont. They few little Skylines here let alone people who know anything about tham so that is why iam asking here  
    • So now we have a radiator with no attachments whatsoever. It lifts up with a particularly tight spot between the drivers side air box mount and the lower radiator outlet, but if you've got this far you will sort that too. This is the lower mounts with the rad out so you can see where the rubber bushes go, it is a straight shot upwards Done! Assembly is the reverse of disassembly, with blood less likely to be shed.
    • Right, onto the second last trick. The Air Con condenser is mounted to the front of the radiator and stays in the car when the radiator is removed. There are 2x 10mm headed self tappers holding the top of the condenser to the radiator, remove those The bottom of the condenser is attached to the radiator with clips. You need to lift the condenser out of those clips and clear (up, then forward). f**ked if  could work out how to do that last bit with the front bumper on. I hope you can, and you share the trick.  Bumper removal probably deserves its own thread one day once I've recovered the will to live, but basically you need to remove the wheels, front inner guard liners (clips and 10mm headed bolts), the self tapper between the guard and the bumper at the rearmost point of the bumper (same as an R32 that bit), any remaining clips at the top/front of the grill, an absolute bastard design with a plate that holds the top of the bumper above the headlight each side (only 1 bolt which is tricky to get to, but the plate catches 2 places on the bumper and must be removed....carefully!) and push clips between the bumper and guard under the headlight. If you've done all that you will be faced with wiring for the fog lights on both sides and in ADM Q50 RS at least, 4 nasty tight plugs on the driver's side for the ADAS stuff. So, the clips at the bottom look like this on drivers side (looking from the front) And on the passenger side (also from the front), you can see this one is already out Clearance on both of these are super tight; the condenser needs to move up but the upper rad support mount prevents that, and the radiator can't move down far because it is (rubber) mounted. Once you achieve the impossible and drop the condenser off those mounts so it does not stop the rad moving, you are good to go
    • OK, next the shroud needs to come off and there are a couple of tricks. Firstly, there is a loom from near the passenger side headlight to the fans, coolant temp sensor etc and there is no plug to undo.  In my case I was OK to leave the shroud on top of the engine so I just undid the passenger side fan plug and about 10 of the clips which gave enough free wire to put it aside. The fan plugs were super tight, the trick I used was a small falt screwdriver to push down on the release tab, then a larger flat screwdriver to lever the plug out of the fan unit....be careful with how much force you apply! If you need to remove the shroud altogether for some reason you will have to deal with all the plugs (tight) and clips (brittle)....good luck. I removed all of the clips and replaced them with cable ties that I will just cut next time. Also, in the Red Sport / 400R at least, the intake heat exchanger reservoir hose is bolted to the shroud in 2 places with 10mm headed bolts; so remove them (the hose stays in the car; no need to undo it at the t fittings down at the radiator lower mount. Once you've dealt with the HX hose and the wiring loom, there are 3x 10mm headed self tappers holding the top of the shroud to the radiator; remove those.   The shroud then lifts out of the bottom mounts where it sits on the radiator, up and onto the engine out of the way. Simples
    • Ok, disregard my “rate them” comment, sorry for my unrealistic input
×
×
  • Create New...