

Announcements
-
Similar Content
-
-
Latest Posts
-
 All trim back in wired running driving. Few things to follow up on but not far off the return to the road. att.6HN4wP38LTIOISkhA8eACoBFqzfgQMahZPLA8ut0pqE.mp4 att.w2q0ux2PGuqgQTj2Os13cNHQtqcSEcCAhD_CAXy_IQM.mp4
 -
 The trouble with phone apps is that they really do not know the sensitivity of the mic on each specific phone, whether there is some sort of cover or skin that can change that, etc etc. So the readings off them are not calibrated. You certainly couldn't be sure that you were even within 3 dB. I have the same app on two (actually more than that) different phones/tablets and the readings in the same room at the same time are never the same. I don't mind the apps - they are as useful as a dyno - if you're testing for delta from thing1 to thing2. But not to try to generate some sort of absolute value.
 -
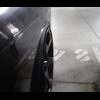
 I'm gonna use the "Sound Meter" app from the Google Play Store and as close as I can bother to these procedures: 4. TEST METHOD FOR ALL VEHICLES EXCEPT PRE ADR83 IN-SERVICE GOODS VEHICLES AND OMNIBUSES 4.1 Microphone position 4.1.1 The microphone shall be directed towards the orifice of the exhaust outlet and shall be supported by a tripod or similar device not providing excessive acoustic reflection. The general requirements for positioning microphones are shown in the Appendix. 4.1.2 The nominal axis of maximum sensitivity of the microphone shall be substantially parallel to the test site surface and shall make an angle of 45 degrees ±10 degrees with the principal direction of gas flow from the exhaust. 4.1.3 In selecting the 45 degree alignment from the outlet of a motor vehicle fitted with two or more outlets, only the angle resulting in the microphone being farthest from any other outlet must be used. National Stationary Exhaust Noise Test Procedures for In-Service Motor Vehicles Page 3 4.1.4 The height of the microphone above the test site surface shall be equal to that of the orifice of the exhaust outlet ±25mm but shall not be less than 200mm above the test site surface. 4.1.5 The distance of the microphone from the exhaust outlet orifice shall be 500mm±25mm. 4.1.6 [Relates to vertical exhaust outlets] 4.1.7 For vehicles fitted with one exhaust outlet the microphone shall be placed so that the greatest possible distance is achieved between it and the vehicle. 4.1.8 [Relates to multi exhaust outlets] 4.1.9 [Relates to multi exhaust outlets] TLDR: 200mm off ground 45 degree angle relative to exhaust flow 500mm from tailpipe exit. (I probably won't use a tripod) Here's a photo, cause I read the instructions wrong myself.
 -
No ABS, no TCS, no airbags, no cruise control, no lane departure assist, no emergency brake assist, no orange lights in the mirrors (continuously annoying me in multi-lane traffic), no stupid rear view camera. I am the one responsible for where my car goes and how it does it.
-
-


Recommended Posts
Create an account or sign in to comment
You need to be a member in order to leave a comment
Create an account
Sign up for a new account in our community. It's easy!
Register a new accountSign in
Already have an account? Sign in here.
Sign In Now