Shoota_77
-
Posts
1,887 -
Joined
-
Last visited
-
Days Won
68 -
Feedback
100%
Content Type
Profiles
Forums
Events
Gallery
Media Demo
Store
Everything posted by Shoota_77
-
 Injectors (and resistor), Boost Controller and Boost Guage sold pending payment......
 -
Hey guys, got some left over bits after upgrading. Vehicle has done 94,000kms so everything is in excellent condition unless otherwise noted. I''m negotiable on some things if you think they're too dear! All parts can be either picked up from Melbourne western suburbs after hours or from Hawthorn during business hours. I''m happy to box things up to post interstate but postage is at your cost. Cheers. Original GT-R Coilovers. Very good condition, no signs of oil leaks at all. $200. Original GT-R 444cc Injectors with Resistor and plugs. Upgraded to 1000cc's so not needed. Worked perfect. $350. K&N M''s Intake Piping. Probably need new filters. Comes with Jecs air flow sensors and plugs. $200. Original GT-R Steering Wheel. Exceleent condition for age, tiny bit of roughening on top. $200. Original GT-R Fuel Pump. Worked perfectly. $75. Orignal GT-R Cam Gears. No signs of wear. $25. GReddy Boost Guage. Pretty good condition. Illuminates green. $50. HKS EVC Boost Controller. Worked fine. Bit tacky looking on top from being taped to dash. $100. Z32 Air Flow Sensor Plug. New plug, original wiring. $15. Ski chains for 14-18"" Wheels. See picture for exact sizes they fit. Why hire?? $75. FREE!!! Orignal Radiator. No leaks but probably needs a flush. $$Postage Only. Please let me know if you need any pictures or further info. Thanks for looking!
-
Atoy Customs R33 To R35 Gtr Skyline Conversion
Shoota_77 replied to Sneakyazn's topic in Exterior & Interior Styling
Yeah it''s wrong but full credit for pulling off a pretty amazing conversion! Looks awesome when they''re done painted up for the show. I''m guessing 35 GTR body panels are cheap in the Philipines! -
How To Use Touch Up Paint Properly?
Shoota_77 replied to West's topic in Exterior & Interior Styling
Terry is totally on the right track. It's important to take your time and do it over a day to build up the paint level slowly. Less is more with touch ups. Try to keep all of the paint within the chip so you're not overlapping too much, especially your first 2-3 layers. Once you're back to slightly over the paint depth on the rest of the panel it's time to crack out the sand paper. The best way to do it (IMO) is to get the little 3M sticky dots that are designed for this task. They're about the size of a 50c coin. Peel off the backing tape and stick the dot to the lid of a softdrink bottle. This gives you a perfect rubbing tool as it's slightly rounded yet keeps your sanding surface relatively flat. Spit on the sand paper side (sticks better than water!) and with circular motions sand back the raised repair back to level. Keep it wet and only apply very light pressure. You then need to rub back the repair and surrounding area with cut and polish. Then fine cut cleaner and then finally with a crystal finish (super fine polish). Make sure you 'blend' in the repair to the surrounding panel over lets say a 40cm area. You'll be a lot less likely to notice the repair this way. Personally I never worry about the clear coat. If the repair is done properly you won't need it. -
Repairing Fibreglass- Bumper/lower Skirts
Shoota_77 replied to Shoota_77's topic in Tutorials / DIY / FAQ
I considered doing that with mine but it was just too splintered. I was a bit worried about the strength of 'butting' the fibreglass usp to a straight edge but with the overlap from behind it's surprisingly super strong. Been too busy to finish it off but I'll post up some more shots when I do. -
Great, just what I wanted to hear! I live in Caroline Springs! I'm mega paranoid about mine getting flogged.
-
Hey Chris, sounds good. Can you please send me some photos, specifically the marks. I'm PM you my mobile number. Cheers.
-
Nah that's cool. By the time I added in postage i'd be better off getting a new one. Thanks for the reply though.
-
Is the radiator new or used Phil? Thanks.
-
I'd be interested in just boot trims if you decide to separate? Cheers.
-
Cheers Eli, thanks for your help! I'll pop him an email. How much was it out of interests sake? I missed out on one the other day and it was $400. I'm hoping it will be around that sort of figure. Ewan.
-
Sounds good, post up a video of the sound and we'll be the judge! Mine needs some decent pipes too. Only drama is the main person that you impress upon is the cops! Slipping under the radar isn't a term that applies when you're running that sort of power and pipe volume like what you will be!
-
Hi guys, As above, hoping someone has one as per the pic below. Prefer one in good condition and with the airbag. The other option is if someone has just the R34 GT-R Airbag and I can source a standard R34 Wheel (I think!). Thanks. Ewan.
-
Hi guys, I decided to have a crack at doing some fibreglass repairs to the bumpers on my R33 GT-R. I got some ideas on price to have it done professionally and it was a bit scary! Now please bear in mind this is the first time I have ever done any fibreglassing so there is a pretty good chance there is a better way of doing it! To help, I watched a couple of Youtube videos to get some ideas on the basic principles. The rest I just worked out as i went. Ok, this is how the bumper looked to start with- As you can see it's pretty badly cracked and splintered. It's a Nismo bumper too. Not that it means anything anymore as I've fibreglassed over the top of the label for the repair! I decided that it would be easiest to make a fibreglass template to sit over the top of the area to be repaired and then lay the new glass onto the back of that. It's a fairly complex section of the bumper with lots of curves so would be a lot harder to have to free hand sand it down later. So top make the template I just layed a cover of packing tape over the bumper and then fibreglassed over the top of the tape so it wouldn't stick to the bar. Once it was cured I removed it from the bar and then put a new layer of the packing tape onto the side of the template that the new fibreglass was to be laid on. I'd heard that wax is good to prevent the fibreglass sticking so I melted a candle (advanced technique I know!!) and lightly spread the wax onto the tape that would be facing the fibreglass. This is how the template looks- This is how the template sits on the bar- I then marked where the template would sit on the bar so I could see how much I could cut off the bumper. Using an air saw I cut out the worst of the cracked section and splintered sections within the boundaries of the temlate (I left about 5mm each side of the template). This is the section I removed- I then put the template over the top of the setion to be replaced and lightly clamped it in place. This also prevented the bar from twisting while the section was removed. I also secured it with the trusty old packing tape as well to prevent it moving around at all. The next step was to cut out the sectiions of fibreglass cloth to be used. I just guessed that it would be 3 layers to fill the hole and I ground a taper behind the bar so I could secure the new section in place by overlapping another 2 layers wider than the repair section. You can see the taper (cleaner section around the cut). These are the 5 pieces of fibreglass cloth, 3 sections for the hole and the two overlap pieces- Mixed up the resin and catalyst (hardener)- I didn't have time to take photos in between layers and coats as the resin hardens pretty quick but this is the final result after I peeled off the template- Obviously there is still a fair bit of tidying up to do with the die grinder and I'll probably need to run some bog over it but for $45 for the fibreglass kit (that will still do another 5 or 6 repairs), it was a pretty good result! In hindsight I would make the template larger to give myself a bit more of a buffer to work within. Otherwise i would (and will) do the exact same thing with the other areas that need repairing. Next up is learning how to paint! Feel free to offer any further suggestions as to how it could be done better. As I said earlier it was my first go so I'm sure there are beter ways. But for anyone thinking about giving it a go, GO FOR IT! It's actually really easy! Cheers, Ewan.
-
I Know It Was A Waste Of Money But..........
Shoota_77 replied to Shoota_77's topic in R Series (R30, R31, R32, R33, R34)
There's another design that I want to try to find as well. They were madte in the late 90's so very period correct! This is the other design- -
As the title states, it was a really wanky purchase but the Skyline bug got the better of me. It's so dorky you gotta love it.....
-
It's kind of disappointing to not make more power with the new cams but at the end of the day, like you alluded to, it's how the car drives that is the most important. You're already running some pretty impressive numbers so anything bigger is really just a 'mines bigger than yours' exercise imo. I can say that cause you're making a shiteload more than me!! Sounds like a bit of fun! Any further plans now?
-
Great work, well done for having a crack! It amazing what you can pull by getting in and having a crack! I need inspiration like what you've done as I'm in the process of having my first go at fibreglassing up my cracked front and rear bars. Next step is obviously painting so thanks for the motivation! Only problem is you made it sound a lot bloody easier than it is!
-
Changing Fan On Gtr To Thermo Fans?
Shoota_77 replied to wingnut999's topic in Engines & Forced Induction
Can I ask why everyone is so against them? They rob power from the engine so I'd be interested to know why everyone is against it? -
Too true, some things surprise you at how cheap they are and others are just plain stupid! I've got a mate that is a Nissan spare parts manager so that helps a little! I just went and picked up a hose from a Jap wrecker so all good. RWC here we come... Thanks again for your offer.
-
Thanks Stuart, I'll see how I go locally first. Nissan would be proud of you mate, they're $26 new!
-
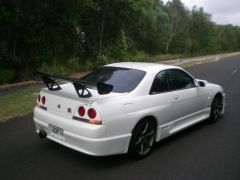
-
-

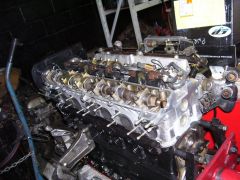
From the album: R33 GT-R
-

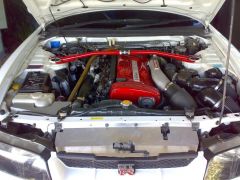
From the album: R33 GT-R
-
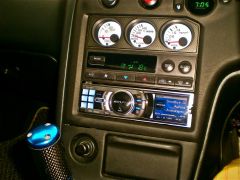
From the album: R33 GT-R