Jump to content
SAU Community

Recommended Posts

Thanks Richie! Going up for sale soon. To be replaced with a turbo :)

Awesome! Be sure to post some pics up of that one too

Terry - Your sold your blue one already!?!? Haha, how quickly did that sell.... clearly says something about it

Your new one is a stunner, even more so than your last.

Edited by wilorichie

First time at an SAU meet! Legends Night.

Compliments of Joel Rodrigues Photography (JoelyMoley) and SAU Pres (Pezhead) > so thanks to them...

JoelyMoley-11.jpg

JoelyMoley-1.jpg

JoelyMoley-13.jpg

Pezhead-8.jpg

JoelyMoley-16.jpg

JoelyMoley-4.jpg

JoelyMoley-2.jpg

JoelyMoley-3.jpg

JoelyMoley-7.jpg

Matthew-8.jpg

JoelyMoley-6.jpg

It's actually Matt's.

Pezhead-6.jpg

...and it was part of a parade of cars on Legends Night.

It was formerly owned by Terry Ashwood as a New Japanese Import with 3,000Kms on it.

My former B/Blue VS2 was parked next to Matt's VS2 Nur

And thanks for your comments Richie :thumbsup:

That's right Skyline - I'd been admiring that one (R34NUR) from afar for a while :rolleyes:. It was sold in the last 2 years or so, is that right?

GTR_NUR_R34_21.jpg

But that's just the way my car ended up; aside from the wheels, the car was bought as-is. In my mind, the 19" LMGT4s suit the car perfectly, no? I have some 20" gold GT-Cs which came with the car, which I'd take offers on...

As it happens, my car was bought by its original owner when it has done only 3,000kms and imported it in 2003, and had these exact wheels on the car from that time. The 2nd owner kept the LMGT4s as spares; they've since made their way back to the car again :thumbsup:

Hey Matt! Yeah that's the one :)

Interesting you say that, as it pieces the history of this R34 GTR together.

But just to clear up, they are two different cars, but just look similar?

Sorry, that's right - 2 different cars. Mine, a V.spec II Nur (one of 750), was bought by Terry Ashwood (owner of the Gibson Motorsport cars) from Japan when almost-new. So it's been in Oz since about 2002-3. There's been a 2nd Aussie owner between him and me. I added the "NUR 1" NSW licence plate. The 19" LMGT4s you see on it have always been together with the car, but it's had 20" GTCs on it at various times. The 2nd owner bought the genuine Nismo R Tune bonnet; but the Nismo front bumper and "eyebrows" were on the car from new.

6343953148_223f67f2b2_b.jpg

The car in the earlier post, is an M.spec Nur (one of 250) and I'd read about it some time ago. Belonged to a NZ owner, with the number plate "R34NUR". I'd admired the look of this car for a while, but the fact my car looks similar is just a coincidence. It has the same wheels (although the rear ones appear to stick out a bit further from the rear guards in that photo) but doesn't have the Nismo front bumper or R Tune bonnet. It does have the assymetric front bumper with oil cooler vents though. I'm not sure where this car ended up? I remember reading that it was for sale a while back.

Sorry for the multiple edits, I can't post the rear end shot of the M spec for some reason.

Edited by God_speed

Sorry, that's right - 2 different cars. Mine, a V.spec II Nur (one of 750), was bought by Terry Ashwood (owner of the Gibson Motorsport cars) from Japan when almost-new. So it's been in Oz since about 2002-3. There's been a 2nd Aussie owner between him and me. I added the "NUR 1" NSW licence plate. The 19" LMGT4s you see on it have always been together with the car, but it's had 20" GTCs on it at various times. The 2nd owner bought the genuine Nismo R Tune bonnet; but the Nismo front bumper and "eyebrows" were on the car from new.

6343953148_223f67f2b2_b.jpg

The car in the earlier post, is an M.spec Nur (one of 250) and I'd read about it some time ago. Belonged to a NZ owner, with the number plate "R34NUR". I'd admired the look of this car for a while, but the fact my car looks similar is just a coincidence. It has the same wheels (although the rear ones appear to stick out a bit further from the rear guards in that photo) but doesn't have the Nismo front bumper or R Tune bonnet. It does have the assymetric front bumper with oil cooler vents though. I'm not sure where this car ended up? I remember reading that it was for sale a while back.

Sorry for the multiple edits, I can't post the rear end shot of the M spec for some reason.

Yep, gotcha Matt!

Make sense and yes I can see all the differences that you mentioned :)

Both cars (NUR 1 and R34NUR) even have the same strut brace, which got my attention too.

Both cars have same good taste in mods :laugh:

Jamie.

Cheers Jamie :thanks:

It does too! A HKS Kansai strut bar! Dad's (Terry's) got the Nismo Titanium strut bar that was also with my car at one stage. Will make an appearance on his new car...

Referring back to that M.spec, looks like it was making 412kW atw using GT2530s.

Cheers Jamie :thanks:

It does too! A HKS Kansai strut bar! Dad's (Terry's) got the Nismo Titanium strut bar that was also with my car at one stage. Will make an appearance on his new car...

Referring back to that M.spec, looks like it was making 412kW atw using GT2530s.

Ah, so your Terry_GT-R34 son...

I see GTR's run in the family :laugh:

Crazy! 412kW is epic for a street car.

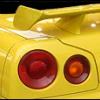
Thought i would share some pics of my new car, not sure if there are many around in this colour?

gallery_85191_4683_550833.jpg

gallery_85191_4683_237496.jpg

gallery_85191_4683_822835.jpg

gallery_85191_4683_695722.jpg

Just took a couple of pics today before my new wheels go on that arrived today... hopefully get them on this weekend..

Still a few things i want to do visually but wheels will be a good start..

Matt, nice to see your car mate, looks awesome, look forward to seeing the beast in person some time.

Cheers,

Anthony

Yeah Jamie. I found Terry's first GTR in the Trading Post; a midnight purple R33 :)

Looks the goods Anthony. :thumbsup: I think the yellows tend to fade if not looked after, and that one you've got there looks nice and bright.

Smoked Nismo indicators, V spec splitter, and some adjustable coilovers and that thing will look mad!

Did you end up buying the Omoris?

Yea mate, the yellow is very bright on it... althought the plastic parts (rear tail light surround etc) tend to fade a little differently unfortunately, but they can be easily sprayed if required.

Didnt end up going with the omoris as i wanted 10.5wide instead of 9.5, and i wanted matte black instead of gloss.... and also wanted 19s.. ended up getting 19x10.5 +22 TE37SL finished from the factory in matte black.. look very nice, hoping they look just as good on the car as they do off!

Currently looking for front splitter and skirts etc.. so they shouldnt be too far behind..

Cheers,

Anthony

Congrats again and well done on the TE37 SLs. Had been admiring those matte SLs but it'd be black on black in the case of my car = murdered out!

Will look awesome on the yellow.

In fact the colour reminds me of this (sorry, slightly OT):

ruf_ctr_yellowbird.jpg

Twin turbo 6, 350kW in a 1150kg body, 11.9 sec quarter... in 1987.

Yea im looking forward to seeing how mine will look at the end,

I tried searching for pics on the net of a yellow 34gtr done exactly how i want it set up and i couldnt find one...

most had huge bodykits or chrome/alloy wheels...

Cheers,

Anthony

Thought i would share some pics of my new car, not sure if there are many around in this colour?

gallery_85191_4683_550833.jpg

gallery_85191_4683_237496.jpg

gallery_85191_4683_822835.jpg

gallery_85191_4683_695722.jpg

Just took a couple of pics today before my new wheels go on that arrived today... hopefully get them on this weekend..

Still a few things i want to do visually but wheels will be a good start..

Matt, nice to see your car mate, looks awesome, look forward to seeing the beast in person some time.

Cheers,

Anthony

Hey Anthony congrats on the R34 purchase.

That car was on carsales 4 a while. I remember it was one of the 1st R34's brought to oz.

I think the TE37 in matte black will look awesome.

Front carbon splitter lip, Carbon Ganador Mirrors and a Top Secret Rear Diffuser.

Thats what I would personal do if I had that.

Also clear front and side indicators

Once again congrats on a very nice car

Create an account or sign in to comment

You need to be a member in order to leave a comment

Create an account

Sign up for a new account in our community. It's easy!

Register a new account

Sign in

Already have an account? Sign in here.

Sign In Now


  • Similar Content

  • Latest Posts

    • Hi, is the HKS  Tower Bar still available ? negotiable ? 🤔
    • From there, it is really just test and assemble. Plug the adapter cables from the unit into the back of the screen, then the other side to the car harness. Don't forget all the other plugs too! Run the cables behind the unit and screw it back into place (4 screws) and you should now have 3 cables to run from the top screen to the android unit. I ran them along the DS of the other AV units in the gap between their backets and the console, and used some corrugated tubing on the sharp edges of the bracket so the wires were safe. Plug the centre console and lower screen in temporarily and turn the car to ACC, the AV should fire up as normal. Hold the back button for 3 sec and Android should appear on the top screen. You need to set the input to Aux for audio (more on that later). I put the unit under the AC duct in the centre console, with the wifi antenna on top of the AC duct near the shifter, the bluetooth antenna on the AC duct under the centre console The GPS unit on top of the DS to AC duct; they all seem to work OK there are are out of the way. Neat cable routing is a pain. For the drive recorder I mounted it near the rear view mirror and run the cable in the headlining, across the a pillar and then down the inside of the a pillar seal to the DS lower dash. From there it goes across and to one USB input for the unit. The second USB input is attached to the ECUtec OBD dongle and the 3rd goes to the USB bulkhead connected I added in the centre console. This is how the centre console looks "tidied" up Note I didn't install the provided speaker, didn't use the 2.5mm IPod in line or the piggyback loom for the Ipod or change any DIP switches; they seem to only be required if you need to use the Ipod input rather than the AUX input. That's it, install done, I'll follow up with a separate post on how the unit works, but in summary it retains all factory functions and inputs (so I still use my phone to the car for calls), reverse still works like factory etc.
    • Place the new daughterboard in the case and mount it using the 3 small black rivets provided, and reconnect the 3 factory ribbon cables to the new board Then, use the 3 piggyback cables from the daughterboard into the factory board on top (there are stand offs in the case to keep them apart. and remember to reconnect the antenna and rear cover fan wires. 1 screw to hold the motherboard in place. Before closing the case, make a hole in the sticker covering a hole in the case and run the cable for the android unit into the plug there. The video forgot this step, so did I, so will you probably. Then redo the 4 screws on back, 2 each top and bottom, 3 each side and put the 2 brackets back on.....all ready to go and not that tricky really.      
    • Onto the android unit. You need to remove the top screen because there is a daughterboard to put inside the case. Each side vent pops out from clips; start at the bottom and carefully remove upwards (use a trim remover tool to avoid breaking anything). Then the lower screen and controls come out, 4 screws, a couple of clips (including 3 flimsy ones at the top) and 3 plugs on the rear. Then the upper screen, 4 screws and a bunch of plugs and she is out. From there, remove the mounting brackets (2 screws each), 4 screws on the rear, 2 screws top and bottom and 3 screws holding in the small plates on each side. When you remove the back cover (tight fit), watch out for the power cable for the fan, I removed it so I could put the back aside. The mainboard is held in by 1 screw in the middle, 1 aerial at the top and 3 ribbon cables. If you've ever done any laptop stuff the ribbon cables are OK to work with, just pop up the retainer and they slide out. If you are not familiar just grab a 12 year old from an iphone factory, they will know how it works The case should now look like this:
    • Switching the console was tricky. First there were 6 screws to remove, and also the little adapter loom and its screws had to come out. Also don't forget to remove the 2 screws holding the central locking receiver. Then there are 4 clips on either side....these were very tight in this case and needed careful persuading with a long flat screw driver....some force required but not enough to break them...this was probably the fiddliest part of the whole job. In my case I needed both the wiring loom and the central locking receiver module to swap across to the new one. That was it for the console, so "assembly is the reverse of disassembly"
×
×
  • Create New...