Jump to content
SAU Community

Recommended Posts

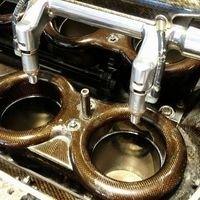
A few basic videos of the new engine, (old front cut sourced stocky shat an oil pump). Pieced together the thusday night before round two in qld, driven 250km on the friday on the way up (benalla to yass) then run in flat out during competition on sat and sunday :thumbsup:

Peak torque is 537.4Nm @ 4707rpm

Peak power is 340.4 @ 7297rpm (this run was stopped early, it made around 355 at 8000 on later runs)

Very basic engine build;

Blitz K5-660R with the smallest rear #7 (have got a #9 to try later, i suspect easy 400kw for those who want a dyno queen)

Blitz 47mm gate (dual outlet)

Blitz D1 exh manifold

Greddy pistons

Greddy pro cams (small)

Kelford springs

Drift H-beam rods

king bearings

Greddy oil pump

Tomei sump baffle

Pro-engines collar

Greddy 1.2mm head gasket

GIZZMO phenolic intake gasket

-10 drain from rear of head

custom block oil restrictors

ARP main studs

ARP head studs

ARP cam studs

PFC D-jetro

GIZZMO MSIBC boost controller

th_catdyno2.jpg

th_catdyno21.jpg

th_catdyno31.jpg

catdyno2-1.jpg

catdyno.jpg

  • Replies 53
  • Created
  • Last Reply

Top Posters In This Topic

Top Posters In This Topic

Posted Images

I hear its going back on the dyno very soon, any truth to this?

BTW.....did you get my message yesterday?

did you get mine? :D

yeah it may go back on to see what the #9 is capaple of, but im booked solid atm and the car is perfect for its purpose wioth the #7 so we will see what happens..... its just a bit of curiosity thats all.

Got all the remap shizzle coming so might do a few GTR remaps on it also for fun.

did you get mine? :thumbsup:

yeah it may go back on to see what the #9 is capaple of, but im booked solid atm and the car is perfect for its purpose wioth the #7 so we will see what happens..... its just a bit of curiosity thats all.

Got all the remap shizzle coming so might do a few GTR remaps on it also for fun.

Nah, didn't get it.....stupid vodafone.

I'll call you later tonight.....might go for a drive after tea :worship:

Are they similar to power enterprise turbos? look similar i thinks.??

sounds nice tho :thumbsup:

good work Trent!

power enterprise use IHI from memory, blitz use KKK but with turbonetics wheeels in them. Sound is rather sweet, can hear it whistle from the other side of the track....

nice results, so this is about the same as a gt3540 in size i presume?

whats the turbo worth and what flange does it have? are these gonna last long term or havent u tested these turbos over a long period yet?

kkk is factory fitted to many supercars like porsche etc but blitz changes the compressor wheels to a specially machined turbonetics combo, the things last ages which is one of the reasons i went this route over a garret, they tend to take more abuse (material going through bearings etc) they are T3 flange but you could probaly buy 2 gt3540's for the price of one K5 :banana: but the GT3540 just dont perform any where near as good.

hmm, got me thinking trent. my engnie is just about to go back into the GTR. I want about 350rwkw and lots of joy in the midrange.

I currently have:

HKS GT-SS

tomei expreme mani's

tomei dumps

head work

tomei 260/9.15 cams

full trust super suction kit

etc etc you know most of the spec.

but lately I have been considering an HKS T04Z kit. price is almost the same and it simplifies things a bit. but I do want it to be very responsive. I don't want to strap on the T04Z and find it makes the 350rwkw with just 14psi and makes all it's power up top. I guess what I mean is there is no point using a 400rwkw capable turbo to get 350 if the set-up will be 'lazy'. and by the same token no point using 320kw turbos to try and make 350kw as everything will be stressed.

I'm starting to think this blitz kit may suit. How do you think this kit compares with a T04Z? are they fairly similar in size/trim? and what's the rough price on this bad boy?

here is a comparo. Price is similar to the HKS version not generic garrett (which is only half a T04Z) :(

i had a look at all 4 players at the size i was after and the K5 seemed on paper to be the pick, its a shame they are not all the same flange as i would be happy to do back to backs on the dyno to give 100% accurate comparo's... maybe if some-one has a T04Z kit laying around we could "run it in" for them :)

post-34927-1212712377_thumb.jpg

post-34927-1212713655.jpg

thanks mate, that helps. it seems they are fairly close in wheel size and trim.

So perhaps the HKS T04Z with the smaller 0.61 exhaust housing would be comparable to the blitz turbo you have?

does the blitz turbo or gate run v-band flanges. I am in love with V-band flanges. :(

For those looking for a budget responsive non stroker 26
Blitz K5-660R with the smallest rear #7 (have got a #9 to try later, i suspect easy 400kw for those who want a dyno queen)

Blitz 47mm gate (dual outlet)

Blitz D1 exh manifold

Greddy pistons

Greddy pro cams (small)

Kelford springs

Drift H-beam rods

king bearings

Greddy oil pump

Tomei sump baffle

Pro-engines collar

Greddy 1.2mm head gasket

GIZZMO phenolic intake gasket

-10 drain from rear of head

custom block oil restrictors

ARP main studs

ARP head studs

ARP cam studs

PFC D-jetro

GIZZMO MSIBC boost controller

you could probaly buy 2 gt3540's for the price of one K5

I read the thread twice.

I can't see how this is a budget build.

and I also can't see the dyno vid... just pics.

something removed?

Create an account or sign in to comment

You need to be a member in order to leave a comment

Create an account

Sign up for a new account in our community. It's easy!

Register a new account

Sign in

Already have an account? Sign in here.

Sign In Now


  • Similar Content

  • Latest Posts

    • Hi, is the HKS  Tower Bar still available ? negotiable ? 🤔
    • From there, it is really just test and assemble. Plug the adapter cables from the unit into the back of the screen, then the other side to the car harness. Don't forget all the other plugs too! Run the cables behind the unit and screw it back into place (4 screws) and you should now have 3 cables to run from the top screen to the android unit. I ran them along the DS of the other AV units in the gap between their backets and the console, and used some corrugated tubing on the sharp edges of the bracket so the wires were safe. Plug the centre console and lower screen in temporarily and turn the car to ACC, the AV should fire up as normal. Hold the back button for 3 sec and Android should appear on the top screen. You need to set the input to Aux for audio (more on that later). I put the unit under the AC duct in the centre console, with the wifi antenna on top of the AC duct near the shifter, the bluetooth antenna on the AC duct under the centre console The GPS unit on top of the DS to AC duct; they all seem to work OK there are are out of the way. Neat cable routing is a pain. For the drive recorder I mounted it near the rear view mirror and run the cable in the headlining, across the a pillar and then down the inside of the a pillar seal to the DS lower dash. From there it goes across and to one USB input for the unit. The second USB input is attached to the ECUtec OBD dongle and the 3rd goes to the USB bulkhead connected I added in the centre console. This is how the centre console looks "tidied" up Note I didn't install the provided speaker, didn't use the 2.5mm IPod in line or the piggyback loom for the Ipod or change any DIP switches; they seem to only be required if you need to use the Ipod input rather than the AUX input. That's it, install done, I'll follow up with a separate post on how the unit works, but in summary it retains all factory functions and inputs (so I still use my phone to the car for calls), reverse still works like factory etc.
    • Place the new daughterboard in the case and mount it using the 3 small black rivets provided, and reconnect the 3 factory ribbon cables to the new board Then, use the 3 piggyback cables from the daughterboard into the factory board on top (there are stand offs in the case to keep them apart. and remember to reconnect the antenna and rear cover fan wires. 1 screw to hold the motherboard in place. Before closing the case, make a hole in the sticker covering a hole in the case and run the cable for the android unit into the plug there. The video forgot this step, so did I, so will you probably. Then redo the 4 screws on back, 2 each top and bottom, 3 each side and put the 2 brackets back on.....all ready to go and not that tricky really.      
    • Onto the android unit. You need to remove the top screen because there is a daughterboard to put inside the case. Each side vent pops out from clips; start at the bottom and carefully remove upwards (use a trim remover tool to avoid breaking anything). Then the lower screen and controls come out, 4 screws, a couple of clips (including 3 flimsy ones at the top) and 3 plugs on the rear. Then the upper screen, 4 screws and a bunch of plugs and she is out. From there, remove the mounting brackets (2 screws each), 4 screws on the rear, 2 screws top and bottom and 3 screws holding in the small plates on each side. When you remove the back cover (tight fit), watch out for the power cable for the fan, I removed it so I could put the back aside. The mainboard is held in by 1 screw in the middle, 1 aerial at the top and 3 ribbon cables. If you've ever done any laptop stuff the ribbon cables are OK to work with, just pop up the retainer and they slide out. If you are not familiar just grab a 12 year old from an iphone factory, they will know how it works The case should now look like this:
    • Switching the console was tricky. First there were 6 screws to remove, and also the little adapter loom and its screws had to come out. Also don't forget to remove the 2 screws holding the central locking receiver. Then there are 4 clips on either side....these were very tight in this case and needed careful persuading with a long flat screw driver....some force required but not enough to break them...this was probably the fiddliest part of the whole job. In my case I needed both the wiring loom and the central locking receiver module to swap across to the new one. That was it for the console, so "assembly is the reverse of disassembly"
×
×
  • Create New...