Jump to content
SAU Community

Recommended Posts

not 100% on exh side AR... its the 8cm2 i am running at the moment. And i dunno where the post is, but i think it was by Steve, he showed a comparison table that related cm2 to AR

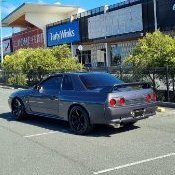
Reason for selling: Building an RB30DET and this ---->

MyGT35R.jpg

is sitting next to me :P

EDIT:

3" i think exhaust

600x270x55 FMIC

EMS Dual Sport ECU

stock!!! injectors

550hp fuel pump

Stock fuel pressure

Stock engine internals

2.25" intercooler piping

  • Replies 62.7k
  • Created
  • Last Reply

Top Posters In This Topic

  • chaos

    7164

  • Ska

    5791

  • BelGarion

    3645

  • Nexus9

    3590

Top Posters In This Topic

well assuming its on an RB20det right now and will bolt straight on...

you will need to block the water feed (comes from inlet side around the back of the head via metal tubing) and water return in the block.

Once that is done a tune would be very wise!

Then once that is done you will notice a big grin on your face :P R32's are MUCH lighter than my car ;) And with the power i got my car gets up and boogies all over the road on boost... well used to, brand new 255's have calmed that a fair bit.

But cuz i bought my turbo from a guy who already had it on an R32 RB20, all i did was unbolt my stocker, plug up the water lines, bolt new turbo on, then drove around with the old tune for 2-3 weeks before i got it tuned.

i did get the dump pipe modified to suit my car etc. Which you will need a custom dump pipe by the sounds of it

Pred, the rb20 turbo is classed as a non good turbo.

lol :P maybe, but then again they were designed to be cheap to make and give 165kw or whatever the stock R32 power output is ;) So they do that. Just like the stockie RB25 turbo isn't great either..

wish i had the funds for an 2530 myself. Probably what i would go for -- not after big dyno figures.

Skyrine-Dave : watchout.. might chew up that phone...mmm.. RB30 + big ass turbos :)

Predator: It can chew that fone.. well try! its lasted many drunken nites in town... read: Dropped all over the place :P good old 3210 reliability :)

I did want a 2530, but being a tight ass uni student didnt really allow for it. I previously had a hi-flowed R32 turbo and that sucked so much ass its not funny. Sure the car was powerful... compared to my old V8 Fairlane 500 (god bless it ;))... but it sucked none the less.

As i see it. The 2530 sounds like a very nice turbo for an Rb20, but not having been in a car with one on it... i cannot comment. Tho i've seen some Rb25 owners not happy with 2530's due to their extra capacity.

yeah.. heard that - HKS 2530 will only give 230rwkw or so on an RB25DET. Apparently though its meant to spin up quicker than the stocker and give you a bootfull of midrange which sounds nice. Keeps the engine nice and safe anyhow.

anyhow, i'm off..later all.

Dave - so running it on the stock engine and stock cooler would be fine? at 7 psi?

whats the lag like .. doesnt get on boost to 5 grand or something?

is turbo lag a good or a bad thing?

oh man! stock cooler... i wouldnt bother. With my hi-flow i had so many over heating issues with my stock cooler!!!

FMIC at the same time or before... or ASAP once you install it. makes a huge difference... i went from 47deg inlet temps to 25deg inlet temps!

Turbo lag... hmm u can drive around casual just makin spool noise but not coming on boost, just goin all casual and quiet around the streets... but mash ya foot to the floor... 4000rpm and all hell breaks loose...

i like the lag so i dont have to drive on boost all the time. as the car is daily driven.

Personal preference really. The only time i kick myself is when i'm in the wrong gear and have 2000rpm before decent boost kicks in when having a "roll on"... problem solvered by dropping it back a gear... or 2 and away you go.

OK here's the deal the $5 do not have plastic covers and have really been used and show it, all the pages are in and not looking at falling out, but you can tell they've been heavily used. The $10 are from here in the office and are perfect other than the plastic is faded.

These are also for sale to anyone inside the company so dont know how much longer they will be there for, but we did have about 30 to start with so guess whoever wanted one has one by now, but yeah dont know how much longer I'll be able to get them for.

$5

1.

2.

$10

1. Nexus9

2.

Alright last chance anyone want a cheap UBD, going, going..............

Guest
This topic is now closed to further replies.


  • Similar Content

  • Latest Posts

    • Did this end up working? Did you take some pictures?
    • And finally, the front lower mount. It was doubly weird. Firstly, the lower mount is held in with a bracket that has 3 bolts (it also acts as the steering lock stop), and then a nut on the shock lower mount itself. So, remove the 3x 14mm head bolts , then the 17mm nut that holds the shock in. From there, you can't actually remove the shock from the lower mount bolt (took me a while to work that out....) Sadly I don't have a pic of the other side, but the swaybar mounts to the same bolt that holds the shock in. You need to push that swaybar mount/bolt back so the shock can be pulled out past the lower control arm.  In this pic you can see the bolt partly pushed back, but it had to go further than that to release the shock. Once the shock is out, putting the new one in is "reverse of disassembly". Put the top of the shock through at least one hole and put a nut on loosely to hold it in place. Put the lower end in place and push the swaybar mount / shock bolt back in place, then loosely attach the other 2 top nuts. Bolt the bracket back in place with the 14mm head bolts and finally put the nut onto the lower bolt. Done....you have new suspension on your v37!
    • And now to the front.  No pics of the 3 nuts holding the front struts on, they are easy to spot. Undo 2 and leave the closest one on loosely. Underneath we have to deal with the wiring again, but this time its worse because the plug is behind the guard liner. You'll have to decide how much of the guard liner to remove, I undid the lower liner's top, inside and lower clips, but didn't pull it full off the guard. Same issue undoing the plug as at the rear, you need to firmly push the release clip from below while equally firmly gripping the plug body and pulling it out of  the socket. I used my fancy electrical disconnect pliers to get in there There is also one clip for the wiring, unlike at the rear I could not get behind it so just had to lever it up and out.....not in great condition to re-use in future.
    • Onto the rear lower shock mount. It's worth starting with a decent degrease to remove 10+ years of road grime, and perhaps also spray a penetrating oil on the shock lower nut. Don't forget to include the shock wiring and plug in the clean.... Deal with the wiring first; you need to release 2 clips where the wiring goes into the bracket (use long nose pliers behind the bracket to compress the clip so you can reuse it), and the rubber mount slides out, then release the plug.  I found it very hard to unplug, from underneath you can compress the tab with a screwdriver or similar, and gently but firmly pull the plug out of the socket (regular pliers may help but don't put too much pressure on the plastic. The lower mount is straightforward, 17mm nut and you can pull the shock out. As I wasn't putting a standard shock back in, I gave the car side wiring socket a generous gob of dialectric grease to keep crap out in the future. Putting the new shock in is straightforward, feed it into at least 1 of the bolt holes at the top and reach around to put a nut on it to hold it up. Then put on the other 2 top nuts loosely and put the shock onto the lower mounting bolt (you may need to lift the hub a little if the new shock is shorter). Tighten the lower nut and 3 upper nuts and you are done. In my case the BC Racing shocks came assembled for the fronts, but the rears needed to re-use the factory strut tops. For that you need spring compressors to take the pressure off the top nut (they are compressed enough when the spring can move between the top and bottom spring seats. Then a 17mm ring spanner to undo the nut while using an 8mm open spanner to stop the shaft turning (or, if you are really lucky you might get it off with a rattle gun).
    • You will now be able to lift the parcel shelf trim enough to get to the shock cover bolts; if you need to full remove the parcel shelf trim for some reason you also remove the escutcheons around the rear seat release and you will have to unplug the high stop light wiring from the boot. Next up is removal of the bracket; 6 nuts and a bolt Good news, you've finally got to the strut top! Remove the dust cover and the 3 shock mount nuts (perhaps leave 1 on lightly for now....) Same on the other side, but easier now you've done it all before
×
×
  • Create New...