Jump to content
SAU Community

Recommended Posts

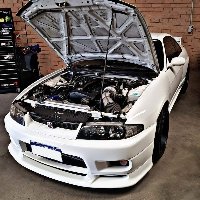
hi guys currently getting my motor built at moment it will be ready to get tunes soon when its back in and i was wondering cause im new to wa where is the best place to get it tuned a reputable place ?

its a r32 gtr by the way

please pm me

thanks guys

  • Replies 55
  • Created
  • Last Reply

Top Posters In This Topic

hi there, best place in town is allstars in malaga, they do a good tune and get plenty of good feed back. im getn my r33 gts done there in the next few weeks.

Big question is who built the engine ? Whenever tuning a new engine there is alot of reluctance, cause when something goes wrong, as is often the case, the tuner doesn't want to get blamed for a poorly built engine, and vice versa.

Also, what ECU have you got, turbs etc ?

Please post results in the SAUWA Member area :thumbsup:

If the bad boy works, I'll be telling every one don't u worry,

Quick parts list

Bottom end built by me with

Nissan bearing

Spool rods

CP pistons 86.5

Nitto pump

Trust sump extension

Head consists of

Tomie -

Pro cams 270x10.8

Type B springs and retainer

Bronze valve

Ferrea +1mm valves

Tomie gaskets

1.2 HG

1000cc xpurts

GT 35 .82 vband

3.5" dump

6 boost and 48mm pro gate with screamer

040 intake and 2x 044 externals all direct wired

3lt surge tank

3lt baffled catch can with rear head drain,

Think I covered everything and all issues RB related

Let's hope it all works

  • 2 weeks later...
  • 5 weeks later...

MOTOR BUILD UPDATE, ALL BUILT AND FINISHED GOING BACK IN CAR NOW !!! maybee some things i missed out !!

sard 700 cc injectors

brand new garret 2860-5 turbos with all new gaskets

hks exhaust gasket and tomei metal intake gaskets/throttle bodies

acl race series full engine bearing kit, along with king bearings unknown what they were for !

shim head gaskit race series (metal)

N1 water pump

tomei UMEDA oil pump

tomei 260 deg cams

custom built extended sump and pickup with trap door setup in sump (MADE BY RED R RACING )

rebuilt front diff and preload reset

engine balance

machine crankshaft

ross harmonic balencer

cp forged pistons, 30thou over size from original bore

eagle conrods

gates performace timing kit

replace crankshaft oil galleries with screw in plugs

deck block

recon head ,full set of valve guides,3 angle valve cut ,set of shim tappets to cams supplied

aftermarket valve springs

custom work (drill and weld up oil galleries in head advised by red r racing)

TOMIE Oil Feed Restrictors

TOMIE Sump Baffles

HKS Adjustable Cam Gears

ARP Mains + Head Studs

All New Hoses And Gaskets

Oil Relocation Kit + Cooler

alloy Radiator

new clutch built by (JIM BERRY RACE CLUTCHES QLD)

Nismo Airflow Meters

New O2 Sensors

trust 600x300x120mm Intercooler,

recent full rebuild on gearbox

running the nistune ecu with nismo afms

and a blitz i colour elect boost controller

will be interesting to see how much power i will make ,would anyone know an estimate on power figure ?

Thanks I bought these brand new turbs cause I blew one up originally when I had same turbs before not expecting motor to go and make a new stronger motor with more power so yeah I hope I can make some good power anyways was hoping for 600 but oh well ...

Thanks I bought these brand new turbs cause I blew one up originally when I had same turbs before not expecting motor to go and make a new stronger motor with more power so yeah I hope I can make some good power anyways was hoping for 600 but oh well ...

A mate with an RB28 running 26psi and e85 with big cams and a shit load of head work made 630rwhp, so with your setup on pump98, and similar boost I'd expect around 550rwhp thumbsup.gif

but thats really a guess whistling.gif

Make 500 easy, pending ignition and boost will indicate how far you want to go. Camshafts could be alittle bigger for some extra hp, I changed from 260's to 272's and noticed a mega difference top end. Either way, great street and all round setup.

Create an account or sign in to comment

You need to be a member in order to leave a comment

Create an account

Sign up for a new account in our community. It's easy!

Register a new account

Sign in

Already have an account? Sign in here.

Sign In Now


  • Similar Content

  • Latest Posts

    • Thought I would get some advice from others on this situation.    Relevant info: R33 GTS25t Link G4x ECU Walbro 255LPH w/ OEM FP Relay (No relay mod) Scenario: I accidentally messed up my old AVS S5 (rev.1) at the start of the year and the cars been immobilised. Also the siren BBU has completely failed; so I decided to upgrade it.  I got a newer AVS S5 (rev.2?) installed on Friday. The guy removed the old one and its immobilisers. Tried to start it; the car cranks but doesnt start.  The new one was installed and all the alarm functions seem to be working as they should; still wouldn't start Went to bed; got up on Friday morning and decided to have a look into the no start problem. Found the car completely dead.  Charged the battery; plugged it back in and found the brake lights were stuck on.  Unplugging the brake pedal switch the lights turn off. Plug it back in and theyre stuck on again. I tested the switch (continuity test and resistance); all looks good (0-1kohm).  On talking to AVS; found its because of the rubber stopper on the brake pedal; sure enough the middle of it is missing so have ordered a new one. One of those wear items; which was confusing what was going on However when I try unplugging the STOP Light fuses (under the dash and under the hood) the brake light still stays on. Should those fuses not cut the brake light circuit?  I then checked the ECU; FP Speed Error.  Testing the pump again; I can hear the relay clicking every time I switch it to ON. I unplugged the pump and put the multimeter across the plug. No continuity; im seeing 0.6V (ECU signal?) and when it switches the relay I think its like 20mA or 200mA). Not seeing 12.4V / 7-9A. As far as I know; the Fuel Pump was wired through one of the immobiliser relays on the old alarm.  He pulled some thick gauged harness out with the old alarm wiring; which looks to me like it was to bridge connections into the immobilisers? Before it got immobilised it was running just fine.  Im at a loss to why the FP is getting no voltage; I thought maybe the FP was faulty (even though I havent even done 50km on the new pump) but no voltage at the harness plug.  Questions: Could it be he didnt reconnect the fuel pump when testing it after the old alarm removal (before installing the new alarm)?  Is this a case of bridging to the brake lights instead of the fuel pump circuit? It's a bit beyond me as I dont do a lot with electrical; so have tried my best to diagnose what I think seems to make sense.  Seeking advice if theres for sure an issue with the alarm install to get him back here; or if I do infact, need an auto electrician to diagnose it. 
    • Then, shorten them by 1cm, drop the car back down and have a visual look (or even better, use a spirit level across the wheel to see if you have less camber than before. You still want something like 1.5 for road use. Alternatively, if you have adjustable rear ride height (I assume you do if you have extreme camber wear), raise the suspension back to standard height until you can get it all aligned properly. Finally, keep in mind that wear on the inside of the tyre can be for incorrect toe, not just camber
    • I know I have to get a wheel alignment but until then I just need to bring the rear tyres in a bit they're wearing to the belt on the inside and brand new on the outside edge. I did shorten the arms a bit but got it wrong now after a few klms the Slip and VDC lights come on. I'd just like to get it to a point where I can drive for another week or two before getting an alignment. I've had to pay a lot of other stuff recently so doing it myself is my only option 
    • You just need a wheel alignment after, so just set them to the same as current and drive to the shop. As there are 2 upper links it may also be worth adding adjustable upper front links at the same time; these reduce bump steer when you move the camber (note that setting those correctly takes a lot longer as you have to recheck the camber at each length of the toe arm, through a range of movement, so you could just ignore that unless the handling becomes unpredictable)
    • I got adjustable after market rear camber arm to replace the stock one's because got sick of having to buy new rear tyres every few months. Can anyone please let me know what the best adjustment length would be. I don't have the old ones anymore to get measurements. I'm guessing the stock measurement minus a few mm would do it. Please any help on replacing them would be fantastic I've watched the YouTube clips but no-one talks about how long to set the camber arm to.
×
×
  • Create New...