Jump to content
SAU Community

Recommended Posts

Sorry for not updating it. Things have happened, car got clipped by L plater in a commondore leaving a carpark. Broke the headlight, clips holding bumper up and wrinkled and creased front drivers quater panel. Going in tomorrow (4th Feb) to be fixed up to a total of $1400+ including headlight. Lower sill will be painted body white.

Car has also been raised to stock height and rolling on R32GTST stock 16s for insurance purposes. Car will be back in the coming weeks with the diff in (been waiting on shimms from japan) coupe midpipe and a custom tail section theb slammed back to its former glory. Ready for the Matt Smith Memorial Car Show (facebook for more details) on the 17th.

I will be back

  • 1 month later...

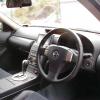
Ok so the car is back slammed. Wont best stanced at previously mentioned car show, got alot of hate for it but the can EADC. Diff still isnt in, shimms and diff are ready in waiting. In the meantime i have bought a recaro SR3 30th anniv edition seat and V35 rail and should be going in. Just worried about the airbag sensor module thing under the seat.

Next is the R34 GT-T Sumitomo front brake upgrade and further interior bits from MOMO and nismo

  • 4 weeks later...

More current pics will be up soon of the car. Diff finally shimmed ready to go but ran into a hurdle. VLSD has 6x1 bolt patter to bolt to the factory shafts but the sedan has the 3 lots of two bolts. Luckily M35 stagea have the same rear subframe section and the 6x1 drive shafts needed and ScottyNM35 has one wrecking and is selling the set to me for $300 posted to Newcastle so hopefully it will be in within the fortnight.

Also got HEKO design weathershields from the USA which fit in the window tracks instead of over the chrome so it looks neater than the brown faded OEM ones. Also a subtle bootlip from Ebay which looks nice, but in all honesty get it unpainted and do it yourself. the colours dont match nice at all.

>M35 Aero bar (without cibies) and V35 sedan nismo kit all in white and on the hunt for on yahoo japan and in Aus.

>19' Enkeis of some sort to replace the RPF1s.

>Whiteline sways (dale im looking at you).

>Nismo Odds'n ends (Speedo, wheel, matts, pedals and blinkers)

>Minor electricals.

>Worksbell Paddles (4AT for life, JKS)

>A goood professional detail and service.

All on the agenda for the next 12-18 months or so. if you have or know of anyone selling these things let me know

Cheers #NoFace

Edited by Howaitonaito

More current pics will be up soon of the car. Diff finally shimmed ready to go but ran into a hurdle. VLSD has 6x1 bolt patter to bolt to the factory shafts but the sedan has the 3 lots of two bolts. Luckily M35 stagea have the same rear subframe section and the 6x1 drive shafts needed and ScottyNM35 has one wrecking and is selling the set to me for $300 posted to Newcastle so hopefully it will be in within the fortnight.

Also got HEKO design weathershields from the USA which fit in the window tracks instead of over the chrome so it looks neater than the brown faded OEM ones. Also a subtle bootlip from Ebay which looks nice, but in all honesty get it unpainted and do it yourself. the colours dont match nice at all.

VQ25det on the agenda in the next 12-18 months or so.

Cheers #NoFace

FYP. :P

  • 1 month later...

Car is now raised up and my RPF1s have been sold off. Running PIAA super mesh in 17s. Feels good to drive places.

The whole "stance", "hardparker" and "form>function" days are over. Focusing on sensible power, driving enjoyment, fun and functionality.

Big things are happening within the next 3-8 months (maybe longer) to the stagline to further make it different fron its normal sedan/coupe counterparts.

Aim is for 210RWKW.

#NoFace

  • Like 1

Yes VQ25DET. Driving from Newcastle all the way down to Melbourne to see scotty. Keeping the 4AT in for the time being because $$$$ but will go 6sp MT as the parts pop up and funds come my way.

Had 50 million engine choices, i drove my mates nuts deciding and changing my mind but found that the VQ25DET will be the logical choice. If all else fails then its VQ35.

Going to be a long and expensive 2013.

Watch this space for more updates.

#NoFace

  • 2 weeks later...

Big news! The biggest and most important part is now MINE!! Just bought a VQ25DET and i am chuffed to bits.

Next is a Greddy E-manage, map sensor and universal loom new from Greddy Australia.

And also a factory NM35 turbo. Dead or alive. Im looking in Craigs direction hahahaha.

Happy Mark

#NoFace

Create an account or sign in to comment

You need to be a member in order to leave a comment

Create an account

Sign up for a new account in our community. It's easy!

Register a new account

Sign in

Already have an account? Sign in here.

Sign In Now


  • Latest Posts

    • Stock ECU (or more accurately stock tune) absolutely refuses to go over 10psi and behaves like you have seen. The Nistune is the same if it is the stock tune. If the Nistune chip has been tuned, the resulting tune could be literally anything for any combination of parts. The Nistune just makes the stock ECU Tunable.
    • So stock ECU does not like anything above 10 psi?  That Nistune one is just for "try" if it will be any different, I know it need to be tune for that. I know but YOU may know about these problem but i/we dont. They few little Skylines here let alone people who know anything about tham so that is why iam asking here  
    • So now we have a radiator with no attachments whatsoever. It lifts up with a particularly tight spot between the drivers side air box mount and the lower radiator outlet, but if you've got this far you will sort that too. This is the lower mounts with the rad out so you can see where the rubber bushes go, it is a straight shot upwards Done! Assembly is the reverse of disassembly, with blood less likely to be shed.
    • Right, onto the second last trick. The Air Con condenser is mounted to the front of the radiator and stays in the car when the radiator is removed. There are 2x 10mm headed self tappers holding the top of the condenser to the radiator, remove those The bottom of the condenser is attached to the radiator with clips. You need to lift the condenser out of those clips and clear (up, then forward). f**ked if  could work out how to do that last bit with the front bumper on. I hope you can, and you share the trick.  Bumper removal probably deserves its own thread one day once I've recovered the will to live, but basically you need to remove the wheels, front inner guard liners (clips and 10mm headed bolts), the self tapper between the guard and the bumper at the rearmost point of the bumper (same as an R32 that bit), any remaining clips at the top/front of the grill, an absolute bastard design with a plate that holds the top of the bumper above the headlight each side (only 1 bolt which is tricky to get to, but the plate catches 2 places on the bumper and must be removed....carefully!) and push clips between the bumper and guard under the headlight. If you've done all that you will be faced with wiring for the fog lights on both sides and in ADM Q50 RS at least, 4 nasty tight plugs on the driver's side for the ADAS stuff. So, the clips at the bottom look like this on drivers side (looking from the front) And on the passenger side (also from the front), you can see this one is already out Clearance on both of these are super tight; the condenser needs to move up but the upper rad support mount prevents that, and the radiator can't move down far because it is (rubber) mounted. Once you achieve the impossible and drop the condenser off those mounts so it does not stop the rad moving, you are good to go
    • OK, next the shroud needs to come off and there are a couple of tricks. Firstly, there is a loom from near the passenger side headlight to the fans, coolant temp sensor etc and there is no plug to undo.  In my case I was OK to leave the shroud on top of the engine so I just undid the passenger side fan plug and about 10 of the clips which gave enough free wire to put it aside. The fan plugs were super tight, the trick I used was a small falt screwdriver to push down on the release tab, then a larger flat screwdriver to lever the plug out of the fan unit....be careful with how much force you apply! If you need to remove the shroud altogether for some reason you will have to deal with all the plugs (tight) and clips (brittle)....good luck. I removed all of the clips and replaced them with cable ties that I will just cut next time. Also, in the Red Sport / 400R at least, the intake heat exchanger reservoir hose is bolted to the shroud in 2 places with 10mm headed bolts; so remove them (the hose stays in the car; no need to undo it at the t fittings down at the radiator lower mount. Once you've dealt with the HX hose and the wiring loom, there are 3x 10mm headed self tappers holding the top of the shroud to the radiator; remove those.   The shroud then lifts out of the bottom mounts where it sits on the radiator, up and onto the engine out of the way. Simples
×
×
  • Create New...