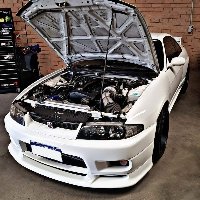
Jump to content
SAU Community

Recommended Posts

hey guys my gtr 32 is due for a brake service i have standard bakes all round on my r 32 gtr. pads are pretty worn down im unsure on what pads are in it. car is making close to 500 hp at 4.

are the standard drilled rotors ok to use again can you get them machined? and i am wanting to know what good pads i can put back in the car is a street car mainly might do a little track in the future.

I would ditch the drilled rotors and start off with a fresh set.

Cross Drilled rotors have less surface braking area and slight cracks will appear around the hole areas after many years.

Depends on how worn the rotors are, but if they are very worn, you can't machine them as they will get too thin.

DBA / Project Mu make good replacements for brake and rotor setups.

At the moment I run DBA 4000 rotors with Project Mu B Spec pads.

Quite good on price too.

Drilled rotors can crack, but if they're not cracked now and have plenty of meat left in them you may as well use them again. IIRC the rotors are 32mm wide new and 30mm is the wear limit. I never machine rotors at a pad change unless there's a problem with them.

  • 2 weeks later...

whats the best pads to use if the discs have heaps of meat left and arnt cracked.

ps they have been working fine just getting low on pads but there is slight groves in discs etc

Depends on how you drive, and if you do any track days.

If you want a pad that can cope with a track day but not be too much for the street QFM A1RMs are great and cheap. If you're street only, then something milder than and A1RM should have better grip cold, and be kinder to the rotors. I've used EBC greens and they were great, but these days i'd probably try QFM HPX or the Remsas (See trader GSL Rallysport for both - also he can recommend a pad based on your usage).

Create an account or sign in to comment

You need to be a member in order to leave a comment

Create an account

Sign up for a new account in our community. It's easy!

Register a new account

Sign in

Already have an account? Sign in here.

Sign In Now


  • Similar Content

  • Latest Posts

    • Good luck on the weekend mate
    • Must have been an absolute nightmare to drive when the power steer was out, the rack ratio/wheel size/caster is all set up for power assistance
    • Welcome to SAU, what are you looking at buying?
    • I checked the injectors again (1 and 2, since they’re easiest to access) to make sure they weren’t clogged. Even though the entire fuel system had been cleaned, I wanted to be certain. Everything looked clean, so I reinstalled and connected everything. When I started the car to confirm everything was okay, it immediately revved up high, so I shut it off straight away. I checked to see if I’d missed a vacuum hose or something, but everything was connected. On the second attempt, the car ran without the high idle, but I noticed a distinct “compressed air” sound coming from the engine bay. Tracing the sound, I pushed injector #6 forward slightly and the noise stopped — it turned out it wasn’t seated properly, despite the fuel rail being bolted down. While holding it in place, the car idled steadily without stalling and ran for over 5 minutes. At this point, I pulled all six injectors out just in case I hadn’t seated them correctly or dirt had gotten onto the O-rings. Unfortunately, I discovered that I had damaged 3 out of 6 injectors (the OEM 270cc ones) during installation. So yes, this was my fault. Since only the pintle caps were damaged, I’ve ordered a Fuel Injector Service Kit from NZEFI to refurbish them. In the meantime, I reinstalled my new injectors – the car now idles fine for over 15 minutes without stalling. I have not attempted to drive it so far. It’s not perfect yet, as it hesitates when the throttle is pressed, but it’s a big improvement. Unplugging the IACV with the new injectors idles at around 800rpm, even with the IACV screw tightened fully. But this is probably due to tune.
    • I wanted to try and preserve the front bumper as long as possible, they're not cheap and are made to order in Japan. Taking inspiration from my previous K11 Micra build where I made an undertray for the Impul bumper, I did the same for this BN Sports bumper but a little slimmed down.  This time round I only made a 'skid plate' (if that's the correct wording/term) for just the bumper surface area, the Micra version covered the gap like an undertray. Starting off with a sheet of mild steel approx. 0.9mm thick 4ft x 2ft in size. I traced around the bumper, cut it out and cleaned the edges. Luckily I was able to get two halves from one piece of metal In the video I installed it as is, but I've since then I've removed it to spray and add a rubber edging trim. The rubber trim is suitable for 1-2mm and it's a really nice tight fit. The bolts had to be loosened due to the plates being too tight against the bumper, the trim wouldn't push on I used some stainless M6 flat headed bolts for a flusher finish (rather than hex heads poking down), I believe this style fastener is used for furniture too incase you struggle to source some. The corner's are a little wider, but this may be an advantage incase I get close to bumping it  The front grill got some attention, finally getting round to repairing it. Upon removal one fixing pulled itself out of the plastic frame, one side is M8 that fixes inside of the frame, where as the other side is M5. Not knowing I could get replacements, I cut down an M8 bolt, threaded it inside the frame along with a decent amount of JB Weld.  The mesh was replaced to match the bumper. One hole on the bonnet/hood had to be drilled out to 8mm to accommodate the new stud, once the glue had set it could be refitted. I think the reason the grill was double meshed was to hide the horn/bonnet latch (which makes sense) but I much prefer it matching the bumper Bumper refitted and it's looking much better IMO The Youtube video can be seen here: https://www.youtube.com/watch?v=bVZP35io9MA
×
×
  • Create New...