Jump to content
SAU Community

Recommended Posts

Hi Guys and Gals,

JP here, thought I'd introduce myself.

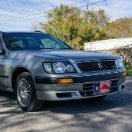
As the title shows I've just bought a 3.5l ARX. Fresh import from Japan with 93,000km in silver with black leather interior and all the electro gizmos (including indicators on the mirrors). Having come from a 2005 Legacy GT I'm very happy with how this car runs and the trim level.

So far its had:

- Engine oil (15w40), air and oil filters done

- New brake pads all round with new rear rotors and machined fronts

- Interior lights changed to LEDs

- Reverse lights changed to LEDs

- MAF and throttle body cleaned

- New Enasave tires on factory wheels (not my preferred choice)

My to-do list is:

- Diff/transfer case oil changes

- Transcooler and Transgo shift kit with fluid change

- "Z-tube" and plenum spacer, just cos I can

- Upgrade the Bose stereo to a 2din head unit/screen

- Change the oil to 5w30 or 0w30

- Spark plugs

Currently I have a minor issue. The engine sounds like its revving very high, like a whining or supercharger sound that increases with speed from 40kph (even though the tach is saying its under 2000 rpm). I'm thinking either the brakes are sticking (they haven't bedded in yet), the wheel bearing are shot, or possibly the tires are just loud.

Is there any way to confirm this before taking it into a garage? Its loud, and coming from a car with a full 3" exhaust it is very noticeable.

Anyway, I'll post some pics up shortly. Thanks in advance for any advice or ideas on the above issue.

JP

Edited by polyarkos
Link to comment
https://www.sau.com.au/forums/topic/444744-just-picked-up-an-arx/
Share on other sites

If the whining noise is noticeable while cornering, then it's the wheel bearings. It's rare to have both sides go at the same time.

Its loud and noticeable even when driving in a straight line, I'll check if it gets worse when cornering tomorrow.

Thanks

Sounds a lot more like noisy tyres to me, are they just cheapy compliance tyres?

A noisy wheel bearing will also tend to manifest under braking as well.

Good luck with it, welcome to the forum.

Sounds a lot more like noisy tyres to me, are they just cheapy compliance tyres?

A noisy wheel bearing will also tend to manifest under braking as well.

Good luck with it, welcome to the forum.

Its noticeable from 40kpm upwards whether I'm accelerating, cruising or braking.

I'm not sure about the tires, they are Dunlop RV503 Enasave. They were on the vehicle when it arrived of the boat, basically new with a lot of tread - supposedly an fuel saving tire.

Will check tire pressure tomorrow, maybe that will help. As far as I can find the 4wd Infiniti G35 hubs and bearings share the same part number 40202-24U00 so possibly a DIY fix.

Edited by polyarkos

I took the long way to work to see if the noise got worse with aggresive cornering and breaking. Seems to make the same sound the whole time from 40kph upwards, accelerating, cruising or braking.

I'll see if a garage can give some advice.

Checked the tire pressures tonight, all 4 sitting on 28psi. Pumped them up to 40psi and the car seemed less noisy, but not by much. I'll see how it goes over the next week and I might even see some improvement in economy too.

Wheel bearings failing at 93'000km's...... That is not a good sign for the accuracy of the km's the car has travelled.

My 03 ARX had 169'000km on mine when sold and had no problems with wheel bearings.

Wheel bearings failing at 93'000km's...... That is not a good sign for the accuracy of the km's the car has travelled.

My 03 ARX had 169'000km on mine when sold and had no problems with wheel bearings.

Personally I don't think there are many cars coming into NZ with legit KMs. I am yet to find a dealer that will provide the auction sheets if requested.

Having said that the car looks in really good condition and I do expect stuff to wear out (at least I know I'm good for a while when they are replaced).

Hey mate, I have the identical issue with my axis. Over 40ks and it sounds like a airplane bout to take off! Have had tyres rotated, balanced and camber adjusted all to no avail. Also had 3 diffrent mechanics drive it and all conclude its tyres. Havent had coin to change em, so cant confirm or deny it being the fix. But im in the same boat and tyre's would be my outsourced opinion.

Hey mate, I have the identical issue with my axis. Over 40ks and it sounds like a airplane bout to take off! Have had tyres rotated, balanced and camber adjusted all to no avail. Also had 3 diffrent mechanics drive it and all conclude its tyres. Havent had coin to change em, so cant confirm or deny it being the fix. But im in the same boat and tyre's would be my outsourced opinion.

This is exactly whats happened to mine. I got a garage to check the bearings as a road test was not conclusive. Spoke to Dunlop and they say the tyres are supposed to be very quiet....unless they have begun to sepparate.

Put the car on stands, remove the tyres and see if there is play in the bearings are they are noisy or catching when you rotate the axle. This will help to narrow things down.

I have changed many front wheel bearings on these, new and old. They seem to wear out quickly, especially if they were replaced by incompetent mechanics. Bearings need to be pressed in correctly or they will make the same noise as the old bearings and quickly fail.

You can't always feel slop in the bearing as there are two races, unless one race has failed completely.

Can't you just borrow a set of wheels of someone to try?

Create an account or sign in to comment

You need to be a member in order to leave a comment

Create an account

Sign up for a new account in our community. It's easy!

Register a new account

Sign in

Already have an account? Sign in here.

Sign In Now


  • Similar Content

  • Latest Posts

    • Hi, is the HKS  Tower Bar still available ? negotiable ? 🤔
    • From there, it is really just test and assemble. Plug the adapter cables from the unit into the back of the screen, then the other side to the car harness. Don't forget all the other plugs too! Run the cables behind the unit and screw it back into place (4 screws) and you should now have 3 cables to run from the top screen to the android unit. I ran them along the DS of the other AV units in the gap between their backets and the console, and used some corrugated tubing on the sharp edges of the bracket so the wires were safe. Plug the centre console and lower screen in temporarily and turn the car to ACC, the AV should fire up as normal. Hold the back button for 3 sec and Android should appear on the top screen. You need to set the input to Aux for audio (more on that later). I put the unit under the AC duct in the centre console, with the wifi antenna on top of the AC duct near the shifter, the bluetooth antenna on the AC duct under the centre console The GPS unit on top of the DS to AC duct; they all seem to work OK there are are out of the way. Neat cable routing is a pain. For the drive recorder I mounted it near the rear view mirror and run the cable in the headlining, across the a pillar and then down the inside of the a pillar seal to the DS lower dash. From there it goes across and to one USB input for the unit. The second USB input is attached to the ECUtec OBD dongle and the 3rd goes to the USB bulkhead connected I added in the centre console. This is how the centre console looks "tidied" up Note I didn't install the provided speaker, didn't use the 2.5mm IPod in line or the piggyback loom for the Ipod or change any DIP switches; they seem to only be required if you need to use the Ipod input rather than the AUX input. That's it, install done, I'll follow up with a separate post on how the unit works, but in summary it retains all factory functions and inputs (so I still use my phone to the car for calls), reverse still works like factory etc.
    • Place the new daughterboard in the case and mount it using the 3 small black rivets provided, and reconnect the 3 factory ribbon cables to the new board Then, use the 3 piggyback cables from the daughterboard into the factory board on top (there are stand offs in the case to keep them apart. and remember to reconnect the antenna and rear cover fan wires. 1 screw to hold the motherboard in place. Before closing the case, make a hole in the sticker covering a hole in the case and run the cable for the android unit into the plug there. The video forgot this step, so did I, so will you probably. Then redo the 4 screws on back, 2 each top and bottom, 3 each side and put the 2 brackets back on.....all ready to go and not that tricky really.      
    • Onto the android unit. You need to remove the top screen because there is a daughterboard to put inside the case. Each side vent pops out from clips; start at the bottom and carefully remove upwards (use a trim remover tool to avoid breaking anything). Then the lower screen and controls come out, 4 screws, a couple of clips (including 3 flimsy ones at the top) and 3 plugs on the rear. Then the upper screen, 4 screws and a bunch of plugs and she is out. From there, remove the mounting brackets (2 screws each), 4 screws on the rear, 2 screws top and bottom and 3 screws holding in the small plates on each side. When you remove the back cover (tight fit), watch out for the power cable for the fan, I removed it so I could put the back aside. The mainboard is held in by 1 screw in the middle, 1 aerial at the top and 3 ribbon cables. If you've ever done any laptop stuff the ribbon cables are OK to work with, just pop up the retainer and they slide out. If you are not familiar just grab a 12 year old from an iphone factory, they will know how it works The case should now look like this:
    • Switching the console was tricky. First there were 6 screws to remove, and also the little adapter loom and its screws had to come out. Also don't forget to remove the 2 screws holding the central locking receiver. Then there are 4 clips on either side....these were very tight in this case and needed careful persuading with a long flat screw driver....some force required but not enough to break them...this was probably the fiddliest part of the whole job. In my case I needed both the wiring loom and the central locking receiver module to swap across to the new one. That was it for the console, so "assembly is the reverse of disassembly"
×
×
  • Create New...