


Sydneykid
-
Posts
12,004 -
Joined
-
Last visited
-
Days Won
1 -
Feedback
96.2%
Content Type
Profiles
Forums
Events
Gallery
Media Demo
Store
Everything posted by Sydneykid
-
You can order whatever you want, I organised the Group Buy that way because a lot of people already have some of the parts. Keep in mind that the kit is designed to work together and the settings are based on using the whole kit. You may find you have to change some settings to get the best out of thre combination that you have. cheers PS; remember orders over $500 have no freight and orders over $1K have an extra 5% discount.
-
As much caster as you can get, keep pulling it on until the front of the wheels rub on the inner guards, then back it off a bit. Should be 7 degrees positive at least, you can never have too much caster. Front camber at least 2.5 degrees negative, maybe as much as 3.5 degrees negative depending on how high the spring rate and bar rate is. Use the pyrometer to tell you how much it needs. If you don't have a pyrometer, then have a look at the tyres after a few laps, they will tell you whether there is too much or not enough camber. Rear camber, 1.5 degrees negative, but again it depends on the springs and bar rates and to a lesser extent how much anti squat geometry you are running. Once again use the pyrometer to tell you how much it needs. cheers
-

Traction Issues - Work In Progess
Sydneykid replied to paulr33's topic in Suspension, braking, tyres and drivetrain
No, that's Ben's R34GTT, well ex-Ben anyway, he sold it after they tried the GT30 turbo upgrade. The guys at Whiteline used KYB shocks on his, mine has Eibach springs with Bilstein shocks, as I prefer them. I used MT ET radials on ours for the 11.9, couldn't drive with them on the street, absolutely useless around corners and dangerous in the wet. We have found them to be much better than the Nittos on the track though. On the road it runs my usual choice, Michelin Pilot Sport in 245/40/17 on the R33GTR 17X9's. Yep, the 420+rwkw from the RB31DET in the R32GTST is quite nice, it has 245/45/17 A032R's on it. One day I might stick the MT's on it and try for a time, it should do a mid 9 at around 145mph. That's if I change the suspension settings from its current circuit spec. At the moment it would be lucky to do a 10, too much rear camber, anti squat geometery, bump valving in the shocks, toe in and the spring rate is a little high. Just because I am a circuit racing specialist, doesn't mean I don't do drag cars. cheers -
Sorry, but I find that hard to believe, are you sure that they haven't just superceded the part number with a newer one? Like the S1 door seals have been superceded by the S2 door seals? That sort of stuff happens all the time. cheers
-
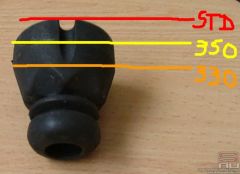
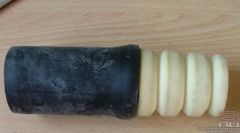
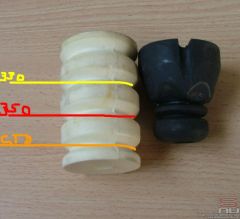
For the guys that are ordering the Bump Stop and Dust cover kit. You will have to trim the bump stops to suite the correct height that you are going to have your car set at. The dust cover clips ove the end of the bump stop stop so you have to trim the other end with a knife, be careful it is easy to slip and cut yourself. This is a picture of what the bump stop and dust cover assembled would look like at higher than standard height; This is how much much to trim off the bump stop, shown next to a standard Skyline bump stop. The orange line is for standard height, the red line is for ~350 mm centre of wheel to guard and the yellow line is for ~330 mm centre of wheel to guard. Note that standard height is 2 circlip grooves up from the standard circlip groove, ~350 mm is the standard circlip groove and 330 mm is 2/3 circlip grooves down from the standard groove. You can pick the standard groove as it has a yellow stripe accros it. Plus the circlip should be in that groove when you get the shocks. If you are using the standard bump stops they also have to be trimmed if you are going lower than standard height. Not that you have to trim the thick part of the standard bump stop, not just cut off the little lump on the bottom. You will need a hack saw as the rubber is very tough. The red line (no trimming) is for standard height, the yellow line is for ~350 mm centre of wheel to guard and the orange line is for ~330 mm centre of wheel to guard. Hope that was of some help, if you have any questions please post them up here as it may answer other peoples queries as well cheers
-
Traction Issues - Work In Progess
Sydneykid replied to paulr33's topic in Suspension, braking, tyres and drivetrain
You are correct, I have never lived with an R33GTST as a daily driver, however I do have an R34GTT with 265rwkw that has run an 11.9 at 120mph on radials that I drive almost every day. And once again you are right, I have never experienced the frustration that you have, maybe because I set up the suspension before I touched the engine. If you want wheelspin frustration you should try the R32GTST with 420+rwkw, now that's a whole different ball game. cheers -
For the guys that are ordering the Bump Stop and Dust cover kit. You will have to trim the bump stops to suite the correct height that you are going to have your car set at. The dust cover clips ove the end of the bump stop stop so you have to trim the other end with a knife, be careful it is easy to slip and cut yourself. This is a picture of what the bump stop and dust cover assembled would look like at higher than standard height; This is how much much to trim off the bump stop, shown next to a standard Skyline bump stop. The orange line is for standard height, the red line is for ~350 mm centre of wheel to guard and the yellow line is for ~330 mm centre of wheel to guard. Note that standard height is 2 circlip grooves up from the standard circlip groove, ~350 mm is the standard circlip groove and 330 mm is 2/3 circlip grooves down from the standard groove. You can pick the standard groove as it has a yellow stripe accros it. Plus the circlip should be in that groove when you get the shocks. If you are using the standard bump stops they also have to be trimmed if you are going lower than standard height. Not that you have to trim the thick part of the standard bump stop, not just cut off the little lump on the bottom. You will need a hack saw as the rubber is very tough. The red line (no trimming) is for standard height, the yellow line is for ~350 mm centre of wheel to guard and the orange line is for ~330 mm centre of wheel to guard. Hope that was of some help, if you have any questions please post them up here as it may answer other peoples queries as well cheers
-
Stagea Group Buy Whiteline & Bilstein
Sydneykid replied to Sydneykid's topic in Four Door Family & Wagoneers
For the guys that are ordering the Bump Stop and Dust cover kit. You will have to trim the bump stops to suite the correct height that you are going to have your car set at. The dust cover clips ove the end of the bump stop stop so you have to trim the other end with a knife, be careful it is easy to slip and cut yourself. This is a picture of what the bump stop and dust cover assembled would look like at higher than standard height; This is how much much to trim off the bump stop, shown next to a standard Skyline bump stop. The orange line is for standard height, the red line is for ~350 mm centre of wheel to guard and the yellow line is for ~330 mm centre of wheel to guard. Note that standard height is 2 circlip grooves up from the standard circlip groove, ~350 mm is the standard circlip groove and 330 mm is 2/3 circlip grooves down from the standard groove. You can pick the standard groove as it has a yellow stripe accros it. Plus the circlip should be in that groove when you get the shocks. If you are using the standard bump stops they also have to be trimmed if you are going lower than standard height. You have to trim the thick part of the standard bump stop, not just cut off the little lump on the bottom. That would make them very harsh at first contact. You will need a hack saw as the rubber is very tough. The red line (no trimming) is for standard height, the yellow line is for ~350 mm centre of wheel to guard and the orange line is for ~330 mm centre of wheel to guard. Hope that was of some help, if you have any questions please post them up here as it may answer other peoples queries as well cheers -
From the album: Sydneykid's Gallery
-
Hi Justin, you've got it, just choose which items you want, note that you need 2 pairs of shocks and 2 pairs of springs. Following is a typical R33GTST kit with fixed rate stabiliser bars; Front Springs $144.00 Rear Springs $144.00 Front Bilstein Shocks $485.00 Rear Bilstein Shocks $485.00 Front stabiliser bar $194.00 Rear stabiliser bar $194.00 Caster Kit $115.00 Front Camber kit $272.00 Rear Camber Kit $123.00 Rear Subframe alignment kit $105.00 Freight (over $500 order) $Zero Sub Total $2,261.00 Less extra 5% $113.05 Total $2,147.95 If you don't intend to adjust the stabiliser bars to get the handling balance you want, then I recommend the fixed rate bars. Just put them on and drive away, I have chosen them so that they suite a wide range of applications and conditions. cheers
-
For the guys that are ordering the Bump Stop and Dust cover kit. You will have to trim the bump stops to suite the correct height that you are going to have your car set at. The dust cover clips ove the end of the bump stop stop so you have to trim the other end with a knife, be careful it is easy to slip and cut yourself. This is a picture of what the bump stop and dust cover assembled would look like at higher than standard height; This is how much much to trim off the bump stop, shown next to a standard Skyline bump stop. The orange line is for standard height, the red line is for ~350 mm centre of wheel to guard and the yellow line is for ~330 mm centre of wheel to guard. Note that standard height is 2 circlip grooves up from the standard circlip groove, ~350 mm is the standard circlip groove and 330 mm is 2/3 circlip grooves down from the standard groove. You can pick the standard groove as it has a yellow stripe accros it. Plus the circlip should be in that groove when you get the shocks. If you are using the standard bump stops they also have to be trimmed if you are going lower than standard height. Not that you have to trim the thick part of the standard bump stop, not just cut off the little lump on the bottom. You will need a hack saw as the rubber is very tough. The red line (no trimming) is for standard height, the yellow line is for ~350 mm centre of wheel to guard and the orange line is for ~330 mm centre of wheel to guard. Hope that was of some help, if you have any questions please post them up here as it may answer other peoples queries as well cheers
-
From the album: Sydneykid's Gallery
-
From the album: Sydneykid's Gallery
-
Traction Issues - Work In Progess
Sydneykid replied to paulr33's topic in Suspension, braking, tyres and drivetrain
Look you have Duncan who has arguably the 2nd fastest Production Skyline in the country telling you to have a good look at your suspension. You have me who does the suspension work on arguable the fastest Improved Production Skyline in the country telling you to have a good look at your suspension. And there are 2 or 3 other guys with lots of Skyline experience telling you the same. Compared to one guy who says tyres are everything and suspension does somewhere between nothing and very little. Don't listen to any of us if you like, but please take it to Chris at Centreline and ask his opinion. cheers -
Jaycar Boost and Fuel Control
Sydneykid replied to Sydneykid's topic in Four Door Family & Wagoneers
Suggestion follow; 1. Same, it's just easier to go though the loop, take a look at the picture in the Stagea cambelt and adj pulley thread. It is pretty big loop designed for timing light sensors. 2. No way I could even fit the DFA on its own near the ECU, there is very little space. The wiring harness for the stereo goes around the ECU as well and it soaks up all of the available area. Plus I had the IEBC (same size as the DFA) and the SITC coming later on. 3. Nope, do it fairly quickly, just long enough for the solder to flow. cheers -
We have had a couple on the dyno and they make around 100 4wkw standard, so I reckon on around 70 kw losses through the drive train. Which is around 10 to 15 kw more losses than a standard auto R33GTST (ie; rwkw). Difficult to compare to a GTR as they are never standard when we see them. Plus their 206 kw, gentlemen's agreement limited, is a joke. So 141 4wkw would be around 211 kw, maybe slightly more (2-3 kw) as the auto does soak up a little more as the kw's increase (ie; more heat in the transmission fluid). cheers
-
Turbo rubbing? Simple to check, pull the inlet feed off the compressor and feel the end float in the turbo. Oil supply problem? Also simple to check, just pull the oil return hose off the fitting at the return to sump. Measure the flow at idle. The usual stuff for 250 4wkw is; Split dump, 3.25" exhaust, high flow cat FMIC (at least 600 X 300 X 75) Tomei Poncams, 256 for RB25DET hydraulic lifters GCG Ball Bearing hi flow (use an R34GTT turbo as they have the larger turbine cover) Power FC (piggy backs won't cut it) Z32 AFM upgrade Injectors (JDM S15 manual) Fuel pump (R33GTR) Panel filter in the standard airbox (Pipercross) Tuning, tuning, tuning You have to have a good think about what you are trying to achieve and how much it is going to cost. The Stagea has the same basic lay out in the drive train as an R33GTR but the components themselves are much smaller. Have a look at StageZiller's pictures of his drive train swap over. I wouldn't be surprised if at 250 4wkw and 1800 kgs you start to run into drive shaft, diff, ATTESA and auto gearbox problems. This is quite expensive (parts and labour) to fix, so you should budget for it in case you really need to do it all. For example, the gearbox upgrade is around $2500, for a new 2nd gear drive belt plus 3rd and 4th clutch pack upgrades and an upgraded valve body. Getting it to live with the Power FC's lack of ignition cut on gearchanges will be tricky. Going to a manual is even more expensive as you will need a tripple plate clutch to handle the torque/weight/4wd combination. You could easily spend $25K and several months getting it all to work reliabily together. Sorry if that's a bit too much realism, but better to know in advance what you are in for before you start. cheers
-
Same compliance shop, no dash dimmer on mine. Maybe they forgot. cheers
-
Jaycar Boost and Fuel Control
Sydneykid replied to Sydneykid's topic in Four Door Family & Wagoneers
I foun no difference with the TPS disconnected. Why can't you use the loop at the back? cheers -
Absolutely stock 170 kw (100 4wkw) and with 1800 kgs (1660kgs car + fuel + driver) to accelerate, they are not so fast (lows 15's if you are lucky). In the wet ours killed everything up to the speed limit, even manual SS utes had no chance. Boost up via the IEBC and a quick DFA tune (standard exhaust) and it holds out the SS ute up to the speed limit (80kph) in the dry. Then the exhaust chokes it. That's the advantage of turbo car, for not a lot of money (less than $1500 in my case) you can kick some ass. By the time it has 200 4wkw ($3500 cost) it should see off most cars due to power, traction and the auto. If it doesn't do a mid 12 for the 1/4 I will be surprised. cheers
-
Jaycar Boost and Fuel Control
Sydneykid replied to Sydneykid's topic in Four Door Family & Wagoneers
Suggestions to your quetions follow; 1. You have to heat it up a fair bit, it's a big heat sink. Not too much heat, just enough to get the solder to flow. 2. Yes 3. The R33 ECU pin outs are definitely different to the Stagea, which is R34 spec. 4. Yes 5. I set mine at 15 degrees, tuned the DFA, all the time checking for pre-ignition while tuning the A/F ratios. Because I had the standard exhaust I couldn't get the A/F ratios lean enough (still around 11 to 1). Later on I fitted the adjustable exhaust camshaft pulley, while I was doing the cambelt service. With 4 degrees retarded exhaust camshaft timing I was able to advance the ignition a few degrees without any pre-ignition. So it is now around 20 degrees. But I figure once I finish the exhaust, I might have to go back to standard timing (15 degrees) to tune the A/F ratios a little closer to 12 to 1. Hope that answered your questions cheers -
My Stagea doesn't have a dash dimmer that I can find, where is yours located? After a year and 30,000k's I don't find the dash lights too dimm at all. I only notice it when I get out of cars that have too bright dash lights that I have to turn down. I wouldn't run an exhaust temperature gauge in the cat, it is too far from the engine to tell you anything. Plus the cat itself, by its catalyser activities, increases the heat to burn off the contaminents. So you will get a false reading anyway. Australia has no requirement (via ADR's) for cat overheat sensors. Most cars with cat over heat sensors have them pulled up and wound (stuffed) under the passengers seat. I would check there, you may find that the compliance shop did that and then replaced the rubber floor bung with one with no hole. Pull the globe is a "standard" trick to stop it ever coming on. cheers
-
Max Power With Rb20det Stock Ecu And Inj
Sydneykid replied to 1400r's topic in Engines & Forced Induction
Have you checked your fuel pressure? Standard is 36-38psi, with a big flow fuel pump I have seen the fuel pressure lift to well over 40 psi. I figure it's the standard FPR not being able to bypass enough fuel to lower the pressure. Either that or the response to higher than standard boost from the standard FPR is not linear. A quick fuel pressure check will confirm it. I have seen cars show less power in ShootOut Mode, this is on days when the temperatures (inlet and ambient air) are lower than the ShootOut Mode medium. So it lowers the power output to compensate for the increased actual power from the lower temperatures. Which is exactly what it is supposed to do. cheers


