

R33Keaton
-
Posts
193 -
Joined
-
Last visited
-
Feedback
0%
Content Type
Profiles
Forums
Events
Gallery
Media Demo
Store
Everything posted by R33Keaton
-

R33Keaton's R31 "build"
R33Keaton replied to R33Keaton's topic in Members Cars, Project Overhauls & Restorations
Finished most of the grinding. Big thanks to my dad for his help Driver's side Passenger side Battery stand Also degreased, wire brushed, sanded, then painted the extractors with high-temp paint. Not sure how long it will last but can only give it a go i guess. Apparently the paint can handle 2000F (just under 1100C) and when completely dry has a matte finish. -
R33Keaton's R31 "build"
R33Keaton replied to R33Keaton's topic in Members Cars, Project Overhauls & Restorations
Picked up some Advance Extractors today for $50. Just have to remove the surface rust, then I'll be painting them black with high-temp paint, and possibly wrapping them with some heat wrap. -
R33Keaton's R31 "build"
R33Keaton replied to R33Keaton's topic in Members Cars, Project Overhauls & Restorations
Cut out the box section of the fender using a multi-tool grinder disk (to keep sparks to a minimum) Box section removed All the rust cut out Will do the exact same for the passenger side. The battery stand will need to be cut out also. Has seen better days... This picture was before everything was taken out of the bay. -
R33Keaton's R31 "build"
R33Keaton replied to R33Keaton's topic in Members Cars, Project Overhauls & Restorations
The rust was worse than first expected. I will do my best to fix it though. Progress pics soon. I started removing the air-con inside the car. The rust peeking through the other side More rust due to poor drainage im guessing.. So the air-con is completely out. What do i still need to keep to be able to run the heater? Has anyone removed their air-con before and have advice on what they did? I'm unsure of what i need keep/throw away/change. She's keeping me company atleast! Took her off the stands and plan to degrease the engine bay and surrounding areas tomorrow. -
R33Keaton's R31 "build"
R33Keaton replied to R33Keaton's topic in Members Cars, Project Overhauls & Restorations
Update: Exhaust mani studs = broken (which was expected aha); and i didnt even snap them, old age did... Stripping engine bay = done -
R33Keaton's R31 "build"
R33Keaton replied to R33Keaton's topic in Members Cars, Project Overhauls & Restorations
Managed to free it, thanks for your help I'll probably just redo the tape on it with something that can withstand engine bay heat. Should freshen it up a bit. -
R33Keaton's R31 "build"
R33Keaton replied to R33Keaton's topic in Members Cars, Project Overhauls & Restorations
Yeh I agree, it's good to mix it up and work on this instead of my 33. Thanks for your reply to my questions also. I plan on maybe just putting some mesh where the condenser was. With the loom, and engine wiring in general, is there a way I can disconnect it easily, so that it could be repaired? Right now I've got the injector wiring (don't know what it's officially called) hanging out the left side of the engine bay. I've got wiring with concerning headlights, power steering etc , fuse box, hanging out the right side of the engine bay. And starter motor and what not wires (the ones coming from the gearbox tunnel) just hanging down to the ground.. All this wiring is making me confused as electrics are a weakpoint for me -
R33Keaton's R31 "build"
R33Keaton replied to R33Keaton's topic in Members Cars, Project Overhauls & Restorations
Just finished removing the A/C (there was no gas in it) and decided that it will not be going back in the car. Also removed the alternator, and a few other things which i cant remember right now. Progress: Tomorrow's jobs are to remove the water pump + timing cover, exhaust manifold, brake lines + system. QUESTION FOR ANYONE READING: When removing all the wiring, i found most of the clips to be quite dodgy, broken, or they broke when i was unclipping them. Some are corroded as well, and i wouldn't really like to hook the car back up with the wiring in its current state. What would be the best (yet cost effective) way to redo the wiring? Could i just drop the wiring off at an autosparky and they'll do it? Is this a costly thing to do? Where can i find something new? or should i just go round to wreckers? Also, if I'm not putting the A/C back in, do i still need the condenser at the front, the one in front of the radiator? I still want the heater in the car to work. Any help would be appreciated thanks. -
R33Keaton's R31 "build"
R33Keaton replied to R33Keaton's topic in Members Cars, Project Overhauls & Restorations
Haha, Project Polar Bear it is! And thanks, I'm getting stuck into it, there's no turning back now. -
R33Keaton's R31 "build"
R33Keaton replied to R33Keaton's topic in Members Cars, Project Overhauls & Restorations
-
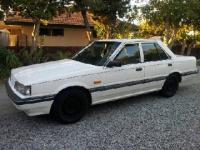
Picked up another 31 and plan to do a "budget" restoration; as it needs to be tidied up and i have the next few months free. I plan on trying to minimise costs, as it's only going to be used as a daily. She's a classic white 1989 GX (Auto ) with around 220,000 kms. Currently, the first step is to fix her up (I chose to focus on just the front of the car for now). This will include: Rust removal and repair (engine bay and under the guards) Fab up new battery stand 2 replacement fenders Respray the bay (QM1 white) Clean and paint engine Paint rocker cover, fuel rail, intake Pod filter (only due to space) - Cold air intake New gaskets all round (unsure about head gasket yet) New bolt kit for engine bay Paint wheel arches black Paint hubs black Paint calipers blue Fit new rims that have been recently sprayed Fix dodgy/broken wiring and clips Future plans include: QM1 Polar white paint job Manual conversion New springs and shocks Extractors and exhaust Will post pictures later on tonight of how she's currently sitting at the moment and what ive done so far. Even though I've previously owned an R31, I'd say I've got a lot to learn about them still Any help/advice/recommendations will be greatly appreciated. Thanks
-
The Evolution Of "night Fury"
R33Keaton replied to jez NF's topic in Members Cars, Project Overhauls & Restorations
Wing ---> rear diffuser ---> then racetrack -
The Evolution Of "night Fury"
R33Keaton replied to jez NF's topic in Members Cars, Project Overhauls & Restorations
Hey Jez how you been? Love the progress. Wide stance is wide. Was just wondering, are you happy with the current power set up, or do you have plans of achieving a few more horsies down the track? -
Where Can I Get A Front Lip Like This?
R33Keaton replied to R33Keaton's topic in Exterior & Interior Styling
Yeah that does look similar. Probably would be a bit of a gamble buying one for it to not even fit? -
Title pretty much explains it. Front lip for a series 2.
-
R33Keaton's Series 2 Build
R33Keaton replied to R33Keaton's topic in Members Cars, Project Overhauls & Restorations
I have been trying to solve this ongoing problem but nothing seems to be working. Will be buying Splitfires as i think my current coilpacks have had it. -
Keen for a video of the start up. This beast looks amazing!
-
R33Keaton's Series 2 Build
R33Keaton replied to R33Keaton's topic in Members Cars, Project Overhauls & Restorations
Managed to coat my coilpacks with the silicon 401 to fix a missfire issue ive been getting upwards of 4-5000 RPM... It seems to have improved the problem, and is sometimes there and sometimes isnt.. (intermittent). Will try and reset the ECU tomorrow and see if it has fixed the problem for good. Otherwise a set of Splitfires will be on the next shopping list. If anyone has any other solutions in mind, feel free to PM me -
Good idea sir
-
The skirt is completely fiberglass with no clips or anything. Have decided to paint them, then use a little bit of sikaflex at the top of each skirt so i can let that dry, then angle them. Once im happy im just going to drill a through the marked hole in the skirt (so, technically the body) and then bolt them to the car (once ive found/bought some good nuts/bolts etc)
-
R33Keaton's Series 2 Build
R33Keaton replied to R33Keaton's topic in Members Cars, Project Overhauls & Restorations
Wheel arches before During After with wheel on (and yes i realize the tyre pattern is the wrong way ) Ahhhh... that's better! -
Fibreglass kit brah
-
Fitted seat covers (not just cheap ones) could do the trick. As for the dash, I wouldn't be changing it too much. Colour wise I would go for something to match the interior (such as a satin black finish or a darker scheme of colours. Not bright blue or pink for eg lol. Could even carbon wrap it? In the end I think these interior additions will keep you satisfied only for a very short time. You need to weigh up the positives and negatives of keeping / selling her. And then go with your instinct
-
R33Keaton's Series 2 Build
R33Keaton replied to R33Keaton's topic in Members Cars, Project Overhauls & Restorations
Recent Updates: *Wheel Arches sprayed black *Tyres --> Rims then = Rims +Tyres on car *New wheel nuts on *Car tinted (Driver + Passenger door in Octane) (Rear quarters and windscreen - 20g (darker)) -
Can I buy some of those clips anywhere and try fit them on my aftermarket skirts? I don't have any holes drilled in the side arches of my car.
