Jump to content
SAU Community

Changing The Rocker Cover Gasket


Mike_
 Share

Recommended Posts

Rocker cover gasket change in a series 1 R33 GTS-T (RB25DET):

Disclaimer:

Do this at your own risk! I accept not responsibility for injury or damage to any part of the engine or otherwise as a result of following this guide.

For Torque specs and other specific instructions, see the bottom of this post.

What you will definitely need:

New gasket(s) from nissan

New rear cam-shaft seal(s) from nissan

Gasket goo

Large phillips-head screwdriver

Medium phillips-head screwdriver

Spanner set

Socket set

Allan key set

Around an hour - more if it's your first time.

What you don't need but should probably use:

Carby cleaner

Relatively clean rags/towels

Throttle body gasket

1. Go to Nissan and purchase the rocker cover gasket(s) you require. This guide goes through the process of replacing both.

Part numbers for RB25DET:

LEFT (exhaust side) gasket: 13270-58S01

RIGHT (inlet side) gasket: 13270-58S11

(Consult your nissan dealer to be SURE of this. I am fairly confident that I have left & right correct. I bought both for $72.05.)

rightgasket.jpg

leftgasket.jpg

'Half moon' Cam gear seals: 11051-58S00

crankseals.jpg

crankseals2.jpg

2. Pop the bonnet.

3. Remove the crossover pipe.

There are a number of things that you must disconnect/unscrew to fully remove the crossover pipe and associated bits and pieces. These are highlighted in red on the image below.

enginecloseupred.jpg

It would be worthwhile putting a clean cloth in either end of the crossover now that it is removed, and also in the throttle body to prevent any unwanted debris entering the engine.

4. Now remove the two hoses on the rocker cover breather:

nocrossoverred1.jpg

Mine split when removing as they are very stiff hoses. I will need to get new ones from Nissan and I will update this with part numbers when I do.

5. Remove the coilpack cover.

Disconnect the two connectors highlighted in red below, and then use the appropriate Allan key to remove the 8 screws holding the coilpack cover to the rocker covers (highlighted in blue)

nocrossoverred2.jpg

6. Unscrew the left rocker cover

Take particular note on how tightly these screws are done up: NOT VERY TIGHTLY AT ALL. Remember not to do them up very tight when you put the cover back on. just to the point where u can see the rubber washer undergo a bit of pressure. Torque specs are at the bottom of this post.

Also, on some screws the rubber grommet will also come out with the screw, on others it will not. Do not lose these grommets!

Be very careful not to let any dirt or other crap into the engine, or into the rocker cover.

The 10 screws are highlighted on the image below (right hand side not visible)

nocoilcoverred.jpg

Removing the rocker cover will now expose your camshaft:

leftcoveroff.jpg

7. Remove the old gasket from the rocker cover, and replace with the new one.

Use gasket goo or sealant on the raised half circle on the front side of the cover, highlighted below:

leftcoverred.jpg

While I had the cover off, I cleaned the outside with Carby cleaner, being extra careful not to get any inside the cover.

Use a pair of needle-nose pliers to gently lift the old half-moon rubber from the back of the rocker assembly (highlighted in red below). Coat all outside edges of the new half-moon with gasket goo, and then reinsert it.

oldseal.jpg

8. Replace the left rocker cover by replacing the screws

Remember, not too tight at all.

The process for removing the right cover is slightly different:

9. Remove the screws on the right of the cover.

Note that there is also smaller screws that need to be removed, that are currently supporting the wires:

screwred.jpg

Either that or unfold the support and remove the wires. I did it the hard way.

10. Remove the screws on the left of the cover.

Removing the screws on the left of the cover is more tricky. If you have an angled screwdriver, go for it right now! If not (I didn't) you will need to unbolt the throttle body assembly.

There are 4 bolts you need to undo. well, actually two nuts on the top, and two bolts below.

The top two nuts can be done with a spanner. Use sockets for the bottom bolts, as if you use a spanner you will need to remove the Throttle Position Sensor.

Once the TB is unbolted, unhook the throttle cable from it's position and carefully lift the TB out of the way, allowing you access to the rocker cover screw beneath.

The gasket may break in this step, so it would be handy to replace it while you are doing this. I didn't have to, but probably should have :)

Throttle body and throttle cable (red) and TPS (blue):

plenumred.jpg

The top screw is tricky, but just involves holding a lot of stuff out of the way to get to it. Magnetic screwdrivers work well here.

11. Repeat steps 7 & 8 for this side, and then perform steps 10, 5, 4 & 3 in reverse order.

If putting the allan key screws back on the coilpack cover is proving difficult, try tightening the inner screws of both rocker covers just a little to bring them closer together.

Make sure everything that was disconnected is now properly reconnected, and all hose clamps are tight.

And you're done:

finished.jpg

12. Start 'er up!

An abridged (but specific) guide from a workshop manual is as follows:

rocker1.JPG

rocker2.JPG

rocker3.JPG

Hope this helps :(

Edited by Mike_
Link to comment
Share on other sites

7.5. use a pair of needle-nose pliers to gently lift the old half-moon rubber from the back of the rocker assembly. Coat all outside edges of the new half-moon with gasket goo before reinserting.

=-D

Link to comment
Share on other sites

  • 11 months later...

Nice work Mike!

Have you, or anyone else out there tried it on a RB25DET Neo? Pretty much the same but the throtle body/motor assy has to come off too... I'll post pics when i do mine :D

Link to comment
Share on other sites

7.5. use a pair of needle-nose pliers to gently lift the old half-moon rubber from the back of the rocker assembly. Coat all outside edges of the new half-moon with gasket goo before reinserting.

=-D

LOL!.. Your avatar is just too funny!

Edited by GTS4WD
Link to comment
Share on other sites

  • 1 year later...
  • 2 months later...

This is a great guide but I'd really appreciate if the picture links could be updated/reuploaded.

Especially step 3 with all the 'extra' bits that would need to come off. If anyone could take a photo and circle (as described) I'd be over the moon.

Link to comment
Share on other sites

I dont have a pic of the "extra bits" that need to come off, but i have a photo of everything i removed when i painted the rocker covers.. so ideally, its the same :thumbsup:

Its really not hard to remove them. You just take stuff off thats in the way.

In this case,

Intake J-Pipe

Various VAC hoses attatched to J pipe

BOV

Coil Pack cover

Coil pack loom

Breather hoses

Throttle body

Throttle body can be left in place, but in my case, makes it easier to get back on without scratching the paint, and also makes it a bit easier to undo the one bolt under it :)

Its a good time to do the coolant bypass to the TB at this time too :)

All the bits needed to be removed (bar TB of course), removed: (minus the coil cover, but thats pretty clear on how to be removed)

BlueDoneMedium.jpg

Once you unscrew the coil pack cover and coil loom underneath, your ready to go.

Once its all off, you should have a pile like this : :)

BoltsMedium.jpg

Go play! Good luck :)

Edited by gotRICE?
Link to comment
Share on other sites

Looks nice man! ^^^^

Any chance of the original pictures being re-uploaded??? :banana:

Cheers man. I hated that colour mind you and changed it to this:

MetalcastHigh.jpg

Bus seriously, you cant really do it wrong.

Just take your time, and think about it. Theres nothing tricky or special you need to do to take them off. Just simple unbolting.

The only thing that might get you is that if they havnt been off before, or for a while, they tend to stick. So just grab the breather outlet and jiggle and it will pop off :banana: That, or grab the cover with both hands. One at the radiator end, and one at the firewall end, and do the same.

Link to comment
Share on other sites

  • 4 months later...
Can we get some updates on the pics? Very handy to have.

Pics of the whole process? Im going to have to change me rocker cover seals soon as my exhaust side has finally sprung a leak. So i will try take snapshots of the process.

But for a tease, of you have a pile that looks similar to this:

BoltsMedium.jpg

Your doing ok :D:D

Link to comment
Share on other sites

  • 7 months later...

I've fixed the links for the original post. Now we got pictures :D

Rocker cover gasket change in a series 1 R33 GTS-T (RB25DET):

Disclaimer:

Do this at your own risk! I accept not responsibility for injury or damage to any part of the engine or otherwise as a result of following this guide.

For Torque specs and other specific instructions, see the bottom of this post.

What you will definitely need:

New gasket(s) from nissan

New rear cam-shaft seal(s) from nissan

Gasket goo

Large phillips-head screwdriver

Medium phillips-head screwdriver

Spanner set

Socket set

Allan key set

Around an hour - more if it's your first time.

What you don't need but should probably use:

Carby cleaner

Relatively clean rags/towels

Throttle body gasket

1. Go to Nissan and purchase the rocker cover gasket(s) you require. This guide goes through the process of replacing both.

Part numbers for RB25DET:

LEFT (exhaust side) gasket: 13270-58S01

RIGHT (inlet side) gasket: 13270-58S11

(Consult your nissan dealer to be SURE of this. I am fairly confident that I have left & right correct. I bought both for $72.05.)

rightgasket.jpg

leftgasket.jpg

'Half moon' Cam gear seals: 11051-58S00

crankseals.jpg

crankseals2.jpg

2. Pop the bonnet.

3. Remove the crossover pipe.

There are a number of things that you must disconnect/unscrew to fully remove the crossover pipe and associated bits and pieces. These are highlighted in red on the image below.

enginecloseupred.jpg

It would be worthwhile putting a clean cloth in either end of the crossover now that it is removed, and also in the throttle body to prevent any unwanted debris entering the engine.

4. Now remove the two hoses on the rocker cover breather:

nocrossoverred1.jpg

Mine split when removing as they are very stiff hoses. I will need to get new ones from Nissan and I will update this with part numbers when I do.

5. Remove the coilpack cover.

Disconnect the two connectors highlighted in red below, and then use the appropriate Allan key to remove the 8 screws holding the coilpack cover to the rocker covers (highlighted in blue)

nocrossoverred2.jpg

6. Unscrew the left rocker cover

Take particular note on how tightly these screws are done up: NOT VERY TIGHTLY AT ALL. Remember not to do them up very tight when you put the cover back on. just to the point where u can see the rubber washer undergo a bit of pressure. Torque specs are at the bottom of this post.

Also, on some screws the rubber grommet will also come out with the screw, on others it will not. Do not lose these grommets!

Be very careful not to let any dirt or other crap into the engine, or into the rocker cover.

The 10 screws are highlighted on the image below (right hand side not visible)

nocoilcoverred.jpg

Removing the rocker cover will now expose your camshaft:

leftcoveroff.jpg

7. Remove the old gasket from the rocker cover, and replace with the new one.

Use gasket goo or sealant on the raised half circle on the front side of the cover, highlighted below:

leftcoverred.jpg

While I had the cover off, I cleaned the outside with Carby cleaner, being extra careful not to get any inside the cover.

Use a pair of needle-nose pliers to gently lift the old half-moon rubber from the back of the rocker assembly (highlighted in red below). Coat all outside edges of the new half-moon with gasket goo, and then reinsert it.

oldseal.jpg

8. Replace the left rocker cover by replacing the screws

Remember, not too tight at all.

The process for removing the right cover is slightly different:

9. Remove the screws on the right of the cover.

Note that there is also smaller screws that need to be removed, that are currently supporting the wires:

screwred.jpg

Either that or unfold the support and remove the wires. I did it the hard way.

10. Remove the screws on the left of the cover.

Removing the screws on the left of the cover is more tricky. If you have an angled screwdriver, go for it right now! If not (I didn't) you will need to unbolt the throttle body assembly.

There are 4 bolts you need to undo. well, actually two nuts on the top, and two bolts below.

The top two nuts can be done with a spanner. Use sockets for the bottom bolts, as if you use a spanner you will need to remove the Throttle Position Sensor.

Once the TB is unbolted, unhook the throttle cable from it's position and carefully lift the TB out of the way, allowing you access to the rocker cover screw beneath.

The gasket may break in this step, so it would be handy to replace it while you are doing this. I didn't have to, but probably should have :P

Throttle body and throttle cable (red) and TPS (blue):

plenumred.jpg

The top screw is tricky, but just involves holding a lot of stuff out of the way to get to it. Magnetic screwdrivers work well here.

11. Repeat steps 7 & 8 for this side, and then perform steps 10, 5, 4 & 3 in reverse order.

If putting the allan key screws back on the coilpack cover is proving difficult, try tightening the inner screws of both rocker covers just a little to bring them closer together.

Make sure everything that was disconnected is now properly reconnected, and all hose clamps are tight.

And you're done:

finished.jpg

12. Start 'er up!

An abridged (but specific) guide from a workshop manual is as follows:

rocker1.JPG

rocker2.JPG

rocker3.JPG

Hope this helps :)

  • Like 1
Link to comment
Share on other sites

  • 3 months later...
  • 1 month later...
  • 9 months later...

Create an account or sign in to comment

You need to be a member in order to leave a comment

Create an account

Sign up for a new account in our community. It's easy!

Register a new account

Sign in

Already have an account? Sign in here.

Sign In Now
 Share


  • Similar Content

  • Latest Posts

    • I'll bite. I no longer own any euro's, but I thought I'd share two of my favorites I owned. My 500hp B5 S4 and my 800HP E55 AMG. Yes I did attempt to drive the E55 in Canadian winters, that lasted all of a month as it was a death trap.   
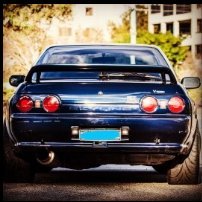
    • To be fair this is the wife’s car. However, I have been accused of owning more cars than I have pairs of undies. Luckily I change my undies more frequently than the cars.
    • Cheers Lads Looking at changing up a few things maybe go 2.8lt, bigger injectors with more a modern Turbo. Possibly transbrake and convert to E85 with Haltech ECU. Any thoughts on those Mods changes or better ideas? Want to try keep the car Street/Strip While also being weekend drivable still.  
    • The time has come, once again, for us to celebrate all things GTR! Motive DVD's GT-R FESTIVAL for 2024 is fast approaching, and we couldn't be more excited to be part of this awesome event once again! As usual, SAU NSW will be be part of the event, with our traditional club display on the day! If you would like to be part of it, firstly, you'll need to make sure you secure your Display Entry into the show via the below link by Motive Video: https://gtrfestival.com.au/ Other tickets are also available, ie. VIP Entry or Drag Entry, for you to also choose from. Once you have your ticket locked in, make sure to send us a PM via Facebook so we can add you to our list of display cars! When you message us, we will gather some more details from you to make sure we can spot you on the day, and guide you to the right place! If you'd like more information regarding the day, please refer to Motive Video's event page, or, you can get in touch with us and we will help you as best as we can. As always, general details are below: Date: Friday 24th May / Saturday 25th May Location: Sydney Dragway Time: 6.00pm Friday / 9.00am Saturday We look forward to seeing you all on the day! One of the things that really sets our club apart is our commitment to being true enthusiasts. When on normal roads we strive to maintain good relations with the authorities as well as the public in general. When attending one of Skylines Australia NSW events please try to: • Be aware of surrounding environment and act accordingly. • Drive courteously on the state’s roads as a true enthusiast should. • Understand how important it is to maintain the good name of SAUNSW and thus, treat others accordingly. • Any misbehaviour will not be tolerated and you will be asked to leave. Thanks guys and hope to see you there!
×
×
  • Create New...