Jump to content
SAU Community

Recommended Posts

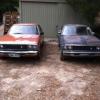
I thought I would share a few photo's of my C210 4 door that I picked up this week. The plan is restore it to original condition. It has had a hit in the front but is in overall good condition. Having said that it will require a full respray and a few interior plastics that have deteriorated sitting in the weather for 3 years between being crashed and when I purchased it last week. Rust wise it's not too bad, with a little bit in a couple of doors and round the back window. I also picked up a C210 Coupe that is only good for parts to repair the front.

1st thing that I will do is repair the damage to the front and then slowly prep for paint.

The aim is to have it completed by September 2013 for the Bay to Birdwood here in South Australia.

This weekend the Mrs and I have spend cleaning up the interior that was very dirty from sitting.

Comments and advice always welcome.

Enjoy:

IMG_0225.jpg

IMG_0230.jpg

IMG_0228.jpg

Picking it up:

IMG_0237.jpg

After a wash:

IMG_0239.jpg

Parts car:

IMG_0233.jpg

Together:

IMG_0245.jpg

Getting into it:

IMG_0249.jpg

IMG_0252.jpg

IMG_0253.jpg

IMG_0250.jpg

IMG_0258.jpg

IMG_0259.jpg

Link to comment
https://www.sau.com.au/forums/topic/392308-rick31s-c210-4-door/
Share on other sites

Looks like a awesome start.

When i red about the hit, I thought it was decent until I scrolled down, should be a easy repair.

whats it like on rust?

Fairly sad 180b SSS in the backround too

Most bits are there for it to come up mint once it's done. Rust wise it's not to bad, just starting to come through in a few areas. Just needs a guard, headlight surround, grill, front bar and the mount for the drivers side bumper mount rewelded as its been torn out of the rail when it was hit.

Very neat Rick.... nice ...your console is okay ..really you just need a centre cover for the cassette player..

and a gear knob ...

get back to you Rick..

...congrats..:cheers:

Cheers

Mario..

Thanks Mario! The console came up ok once I took it out and scrubbed it and removed the pocket that was badly sun damaged. Also the console lid needs some attention, I was thinking of getting it covered with leather. I assume that that is a common problem as the parts car is worse. Badly need a gear knob though.

  • Like 1

Most bits are there for it to come up mint once it's done. Rust wise it's not to bad, just starting to come through in a few areas. Just needs a guard, headlight surround, grill, front bar and the mount for the drivers side bumper mount rewelded as its been torn out of the rail when it was hit.

Thanks Mario! The console came up ok once I took it out and scrubbed it and removed the pocket that was badly sun damaged. Also the console lid needs some attention, I was thinking of getting it covered with leather. I assume that that is a common problem as the parts car is worse. Badly need a gear knob though.

motor trimmer can fix the console cover, also i will let you know what i dig up from someone i know who owes me a favour here..for the gear knob

Hi Rick, Looks like you have a spare LH headlight assembly now. And you're after a gear knob. As I'm not concerned with originality, we may be able work something out where I get a LH headlight assembly and you get a gear knob. With a bit of cash your way of course. Let me know if you're interested.

Hi Rick, Looks like you have a spare LH headlight assembly now. And you're after a gear knob. As I'm not concerned with originality, we may be able work something out where I get a LH headlight assembly and you get a gear knob. With a bit of cash your way of course. Let me know if you're interested.

I'm interested, shoot us a PM with what you have in mind.

too bad the coupe is full of rust. such and rare shape :-)

go hard with the resto man. will be so worth it!

It is a shame, but we will be doing a resto on a Coupe next by the looks of it :D . The Mrs likes the shape more than the sedan.

i really like your gear-stick boot. leather knot is a nice touch.

It came up a lot better than I thought it would, it was really dirty but just used hand wash in a bucket of water. I thought it was standard with the knot in it, my Stanza has the same one..

Congrats on the start of a great looking project!

in regards to the 'oh crap' rust pic...

Can you make sure you document what you end up doing as Im looking at e few similar repairs in the future, so many ways to tackle it but no idea what works best!

  • 3 weeks later...

hi rick spotted a orange c210 coupe at the uni when i pick up my son . next time i am over there this week i will check it out & see if it is a auto .

cheers mick

Hey Mick, any luck with the Orange Coupe?

If anyone needs any C210 Coupe parts shoot me a PM. The whole car is in average condition so expect the parts to be as well. Or if the whole car is of use to anyone let me know, I have taken all the front bolt on panels.

Create an account or sign in to comment

You need to be a member in order to leave a comment

Create an account

Sign up for a new account in our community. It's easy!

Register a new account

Sign in

Already have an account? Sign in here.

Sign In Now


  • Similar Content

  • Latest Posts

    • Hi...so a "development" here aswell The swap is "done" and car went "test drive" BUT it seems the clutch(maybe gearbox?) is a little bit sad? I bought this clutch kit https://justjap.com/products/xtreme-heavy-duty-organic-clutch-flywheel-kit-nissan-skyline-r31-r32-r33-push-type "Problem" is that the first gear is hard to put into and it seems that the clutch is not disengaged. It was not the problem with the old clutch...(or like sometime the first gear would not get as easy specialy when the fluid was cold) So? Can it be like...bad "install" or is the clutch wrong ((it should not have been) i done research to get the right one) Or is this "normal" with new clutch and needs to be break in? 
    • @Duncan I can try  and thanks i did not thought about VIN and part numbers for 33/34. @GTSBoy yeah it looks like iam gonna do that  
    • Forgot to include this but this is the mid section of my steering rack that looks like it has a thread/can be turned with that notch mentioned in the post:
    • Hey everyone, Wanted to pick some brains about this issue I'm having with rebuilding my 33 rack (PN is 49001-19U05). All of the tutorials/videos I've seen online are either R34 or S Chassis racks which seem to be pretty straightforward to disassemble but this process doesnt carry over to my rack. Few of the key differences that I've noted The pinion shaft on the other racks bolt on with 3 torx bolts: Whereas my rack bolts on with 2 allen head bolts: These changes are pretty inconsequential but the main difference is how you pull the actual rack out of the housing. The other skyline/s chassis racks can be taken out by tapping the rack out of the body with a socket and it just slides right out. I'm unable to do that with my rack because there's a hard stop at the end that doesn't let the seal/shaft be tapped out. Can also see a difference in the other end of the rack where mine has a notch that looks like you're able to use a big wrench to unthread 2 halves of the rack whereas the other racks are just kinda set in with a punch. My rack: Other racks: TLDR; Wanted to know if anyone has rebuilt this specific model of steering rack for the R33 and if there were any steps to getting it done easier or if I should just give this to a professional to get done. Sorry if this post is a bit messy, first one I've done.
    • I would just put EBC back on the "I would not use their stuff" pile and move on.
×
×
  • Create New...