Jump to content
SAU Community

Recommended Posts

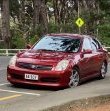
I've recently bought a 2001 Nissan Skyline V35 300GT and I'm looking at how to put a computer in it.

In my previous car (Toyota Mark II/Chaser X90), I had a Raspberry Pi in the boot. It powered on with the car (took ~30 seconds to boot) had wireless, decent USB sound card, USB drive with music etc. You could use an Apple device to AirPlay to it or use an iPhone/iPad app to control the media player installed on the Pi. The centre console perfectly fit an iPad mini in it, so it made controlling via wifi really easy. I'd mounted an iPad dock in the centre console so that the iPad charged. I just used Apple Maps for turn by turn GPS.

So, onto the V35. When I sold the Mark II I took the Pi etc out and kept it, with the plan of putting it in the Skyline, but now I'm thinking I might do it a tad nicer. I've come up with two concepts:

Idea 1: Put the Pi in the upper glove box where the MD stacker was, then mount a dock for an iPad mini in the coin pocket above the heater controls. Then when you're doing a road trip, just throw the iPad in, otherwise just use AirPlay from my phone to play music etc, pretty much the same system as was set up in the Mark II.

Idea 2: Mount an Intel NUC in the upper glovebox. Run Windows 8.1/Window 10 on it, have it running as a wireless hotspot so that iPad/iPhone can connect to it and play music via Airplay. When I purchased the car, the guy before me had purchased the pop up TV for the GPS stuff, so I've pulled that apart and thinking about mounting a 7" touch screen in place of the original screen, having a HDMI and USB cable running from the screen back to the NUC and then using the Windows 8 style metro apps for music, Windows Maps with a USB GPS receiver, maybe setup a USB camera as a reverse camera using the windows 8 camera app to see it etc.

I was then looking at the possibility of getting a printed circuit board made up for the GPS control buttons in front of the screen to do things like media control, a hardware Windows key to get back to the main screen, make the top row of buttons short cut keys to music, maps, camera etc.

I'm also of the understanding that if I'm using Windows, I could possibility get the OBD2-ish (I know it's not OBD2) details and feed them into the computer, making it give real time engine readouts while you're on the road, to get fuel usage etc?

Has anyone done anything like this? Any tips or advice?

<tl;dr I want to make my car into a giant Microsoft Surface. >

  • Like 1
Link to comment
https://www.sau.com.au/forums/topic/455863-v35-car-computer/
Share on other sites

that my friend, sounds like a great idea

an idea i have no clue what to do but if you do figure it out make a DIY so we all can learn from your ways :)

Indeed :)

I'm setting this up using an Android tablet with the assistance of Chris Rogers. Only stumbling block that I have is which tablet? I like installing custom ROMS and having full usability of the system. Planning on running everything from music to nav to live engine stats through it. ;) Can update with details when I get it set up.

I've had a bit more of a play with things, and I've got the GPS screen stuff all pulled apart, but it seemed that it's still held together by the hinge. It's not a screw or a nut or anything, just some round thing with a weird flat edge on the top. Has anyone ever pulled the screen out of one of these?

I've found a few touch screens with HDMI and USB that I think will fit in the enclosure, I just need to be able to get it apart to see how much space is actually inside the screen casing. Has anyone done it before?

Chris Rogers has. Apparently the screen size that you need is 6.4" or something strange. Really hard to come across.

  • Like 1
  • 2 weeks later...

Create an account or sign in to comment

You need to be a member in order to leave a comment

Create an account

Sign up for a new account in our community. It's easy!

Register a new account

Sign in

Already have an account? Sign in here.

Sign In Now


  • Similar Content

  • Latest Posts

    • Nah. You need 2x taps for anything that you cannot pass the tap all the way through. And even then, there's a point in response to the above which I will come back to. The 2x taps are 1x tapered for starting, and 1x plug tap for working to the bottom of blind holes. That block's port is effectively a blind hole from the perspective of the tap. The tapered tap/tapered thread response. You don't ever leave a female hole tapered. They are supposed to be parallel, hence the wide section of a tapered tap being parallel, the existince of plug taps, etc. The male is tapered so that it will eventually get too fat for the female thread, and yes, there is some risk if the tapped length of the female hole doesn't offer enough threads, that it will not lock up very nicely. But you can always buzz off the extra length on the male thread, and the tape is very good at adding bulk to the joint.
    • Nice....looking forward to that update
    • Neg, the top one is actually for the front. The sizes are 18x10.5 +18 and 18x11 +32.   I measured many times but I'm sure I'll have problems as this is the thread for problems.
    • Just one thing; tapping tapered threads is tricky. Taps are always tapered and you would generally run it as far as you can, but with a tapered thread you have to stop much sooner otherwise the wide part of the taper will run in too far and you will have to thread the sensor in too far too as well (possible that it will never make a good seal) BTW nice wide wheels, I guess the top one is for the back!
    • Welp, good to know. Will have to wait awhile until steady hands with drills and taps are available. In other news, these just arrived! I will weigh them for posterity. Edit: 11kg each (or 10.9/11.1 depending on what my scale decides over multiple tests, the 18x11 don't seem to weigh noticeably any more than 10.5)  
×
×
  • Create New...