
Attesa ETS Pro Install on R33 GTR

Announcements
-
Similar Content
-
-
Latest Posts
-

-

By Dose Pipe Sutututu · Posted
I didn't even know that existed!!! Amazing, good work Andy at Haltech! A bit off topic here, but I actually met Andy at a Aus Lancer car meet at the old Shell Space Station in Ryde back in 2003 or so. He brought out this aluminium case and showed everyone this basic circuit and said he was making an ECU that was capable of using closed loop to self tune. Most of the people there dismissed his idea. -

By TurboTapin · Posted
I actually was using 4D tables with my old AEM WMI system. I'm now using "Water Injection Advanced" under engine functions to control my WMI. The timing and fuel corrections are easier to use as they have WMI in mind. Example, my fuel correction is based on my WMI solenoid duty cycle, they also included built in timers to delay corrections before and after spraying, timers to ramp up pulse width, etc. -
By Dose Pipe Sutututu · Posted
Just a thought, how come you didn't use a 4D table? So you essentially run 2x fuel and 2x ignition tables, and the table/map switch is handled when there's enough WMI pressure detected. This is mine, but using the flex sensor as the 4th dimension, note the slider at the bottom. Between 0 to 70%, the timing is blended/interpolated , once it goes past 70% ethanol full send -
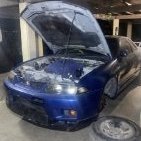 Hi guys, after dreaming of owning a JDM legend for 20 years, I got the chance to buy a 1995 R33 GTR. I live in a small country called the Solomon Islands which is in the pacific. There is no performance car scene here, however 90% of vehicles here are 2nd hand Japanese imports so there is a handful of JDM sports cars here, tucked away. 3 Evo VI’s, 1 180sx turbo, 2 GTO’s, 1 R32 GTR and 2 R33 GTR’s. Only 1 Evo and a 33 (mine) are active. I’m hoping to set up a club to get these cars back in the road. I’d known of my GTR for 9 years and always dreamed of owning it. At the start of this year I found it sitting outside a workshop waiting for a respray. It was in pretty bad shape, although running and driving perfectly apart from a big exhaust leak and worn out bushings. My brother in law who is a huge GTR guy came over for a holiday and I took him to see it, he got into my ear and I bought the car 2 weeks later as is. I’ve had a pretty bad problem with alcohol and weed since 2020 and I really wanted to quit. So I used this as my motivation. I quit everything cold turkey and have been investing all my spare time into restoring this car. It’s honestly been the best experience and has been such a positive impact on my life. There is no market for these cars here, no parts and no mechanics that can work on them, so if you wanted to sell one it would be pretty impossible unless you found the right buyer. After a bit of negotiating with the previous owner (a good friend) I got the car for $15,000 AUD ($85,000 SBD) which is insane. I’ve almost finished doing a refresh on the engine, new turbos, spark plugs and split fire coil packs. Also new gaskets and seals, This car had no leaks to begin with, but it’s due now being 30 years old. . Next I’ll be working on the suspension, all new bushings, ball joints, king pins and new coil overs. Then it will be body work, it has really bad rust in the boot floor, I have purchased a rear beaver cut from my bro which will replace the rusted out one. The car is originally KL0, but was burnt orange when it landed here, then it was resprayed toxic green and then Bayside Blue. I’m probably going to get it redone in Bayside Blue. I’m super grateful to be able to enjoy this car and couldn’t have done it without my bro Chris from OG-JDM. Looking forward to the future with this car and hoping to get it on the runway at the airport here 😂 cheers fellas
-


Recommended Posts
Create an account or sign in to comment
You need to be a member in order to leave a comment
Create an account
Sign up for a new account in our community. It's easy!
Register a new accountSign in
Already have an account? Sign in here.
Sign In Now