Jump to content
SAU Community

Recommended Posts

the plenums are very well made, just need a little refining.

i like to retain the metal gasket with the rubber orings. this gasket only came out in series 1s, and you cant get them any more. they hold their shape and seal well. the all rubber gasket moves and gets squeazed out the side. have removed these seals when the metal one was not available and just used a paper gasket with sealer also. this works, but have to discard the studs supplied also.

Too bad about the Plazmaman plenum Stuart, I made a thicker gasket for my plenum (I think it mentioned that in the instructions that came with it?)

Looks like the build is going on very nicely though.

Keep up the good work and look fwd to see how it goes on the black stuff. :laugh:

  • Replies 843
  • Created
  • Last Reply

Top Posters In This Topic

Top Posters In This Topic

Posted Images

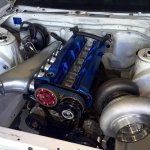
I picked up the correct throttle body from Plazmaman last night after Compak Attak and saw that their new plenums have a revised throttle mounting setup that allows enough room for the retaining nuts on either side. They also allow room for the fitting at the back that runs to the brake booster.

if you had of put both his balls in your mouth at the same time he might have given you the better one.......

A bit unprofesional to sell the plenum knowing that there was issues with it, unless it was cheeeeeeep.

Nevertheless, plenum is sorted, sump is also well underway so our work will be done very soon......hope to be finished this week.

sorry, i have broken the one beer rule again..

I picked up the correct throttle body from Plazmaman last night after Compak Attak and saw that their new plenums have a revised throttle mounting setup that allows enough room for the retaining nuts on either side. They also allow room for the fitting at the back that runs to the brake booster.
Edited by BezerkR32

engine assy is in and bolted up. Nothing major to modify, just have to relocate a few minor things, and mount some of the new additions but otherwise all good. Aftermarket balancer is incorrect however and will need to be replaced.

Shoud complete the majority of these things today with exception to the balancer. Thermo fan & shroud will also require fitting as engine fan and factory shtoud no-longer fit.

If more people knew the grief involved before they started there would by way less modified cars out there. Its been almost 12 months of modifing the modifications, hacking, cutting changing, discarding, reaarranging components to get it all to work as a unit. I thought I did my homework but there are so many hidden perils just waiting to bite you on the arse.

The next person that tries to sell me a part and insists it simply "bolts straight on" will have said part rammed up their coit.

THERE IS NO SUCH THING AS A BOLT ON MOD?

Good luck with this build 2rismo and i hope your pain is way less than mine has been. There are quite a few up here keen to see your car run at jambo.

Every single part (or most) on our car has been Jap off the shelf stuff...why?...not because im rich...its because it fits and works everytime.

To Alex's defence...he once sold me a plenum that wasn't right...so the next day drove 6 hrs (3 hrs each way) to fix it.

Every single part (or most) on our car has been Jap off the shelf stuff...why?..

Because it's an RB26.

To Alex's defence...he once sold me a plenum that wasn't right...so the next day drove 6 hrs (3 hrs each way) to fix it.

The backup from the guys at Plazmaman has been great and they've been proactive about quizzing me on what should be improved.

the driveability of the 30/40 is excellent, have fitted this turbo to half a dozen r33s, two auto, the majority of these with standard internalls. adrians with the bigger exhaust housing due to the engine mods and use of gas. you be silly to upgrade to anything smaller. I would seriously consider gt42 if it is a auto race car.

Man my turbo is going to look tiny as a highmount compared to that.Maybe a GT3082 is on the cards :P

all-so finished the pressure side of the oil system, ran hose around radiator and through inline filter on driver-side chassis rail. there is a good 2 meters of -12 hose which eliminates the need for an oil cooler. mounted filter in a bosch fuel pump bracket.

my work is almost done.

Edited by BezerkR32

I opted for the GT3076 .82 as the car will be used mostly for club sprints and motokhana type stuff. Anything bigger and lag would be so annoying in the really tight and twisty sections.

Good to see that motor in though, im dying to get mine in and running.

definately the right choice for your application...

I opted for the GT3076 .82 as the car will be used mostly for club sprints and motokhana type stuff. Anything bigger and lag would be so annoying in the really tight and twisty sections.

Good to see that motor in though, im dying to get mine in and running.

Create an account or sign in to comment

You need to be a member in order to leave a comment

Create an account

Sign up for a new account in our community. It's easy!

Register a new account

Sign in

Already have an account? Sign in here.

Sign In Now


  • Similar Content

  • Latest Posts

    • Then, shorten them by 1cm, drop the car back down and have a visual look (or even better, use a spirit level across the wheel to see if you have less camber than before. You still want something like 1.5 for road use. Alternatively, if you have adjustable rear ride height (I assume you do if you have extreme camber wear), raise the suspension back to standard height until you can get it all aligned properly. Finally, keep in mind that wear on the inside of the tyre can be for incorrect toe, not just camber
    • I know I have to get a wheel alignment but until then I just need to bring the rear tyres in a bit they're wearing to the belt on the inside and brand new on the outside edge. I did shorten the arms a bit but got it wrong now after a few klms the Slip and VDC lights come on. I'd just like to get it to a point where I can drive for another week or two before getting an alignment. I've had to pay a lot of other stuff recently so doing it myself is my only option 
    • You just need a wheel alignment after, so just set them to the same as current and drive to the shop. As there are 2 upper links it may also be worth adding adjustable upper front links at the same time; these reduce bump steer when you move the camber (note that setting those correctly takes a lot longer as you have to recheck the camber at each length of the toe arm, through a range of movement, so you could just ignore that unless the handling becomes unpredictable)
    • I got adjustable after market rear camber arm to replace the stock one's because got sick of having to buy new rear tyres every few months. Can anyone please let me know what the best adjustment length would be. I don't have the old ones anymore to get measurements. I'm guessing the stock measurement minus a few mm would do it. Please any help on replacing them would be fantastic I've watched the YouTube clips but no-one talks about how long to set the camber arm to.
    • Heh. I copied the link to the video direct, instead of the thread I mentioned. But the video is the main value content anyway. Otherwise, yes, in Europe, surely you'd be expected to buy local. Being whichever flavour of Michelin, Continental or Pirelli suits your usage model.
×
×
  • Create New...