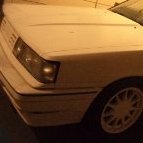
-==L=a=N=c=E==- Posted December 7, 2007 Share Posted December 7, 2007 (edited) Item: 1989 R32 Nissan Skyline GT-R Location: Brisbane Southside Website: Performance Forums, BoostCruising, Nissan Silvia, Skylines Australia, Carsales Item Condition: good Price and Payment Conditions: $16,000 with RWC or $15,500 AS IS Extra Info: Car itself is a 1989 Nissan Skyline GT-R I am the 2nd Australian owner. Colour is white (must of had respray in japan, as engine bay is black) Car has 143XXX kilometers on the tacho Fitted with R33 RB26 Engine, KM's unknown, have compression test from when i purchased it with 150 across the board (Engine number: RB260565XXA ) Aftermarket Oil Cooler and Relocation Kit remapped ecu (unknown, came with car) M's pod filters Trust 3" Exhaust front pipe to back (quiet) M's boost controller at 1Bar Omori Boost Gauge (fitted where stock gauge used to be) Sony MP3 head unit (not pioneer as pictured) R33 GTR Wheels Aftermarket Brake Pads and Rotors Genuine N1 Bodykit (front vents, front bonnet lip, sideskirts, missing rear lip spoiler) N1 fibreglass copy rear bootlip spoiler Trust rear pods Aftermarket steering wheel MOMO Shifter Turbo Timer Lowered Springs (brand unknown) HICAS Lockbar (still have original hicas gear if wanted with car) Heavyduty Clutch Splitfire Coils Seat Covers Recently serviced with new oil and sparkplugs Has rego until Feb.2008 I may be possibly interested in a cheaper car as a run-around, but would much prefer cash in hand. Contact Details: Via PM for more details Pictures: Edited January 24, 2008 by -==L=a=N=c=E==- Link to comment https://www.sau.com.au/forums/topic/196694-bne-1989-r32-skyline-gt-r-with-mods/ Share on other sites More sharing options...
-==L=a=N=c=E==- Posted January 7, 2008 Author Share Posted January 7, 2008 Misfire fixed with replacement of splitfire coils, ignitor and CAS. A/C fixed with replacement of magnetic clutch engagement coil. Car also now comes with Fibreglass N1 rear boot wing painted and fitted. Price now at $18k negotiable. Link to comment https://www.sau.com.au/forums/topic/196694-bne-1989-r32-skyline-gt-r-with-mods/#findComment-3567251 Share on other sites More sharing options...
-==L=a=N=c=E==- Posted January 8, 2008 Author Share Posted January 8, 2008 Appears the market for GTR's has had the guts fall out of it. As such, i've readjusted the price to suit. $17k firm Link to comment https://www.sau.com.au/forums/topic/196694-bne-1989-r32-skyline-gt-r-with-mods/#findComment-3569070 Share on other sites More sharing options...
-==L=a=N=c=E==- Posted January 10, 2008 Author Share Posted January 10, 2008 3 day bump Link to comment https://www.sau.com.au/forums/topic/196694-bne-1989-r32-skyline-gt-r-with-mods/#findComment-3575321 Share on other sites More sharing options...
R1Titan Posted January 11, 2008 Share Posted January 11, 2008 Nice GTR...u willing to drive to Melb? Link to comment https://www.sau.com.au/forums/topic/196694-bne-1989-r32-skyline-gt-r-with-mods/#findComment-3575889 Share on other sites More sharing options...
-==L=a=N=c=E==- Posted January 11, 2008 Author Share Posted January 11, 2008 Nice GTR...u willing to drive to Melb? still thinking about it... waiting on a few interested parties up here. Link to comment https://www.sau.com.au/forums/topic/196694-bne-1989-r32-skyline-gt-r-with-mods/#findComment-3575891 Share on other sites More sharing options...
rb30gtr Posted January 11, 2008 Share Posted January 11, 2008 Free bump, Market hurts at the moment, I feel your pain. Link to comment https://www.sau.com.au/forums/topic/196694-bne-1989-r32-skyline-gt-r-with-mods/#findComment-3576192 Share on other sites More sharing options...
-==L=a=N=c=E==- Posted January 11, 2008 Author Share Posted January 11, 2008 Free bump, Market hurts at the moment, I feel your pain. Fact of the matter, if we want a really quick sale, i'd have to take $15k. There's a loss and a half. Trade in, the max i've been offered is around $16,500. Might be an option. Link to comment https://www.sau.com.au/forums/topic/196694-bne-1989-r32-skyline-gt-r-with-mods/#findComment-3576197 Share on other sites More sharing options...
-==L=a=N=c=E==- Posted January 12, 2008 Author Share Posted January 12, 2008 new pictures updated in first post Link to comment https://www.sau.com.au/forums/topic/196694-bne-1989-r32-skyline-gt-r-with-mods/#findComment-3577971 Share on other sites More sharing options...
-==L=a=N=c=E==- Posted January 14, 2008 Author Share Posted January 14, 2008 price drop $16,500 ono Link to comment https://www.sau.com.au/forums/topic/196694-bne-1989-r32-skyline-gt-r-with-mods/#findComment-3582079 Share on other sites More sharing options...
GTRBOS Posted January 15, 2008 Share Posted January 15, 2008 pretty nice gtr bro, gl wid da sale Link to comment https://www.sau.com.au/forums/topic/196694-bne-1989-r32-skyline-gt-r-with-mods/#findComment-3582339 Share on other sites More sharing options...
-==L=a=N=c=E==- Posted January 17, 2008 Author Share Posted January 17, 2008 pretty nice gtr bro, gl wid da sale thanks mate, be sad to see her go Link to comment https://www.sau.com.au/forums/topic/196694-bne-1989-r32-skyline-gt-r-with-mods/#findComment-3586724 Share on other sites More sharing options...
GTRBOS Posted January 20, 2008 Share Posted January 20, 2008 thanks mate, be sad to see her go bet ya would, gtr is the way to go Link to comment https://www.sau.com.au/forums/topic/196694-bne-1989-r32-skyline-gt-r-with-mods/#findComment-3592306 Share on other sites More sharing options...
-==L=a=N=c=E==- Posted January 23, 2008 Author Share Posted January 23, 2008 3 day bump Link to comment https://www.sau.com.au/forums/topic/196694-bne-1989-r32-skyline-gt-r-with-mods/#findComment-3600324 Share on other sites More sharing options...
-==L=a=N=c=E==- Posted January 24, 2008 Author Share Posted January 24, 2008 price drop $16,000 with rwc or $15,500 as is (needs rear tires for rego) Link to comment https://www.sau.com.au/forums/topic/196694-bne-1989-r32-skyline-gt-r-with-mods/#findComment-3601032 Share on other sites More sharing options...
Inline 6 Posted January 24, 2008 Share Posted January 24, 2008 hey just thought id mention that all 32 gtr's have black engine bays standard it does not neccesarily mean its been resprayed. theres a vin number checker thing someone on the skyline page ya can search ya number and they'll tell you what colour it came out the factory with Link to comment https://www.sau.com.au/forums/topic/196694-bne-1989-r32-skyline-gt-r-with-mods/#findComment-3601321 Share on other sites More sharing options...
-==L=a=N=c=E==- Posted January 24, 2008 Author Share Posted January 24, 2008 hey just thought id mention that all 32 gtr's have black engine bays standard it does not neccesarily mean its been resprayed.theres a vin number checker thing someone on the skyline page ya can search ya number and they'll tell you what colour it came out the factory with Yeah i did that when i bought the car, it was Gun Metal Grey as standard. Link to comment https://www.sau.com.au/forums/topic/196694-bne-1989-r32-skyline-gt-r-with-mods/#findComment-3601326 Share on other sites More sharing options...
djr81 Posted January 24, 2008 Share Posted January 24, 2008 hey just thought id mention that all 32 gtr's have black engine bays standard it does not neccesarily mean its been resprayed.theres a vin number checker thing someone on the skyline page ya can search ya number and they'll tell you what colour it came out the factory with No GT-R built in 1989 was white. So it has been repainted. Not that there is anything wrong with that. If the engine bay is dark grey it was almost certainly a dark grey car. Most white GT-Rs from the factory have a white engine bay. Mine does. Link to comment https://www.sau.com.au/forums/topic/196694-bne-1989-r32-skyline-gt-r-with-mods/#findComment-3601341 Share on other sites More sharing options...
tuyen Posted January 26, 2008 Share Posted January 26, 2008 im keen, just in middle of selling my car at the moment. if car still available in a week or two, should be able to sort something out. thanks, Tuyen Link to comment https://www.sau.com.au/forums/topic/196694-bne-1989-r32-skyline-gt-r-with-mods/#findComment-3604859 Share on other sites More sharing options...
-==L=a=N=c=E==- Posted January 26, 2008 Author Share Posted January 26, 2008 no worries. its basically whoever gets to it first. Got another guy who looked at the car yesturday, and his waiting to sell his, so just a matter of time. Link to comment https://www.sau.com.au/forums/topic/196694-bne-1989-r32-skyline-gt-r-with-mods/#findComment-3604978 Share on other sites More sharing options...


Recommended Posts
Create an account or sign in to comment
You need to be a member in order to leave a comment
Create an account
Sign up for a new account in our community. It's easy!
Register a new accountSign in
Already have an account? Sign in here.
Sign In Now