
Announcements
-
Similar Content
-
Latest Posts
-
 Yeah, I still dunno. The size of the sock should only matter if it is blocked. It is, after all, a filter rather than a "thing to encourage fuel pickup". He has modded the original so that it is now down on the floor, so it's not physically the same as in the original complaint, yet does the same thing. I therefore lean to the problem being somewhere else. Sticking some dynomat on there is a worthwhile experiment, but I'd put $10 on it not fixing the problem.
 -
 I don't remember hearing it before the coolant and bonnet escapade. I wonder if a couple of pulleys being filled with hot coolant was not to their liking?
 -
1.thumb.png.36afd656b26d55f5d425fc76e21561f2.png)
By DraftySquash · Posted
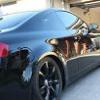
Took her down to be the wedding car ❤️ and I love the people’s advice 😂 -
 If you are going the simple route, this is all you need to do on the draining side. Just keep in mind that you are only replacing 30% of the fluid with each "spill and fill" - 3 litres in and the workshop manual says system capacity is 10 litres, and it recommends doing it 3 times. I can't do maths but chatgpt tells me it can, this is what % new fluid you have after each 3 litre flush: So you can see, you need 20 litres+ and 7 cycles if you want to get to 90%+ new fluid in the trans....slow and expensive!
 -
OK....now the mess starts. At the rear of the transmission is a 17mm drain plug. Put the oil pan under and remove the plug, you should get about 3 litres of fluid out (this is the pan capacity). I forgot to take a pic of the plug, so here is a marked up one I stole. Drain on the left (17mm) and fill on the right (in hex) I got about 3 litres from the drain plug, and even with 75,000klm (and 2 track days), it really looked like it needed a change.
-


1.thumb.png.36afd656b26d55f5d425fc76e21561f2.png)
Recommended Posts
Create an account or sign in to comment
You need to be a member in order to leave a comment
Create an account
Sign up for a new account in our community. It's easy!
Register a new accountSign in
Already have an account? Sign in here.
Sign In Now