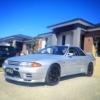
Jump to content
SAU Community

Recommended Posts

Hi Guys,

I am looking to purchase a R32 GTR with the list of mods below. The car was a ground up rebuild from a Nissan worker in japan in 2004 and is in amazing condition!!! The N1 engine has been verified and the pics I have seen, the car looks like it is in show room condition. I have been in Sydney for a 9 days and will be checking it out in person next week. But it is a has to be seen to be believed type of GTR, especially seeing the shell is a 1989 shell.

:: Engine ::

- Brand new R33 RB26DETT N1 Engine, only done around 28,000kms

- Brand new R34 N1 Twin Turbos, same mileage as new engine

- Greddy adjustable Cam Gears with clear cam gear cover (comes with original cover as well, see pic with extra parts)

- Sard 800cc Injectors

- HKS Drag Intercooler (600x300x100mm LxWxD, tube & fin design), 3 Inlet / Outlet

- Custom 3 Intercooler Piping

- Custom 3.5 mandrel Exhaust System from turbos to 4.5 rear muffler - amazingly subdued off boost but sounds great on full boost, very angry and tough. System is quiet easy on the ears as well with zero drone.

- Oil cooler with air guide and remote oil filter for easy replacement

- Oil Catch Can

- Twin Apexi Pod Filters

- Apexi Power FC ECU (tuned by Ben @ Racepace on 20psi = 320awkw )

:: Drive Train / Brakes ::

- Standard two piece drive shaft, LSD and 4WD system all very tight and strong never had any problems running current power for the last 3 years of ownership.

- Jim Berry Full Monty single plate carbonetic clutch, 3600lbs pressure plate matched to an R31 Fly Wheel beautiful clutch, never had it slip on me once with current power level and operates almost like a standard clutch in terms of pedal heaviness and driveability in traffic.

- VSpec 2 Brembo front callipers with Lockheed rotors and pads, standard rear callipers and rotors / pads pulls up exceptionally well, feels like your eyeballs will pop out and its still got more in it before the ABS even kicks in!

- Teflon braided brake lines

:: Suspension / Bracing / Wheels ::

- Tein Coilovers, adjustable stiffness and dampening

- 11 structural bracing bars:

--- 2 Front & Rear Strut Braces

--- 1 Interior Cabin Brace (per image)

--- 4 Front & Rear Guard Braces (1 under each guard running lengthwise)

--- 1 Brace underneath near rear of engine / front of gearbox

--- 1 Mid trans tunnel Brace connecting either side of the tunnel

--- 2 Rear subframe Braces (1 each side)

- Volk Racing CE28N 17x9 Forged Monoblock lightweight Wheels (includes VR Duraluminium wheel nuts and VR valve caps) wrapped in Bridgestone Potenza RE-01 255/40R17 Tyres.

This combination of stiffness and grip makes for a very flat and stable cornering attitude with great response from the tyres under braking, cornering and acceleration.

:: Exterior / Interior ::

- Lightweight fibreglass bonnet

- Aerocatch Bonnet Pins (lockable)

- N1 Side Skirts & Vents in front bar

- Momo Race Steering Wheel

- GTR carbon fibre Gear Knob

- Apexi EL2 Mechanical Boost Gauge

- Nismo 320kmph Speedometer

- Kenwood CD / MP3 head unit with what looks like standard speakers front & back (they do an alright job to provide some good music but this is not a DB comp. car - the music most of the time is the car itself )

- Fire extinguisher mounted to rear cabin brace

- Original Nissan GTR floor mats front & back with the original flare case in the front passengers foot well (flare removed)

- Original Nissan GTR front & rear seats in excellent, nearly as new condition - bolsters still all firm & solid, top of rear seats are not faded like nearly all other R32s are.

- All dash & trim in excellent condition with all accessories, gauges & lights fully functional - heater & aircon work as good as the day it rolled off the factory floor.

:: History ::

The car was originally gunmetal grey before the owner of it then in Japan did a ground up rebuild of the car in 2004. It was resprayed a metallic factory colour wine red but with lots of pearl and the engine bay was sprayed a stark white, maybe to show off the engine or to show up leaks and issues a lot easier, either way you always get asked the question when popping the bonnet did it use to be white. The only place you can still see the original colour is the rear strut towers.

This chap worked at Nissan in Japan and so had access to many new parts for the GTR and is why youll find a lot of the seals and small plastic parts are like new as well as a lot of engine bay components.

Basically from there he dropped in the new motor and turbos with most of the listed supporting mods, the only mods added in Australia were the injectors, adjustable cam gears and the boost gauge.

A bloke well known in the NDSOC (Nissan Datsun Sports Owner Club) association imported it for himself in 2005 and owned it for a little over a year, taking it to a few show n shines and concourse events. While in his possession he added the injectors and cam gears and had it tuned to about 270awkw @ 20psi.

The owner purchased it off of him in 2006 and had owned it for a little while before taking it down to Race Pace as it was getting some injector fuel blow byturned out the wrong O-rings had been used on installation by the previous owner and the injectors needed to be spaced out from the fuel rail a bit. Some new O-rings and some brass washers with rubber inner linings were used to space the injectors by about 2mm and make them seat properly in the head and the issue was resolved. While he was there he had Ben put it on the dyno for a new tune where it was found the CAS was faulty so a new one was installed and after a couple of hours on the dyno, he drove out with 322awkw (still on 20psi) and that was a safe tune. We worked out its about 520HP at the flywheel which Im happy with as its a bit under what an N1 engine is estimated to be cable of handling before needing internal upgrades and so have never pushed it any further. It seems a very streetable power level with the 4WD system and 255 rubber giving great grip and the R34 N1 turbos are very responsive, a combination that nails you to the seat.

Sorry about the lengthy report, this is what the owner sent me in an email.

Any thoughts would be appreciated.

Cheers

  • Replies 54
  • Created
  • Last Reply

Top Posters In This Topic

Yeh I have about 30 amazing pics the pwner has sent me, but I would prefer not to put them up until I am the owner.

Really is an amazing car, with paint work, engine bay and interior looking brand new :P

LoL hate to burst your bubble but this is probably the GTR his referring too http://www.aus300zx.com/forum/showthread.php?t=296017

Edited by DarkRyda

That is the car guys, it is amazing!! Looking to trade my M3 with this car, as the owner is looking to get into something more practical!

Hopefully will be able to put alot more pics and info of this car on here soon:)

I am asking a ball park figure that you think a car like this is worth? Do you think it is worth $35K in the current market??

Cheers

I'd suggest 22-24k.

Took me a while to sell my mint 32GTR for 24.5k with more mods than that (Also 1989). Mine also had 0 rust and no scratches anywhere, 8k kms on forged motor and 67k on shell.

Edited by Ten Four

Ten Four, Im hearing ya!! The owner sent me pics of underneath the car and it is so clean. R33 N1 engine and R34 N1 Turbos with 30,000kms on it as well as complete respray that looks like it was done yesterday. Got to see it in the flesh for sure to appreciate it, but I know the market for GTRs are pretty bad, and the M3 will stay exactly the same or increase over the next few years.

Dilemma!!!!! :)

i paid $20500 for my mint gtr, as good if not better than the one you have posted... and its a nismo edition, and its all the mods as well.

so 35k is a joke, if it was a vspec 2 with super low klms it mite come close to that kinda coin.

Create an account or sign in to comment

You need to be a member in order to leave a comment

Create an account

Sign up for a new account in our community. It's easy!

Register a new account

Sign in

Already have an account? Sign in here.

Sign In Now


  • Similar Content

  • Latest Posts

    • Next, remove the upper and lower radiator hoses, both are held with a spring clamp. While you are under there, tackle the Auto Trans cooler lines.  Again both are held on with spring clamps, and as mentioned above you should cap them on the radiator side with an 8mm cap, and on the car side loop them with a length of 8mm pipe - this will stop you losing a dangerous amount of AT fluid during the rest of the job If you've been meaning to add a sender for AT trans temp, this is a great time to do it; put a sender fitting into the passenger side line as that is the inlet to the cooler/radiator.
    • Next you need to remove the intake duct (as with pretty much every job on these cars), it is a series of clips you gently remove with a flat bladed screwdriver. They do get brittle with time and can break, and I have not found a decent quality aftermarket one that fits (they are all too soft or flimsy and don't last either) but the nissan ones are a couple of bucks each (ouch).  Once the clips are off (either 8 or 10, I didn't check) you lift the intake duct out and will see the reservoirs Undo the line into the radiator side cap (some bent needle nosed piers are awesome for spring clamps) and then remove the 4x 10m nuts that hold both in place.  I didn't get these pics, but remove the line under the radiator reservoir (spring clamp again) then remove that reservoir. Then you can get at the intake reservoir, same thing, spring clamp underneath then remove it. BTW This is a great time to put in a larger (+70%) combined reservoir that AMS makes..... https://www.amsperformance.com/product/q50-q60-red-alpha-coolant-expansion-tank/ They also make an Infiniti branded and part# version if that is your thing
    • To drain the Intake Heat Exchanger, there is a crappy drain plug in front of the driver's side front tyre: You should use the largest headed phillips screwdriver you had, and in my case I needed vice grips on the hose above as the plug was tight (tighter than it needed to be, since it has an o-ring seal).  After you have a tray down and open the drain, open the intake heat exchanger reservoir cap (drivers side one) and you should get a couple of litres of coolant To get to the radiator, you need to remove the plastic engine undertray. It is held on with a series of 10mm headed bolts and some clips. For the radiator, there is another type of crappy drain (kind of like a plastic banjo bolt) and you should attach a length of hose to direct the stream of coolant per this pic (otherwise the coolant hits the rad support and goes everywhere). The drain is on the rear of the radiator on the driver's side and a bit hard to find. Put a big tray or bucket down (5l won't be enough) and slowly unscrew the fitting by hand. You only want to remove it far enough for coolant to flow, it you unscrew it right out the whole fitting and direction pipe will come off and you will get a coolant bath (yum!). Undo the radiator reservoir cap and it should empty about 8l
    • So, this shouldn't be such a mission, but there were a few tricks so I thought I'd post up a DIY for it. This was on a Q50 Red Sport but I doubt any other V37 model is very different (maybe just less steps for the intake heat exchanger hoses) I pulled the radiator out to flush it because the car was running hot at the track, but obviously the same steps apply for changing a radiator for any reason including an upgrade. If you are removing the radiator, you of course need to drain and refill, so have 5+ litres of blue coolant ready. You also need to drain the intake heat exchanger to remove the radiator so you will need a couple of litres for that as well. You will also need something to deal with the auto transmission lines, I used 2x 8mm rubber caps on the radiator side, and a short length of 8mm pipe on the car side.....unless you can block these lines quickly you will loose AT fluid and it may be enough to hurt the transmission if you don't refill it. 2 other tools that really help dealing with coolant lines and spring clamps are Bent Needle Nose pliers Hose pliers Between them they will reduce the frustration (and injury) potential by about 1000% Other than that....lets go... "First, jack up your car". Yes really, and put it safely on stands. If you are not confident doing that you need to give this job to a mechanic
    • If the forester is anything like our old 2007 GTB Liberty, I could near on run ling Long's and "rate them", as no matter what, it just hung to the road, even when abusing it in a hard launch in the wet, or throwing it at corners.
×
×
  • Create New...