Jump to content
SAU Community

Recommended Posts

  • Replies 204
  • Created
  • Last Reply

Top Posters In This Topic

Car is still on pump fuel haha low boost 30psi would be asking for trouble. It didnt get near that sort of boost levels. Tim not interested in alternate fuels at this stage so going to hit a wall soon for safe power levels

i said 3Bar in relation to fuel pressure (3 bar is 43.5psi) as when quoting injector flows you should always quote the fuel pressure, Sards are rated at 800cc @ 3Bar fuel Pressure, I assumed that the GTR was runnung 3Bar fuel pressure as that is the normal operating pressure. i do not not know what the boost was or what the power is. I estimated power using a BSFC figure of .6 which is also the norm for an RBs on pump. It is possible if the engine is running AFRs in the low 10s it could run out of injectors at lower power levels than i estimated or maybe it was on E85, i know Nick loves that shit....not. :)

Edited by TheGotoGuy

There is a time and place to share results. And that time is when the owner is happy with the results.

A lot of time and effort goes into safely tuning a high power engine too. These are things not to be rushed, that is unless you happen to have endless bags of money to replace all the things you break along the way.

Guess im just weird, i have no trouble sharing specs and details and results good or bad when they are available.

I am transparent when it comes to builds, i don't really understand why Tim wont let Nick post some figures. It makes what it makes regardless, if it performed as expected great, if not then sharing info will lead to rectifying any problems faster.

Thats my view.

POWERPLAY STORYTIME.....

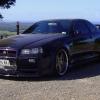
Friday morning the car was driven from Bundy to Brisbane (4 hours) for a decent alignment, tune and a powerplay thrashing. Car ran perfect whole way down.

Took the car into Accurate Supsension Services for it to be better setup for street/track. Reccommend them to anyone wanting a quality setup. Car handles so much better then before, tested it at QR threw it into a few corners at speed and stuck like glue, it used to have the tendency to go into understeer when quickly turned in. It also squirmed and walked under power and heavy braking. All that is now gone.

IMAG0227.jpg

Once that was done it was taken to Mark at Godzilla Motorsport for its long awaited tune. The plan was feed it as much boost until the fuel system wouldnt allow anymore. Early tuning resulted in some suprising figures on very low boost levels. Alot of attention was paid to cruise and transition from decel to accel tuning. Trying to make the car a nice car to drive not only just powerful.

The end result transformed the car, it can potter along in 5:30pm banked up highway traffic (as we found out) without a cough or hesitation. The fuel economy has improved largely too. Gotten 50klms so far more out of a tank along highway.

Trying to get ahold dyno sheet from Mark so can post up current power figure and delivery. Injector duty cycle started to get high (90+%) so Mark added some extra fuel pressure to compansate so a bit more. got a extra 40hp before 92% IDC was reached and stopped at that power and boost level....a bit short of the expected boost that was planned

Its not too bad off boost, ample enough power to cruise along road and climb hills without dropping down gears, like the old 2.7 required. Power comes on hard at 5400 and is suprisingly a flat linear curve all the way till 8500. Unsure of when power will drop off but we all agreed 8500 is enough to rev it at this stage.

BADSIDE is the big cam idle has dissappeared completely :( :( :(. Going to talk to Mark about getting that back. Sounds too cool to get rid off :).

POWERPLAY.

Woke up saturday morning to a car with only half a clutch pedal throw, a little bit of 530am hotel carpark spanner swinging got a full clutch back again. went to track and in process the clutch was giving dramas again. Checked it out in the staging lanes and found the clutch master cylinder had decided it was going to start leaking very slowly and bleed off. Was not going to get a cylider on weekend so just kept eye on fluid level and adjusted things as we went.

On track car performed faultless, Needed more power as always. won some races lost some too. all in fun.

Car made it back to bundy with only a small oil leak (suspected oil relocation adapter and the clutch master leaking) For its first proper outing its done awesome.

Tim is working out what to do with the car next, gearbox upgrade, fuel system, Ecu, but for now just going to drive it until feels slow again and the start chasing power

i said it before & i'll say it again - when i built my 26/30, i should have bolted a t51r on it (as advised by my tuner)

Cant go past the t51r proven and will always get the result, sounds so good on full boost too! What turbo did you end up going for??

This link is giving me serious headaches though, the want for this setup inside a street driven lightweight R32 GTR doing easy 10 second passes down the quater and then backing up on a circuit is so tempting!!

http://www.spoolimports.com/articles-1/rb34det-results

Create an account or sign in to comment

You need to be a member in order to leave a comment

Create an account

Sign up for a new account in our community. It's easy!

Register a new account

Sign in

Already have an account? Sign in here.

Sign In Now


  • Similar Content

  • Latest Posts

    • Did this end up working? Did you take some pictures?
    • And finally, the front lower mount. It was doubly weird. Firstly, the lower mount is held in with a bracket that has 3 bolts (it also acts as the steering lock stop), and then a nut on the shock lower mount itself. So, remove the 3x 14mm head bolts , then the 17mm nut that holds the shock in. From there, you can't actually remove the shock from the lower mount bolt (took me a while to work that out....) Sadly I don't have a pic of the other side, but the swaybar mounts to the same bolt that holds the shock in. You need to push that swaybar mount/bolt back so the shock can be pulled out past the lower control arm.  In this pic you can see the bolt partly pushed back, but it had to go further than that to release the shock. Once the shock is out, putting the new one in is "reverse of disassembly". Put the top of the shock through at least one hole and put a nut on loosely to hold it in place. Put the lower end in place and push the swaybar mount / shock bolt back in place, then loosely attach the other 2 top nuts. Bolt the bracket back in place with the 14mm head bolts and finally put the nut onto the lower bolt. Done....you have new suspension on your v37!
    • And now to the front.  No pics of the 3 nuts holding the front struts on, they are easy to spot. Undo 2 and leave the closest one on loosely. Underneath we have to deal with the wiring again, but this time its worse because the plug is behind the guard liner. You'll have to decide how much of the guard liner to remove, I undid the lower liner's top, inside and lower clips, but didn't pull it full off the guard. Same issue undoing the plug as at the rear, you need to firmly push the release clip from below while equally firmly gripping the plug body and pulling it out of  the socket. I used my fancy electrical disconnect pliers to get in there There is also one clip for the wiring, unlike at the rear I could not get behind it so just had to lever it up and out.....not in great condition to re-use in future.
    • Onto the rear lower shock mount. It's worth starting with a decent degrease to remove 10+ years of road grime, and perhaps also spray a penetrating oil on the shock lower nut. Don't forget to include the shock wiring and plug in the clean.... Deal with the wiring first; you need to release 2 clips where the wiring goes into the bracket (use long nose pliers behind the bracket to compress the clip so you can reuse it), and the rubber mount slides out, then release the plug.  I found it very hard to unplug, from underneath you can compress the tab with a screwdriver or similar, and gently but firmly pull the plug out of the socket (regular pliers may help but don't put too much pressure on the plastic. The lower mount is straightforward, 17mm nut and you can pull the shock out. As I wasn't putting a standard shock back in, I gave the car side wiring socket a generous gob of dialectric grease to keep crap out in the future. Putting the new shock in is straightforward, feed it into at least 1 of the bolt holes at the top and reach around to put a nut on it to hold it up. Then put on the other 2 top nuts loosely and put the shock onto the lower mounting bolt (you may need to lift the hub a little if the new shock is shorter). Tighten the lower nut and 3 upper nuts and you are done. In my case the BC Racing shocks came assembled for the fronts, but the rears needed to re-use the factory strut tops. For that you need spring compressors to take the pressure off the top nut (they are compressed enough when the spring can move between the top and bottom spring seats. Then a 17mm ring spanner to undo the nut while using an 8mm open spanner to stop the shaft turning (or, if you are really lucky you might get it off with a rattle gun).
    • You will now be able to lift the parcel shelf trim enough to get to the shock cover bolts; if you need to full remove the parcel shelf trim for some reason you also remove the escutcheons around the rear seat release and you will have to unplug the high stop light wiring from the boot. Next up is removal of the bracket; 6 nuts and a bolt Good news, you've finally got to the strut top! Remove the dust cover and the 3 shock mount nuts (perhaps leave 1 on lightly for now....) Same on the other side, but easier now you've done it all before
×
×
  • Create New...