Jump to content
SAU Community

Recommended Posts

Nismo Plenum Group Buy #2

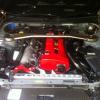
Following Sinista32’s successful Nismo plenum GB last year, I’ve decided I would start another for those that missed out.

Time frame: Group buy run’s from now until the 14th April. This end date is subject to change

Price: TBC closer to the closing date due to fluctuations in the exchange rate – estimated to be ~$1650 delivered. A quick Google will tell you this is a very good price.

Supplier: TBC shortly

No of people: 5 is the magic number

Details of the Plenum:

~ Nismo plenum as discussed on SAU. If you have a comment or technical question, put it in that thread please.

- Group buy #1 – info from the first GB plus results

- Nismo information – from this link. (It's the sales speak)

FEATURES:
To find the most suitable shape for tuning engines (400ps to 600ps), the diameter and the length of the intake pipe, and the cross section shape of the intake collector was redesigned. The distribution of air to each tube was improved to provide more equal airflow volume, improving torque in the mid-speed range. Improved air intake volume between the pipes of the front and rear sides reduces the difference in air intake temperature on both sides of the turbine, optimizing the air-fuel ratio and ignition timing and providing increased output and fuel consumption. Simple bolt-on installation means that no additional work is required (however, the throttle linkage and throttle sensor must be adjusted).

SPECIFICATIONS:
- Collector volume: 4.1 liter (genuine = 3.4 liter)
- Intake pipe length: 73.8mm (genuine = 48.5mm)
- Intake pipe diameter: tapered from ø 43 to ø 45 (genuine = ø 45)
- Material, production method: cast aluminum

PRODUCT NOTES:
- Intake temperature difference at the entrance of turbo chargers is improved averaging 18% in 2,400 to 7,600 rpm range.
- At 4,800 to 7,600 rpm, power output is increased by an average of 1.8%, while fuel economy is improved averaging 0.4%.
- This product cannot be installed with the engine mounted.
- Installation of this product will change the characteristics of the engine, necessitating adjustment of the engine control unit. Failure to do so very likely will result in damage to the engine.
- The engine improvement figures shown above are based on internal company testing. The actual level of improvement will depend on the engine specifications, conditions of air-fuel mixture and ignition timing, weather and the precision of measurement.
- This product cannot be used with single, large-diameter throttle chambers.

So who's keen?


Cheers,

Joel

Image1.jpg

Edited by wedge_r34gtr
Link to comment
https://www.sau.com.au/forums/topic/421901-nismo-rb26-plenum-group-buy-2/
Share on other sites

I might be keen, need to find out if this plenum fits in a vl

I assume it should...the stock rb26 fit's ok i beleive.

Never heard of someone putting a nismo plenum in a VL...nice and unqiue :-)

Hey man, will let you know tomorrow if i can jump in on this group buy..

This is an awesome price guys, wont find it any cheaper anywhere else an if you's are serious about your motor you'd have one of these hanging of the side of it!

Congrats guys. I don't think you'll regret it one bit.

...and it's cheaper than our GB.

yep, can't wait to get it. Final price ended up less then $1550 delivered.

So how many people did we end up getting for the GB?

3 of us

Ibz, yourself and me :-)

Create an account or sign in to comment

You need to be a member in order to leave a comment

Create an account

Sign up for a new account in our community. It's easy!

Register a new account

Sign in

Already have an account? Sign in here.

Sign In Now


  • Similar Content

  • Latest Posts

    • When I said "wiring diagram", I meant the car's wiring diagram. You need to understand how and when 12V appears on certain wires/terminals, when 0V is allowed to appear on certain wires/terminals (which is the difference between supply side switching, and earth side switching), for the way that the car is supposed to work without the immobiliser. Then you start looking for those voltages in the appropriate places at the appropriate times (ie, relay terminals, ECU terminals, fuel pump terminals, at different ignition switch positions, and at times such as "immediately after switching to ON" and "say, 5-10s after switching to ON". You will find that you are not getting what you need when and where you need it, and because you understand what you need and when, from working through the wiring diagram, you can then likely work out why you're not getting it. And that will lead you to the mess that has been made of the associated wires around the immobiliser. But seriously, there is no way that we will be able to find or lead you to the fault from here. You will have to do it at the car, because it will be something f**ked up, and there are a near infinite number of ways for it to be f**ked up. The wiring diagram will give you wire colours and pin numbers and so you can do continuity testing and voltage/time probing and start to work out what is right and what is wrong. I can only close my eyes and imagine a rat's nest of wiring under the dash. You can actually see and touch it.
    • So I found this: https://www.efihardware.com/temperature-sensor-voltage-calculator I didn't know what the pullup resistor is. So I thought if I used my table of known values I could estimate it by putting a value into the pullup resistor, and this should line up with the voltages I had measured. Eventually I got this table out of it by using 210ohms as the pullup resistor. 180C 0.232V - Predicted 175C 0.254V - Predicted 170C 0.278V - Predicted 165C 0.305V - Predicted 160C 0.336V - Predicted 155C 0.369V - Predicted 150C 0.407V - Predicted 145C 0.448V - Predicted 140C 0.494V - Predicted 135C 0.545V - Predicted 130C 0.603V - Predicted 125C 0.668V - Predicted 120C 0.740V - Predicted 115C 0.817V - Predicted 110C 0.914V - Predicted 105C 1.023V - Predicted 100C 1.15V 90C 1.42V - Predicted 85C 1.59V 80C 1.74V 75C 1.94V 70C 2.10V 65C 2.33V 60C 2.56V 58C 2.68V 57C 2.70V 56C 2.74V 55C 2.78V 54C 2.80V 50C 2.98V 49C 3.06V 47C 3.18V 45C 3.23V 43C 3.36V 40C 3.51V 37C 3.67V 35C 3.75V 30C 4.00V As before, the formula in HPTuners is here: https://www.hptuners.com/documentation/files/VCM-Scanner/Content/vcm_scanner/defining_a_transform.htm?Highlight=defining a transform Specifically: In my case I used 50C and 150C, given the sensor is supposedly for that. Input 1 = 2.98V Output 1 = 50C Input 2 = 0.407V Output 2 = 150C (0.407-2.98) / (150-50) -2.573/100 = -0.02573 2.98/-0.02573 + 47.045 = 50 So the corresponding formula should be: (Input / -0.02573) + 47.045 = Output.   If someone can confirm my math it'd be great. Supposedly you can pick any two pairs of the data to make this formula.
    • Well this shows me the fuel pump relay is inside the base of the drivers A Pillar, and goes into the main power wire, and it connects to the ignition. The alarm is.... in the base of the drivers A Pillar. The issue is that I'm not getting 12v to the pump at ignition which tells me that relay isn't being triggered. AVS told me the immobiliser should be open until the ignition is active. So once ignition is active, the immobiliser relay should be telling that fuel pump relay to close which completes the circuit. But I'm not getting voltage at the relay in the rear triggered by the ECU, which leaves me back at the same assumption that that relay was never connected into the immobiliser. This is what I'm trying to verify, that my assumption is the most likely scenario and I'll go back to the alarm tech yet again that he needs to fix his work.      Here is the alarms wiring diagram, so my assumption is IM3A, IM3B, or both, aren't connected or improper. But this is all sealed up, with black wiring, and loomed  
    • Ceste, jak se mas Marek...sorry I only have english keyboard. Are you a fan of Poland's greatest band ever?   
×
×
  • Create New...