Jump to content
SAU Community

Recommended Posts

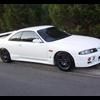
This is my R33 Skyline - Colloquially called Skylin (as i need to get the paint out for an E)

Rufflssky3.jpg

Now for the install (its not finished yet, but allmost!

The Parts:

install1.JPG

install2.JPG

Hokay, So here it begins (well the photos anyway) - the Sub Box - this isnt anything fancy - i just made it out of 18mm MDF to fit into the corner of the boot so that i could retain as much boot space as possible without removing the space saver:

install3.JPG

install4.JPG

So now for the install itself - the odds and ends out in the driveway:

install5.JPG

The Boot as it was pre install - as you can see theres not much room so we were trying to keep as MUCH space as possible, the origional plan was to put the amp beside the battery there and if you had a smaller amp it would be entirely possible but this chunky DD C4 Amp was way too wide for the gap (as you can see):

install6.JPG

We then decided to take care of all the power wiring. I swear i still have bruises on my hands from crimping these. (the RCA and remote wires were allready laid before the camera came out):

Fuse is a must

install7.JPG

Earth point - cant get much better than that:

install8.JPG

As you can see, we didnt need much power cabling in this lol gotta love 33's

install9.JPG

Power wiring all done:

install10.JPG

Time for a Trial Run before things get bolted down:

install11.JPG

Ok, Didnt blow up, Check!

Didnt start smoking, Check!

Pumped out some phat beatz, Check!

Time to put it all together.

and here u have it as it stands at the moment:

install12.JPG

install13.JPG

cdplaya.jpg

This still has a fair bit of work to go - including the speakers (which havnt arrived yet) but its looking good as it is, im also currently in the midle of creating a false perspex floor which will have a skyline feature in the centre!

let me know what you think :cheers:

-Ruffels

Link to comment
https://www.sau.com.au/forums/topic/75386-my-boot-install-in-progress/
Share on other sites

that looks awesome, i mounted my amp the same way in my old car.

i mounted the mdf piece just as you did,

for lordsnipe, its only held up by a bolt passed through the mdf board and secured with the bracket that holds the stock false wall in place as you can see in the pictures. it sort of sits there so not much need for extra support.

Awesome man, appreciate the pic of the distribution block and fuse....I have one of those type connectors and I never knew how to use it properly, now I do :)

I have a Rockford Fosgate 12" in a carpeted box, but it won't fir under the R32 parcel shelf :)

so I'm gunna buy 2 10" subs and get them installed in the back corners of the boot :D

grandmasterb ...lol yeah Axon (jack) did give me a hand with putting it in.. hes a champ

did a fair bit of it myself though... like the box and carpetting :cheers:

thanks for your coments guys... i'll post pics once its all finished

-Ruffels

  • 3 weeks later...

hey guys , i did a bit more work on the boot install today.. i remounted my amp and carpeted the wall

next is the perspex floor .... once i get that done i'll post another pic

sure its no prfessional boot install.. but from someone who has no idea what they are doing then it isnt too bad :)

-Ruffels

booootinstall.jpg

  TracidTrax said:
y do u want a perpex floor if u dont mind me asking?

i dunno... something different i spose lol

i dont have a lot of cash to do performance mods to the car as yet

so im just finding stupid fun stuff to keep me busy

-Ruffels

Create an account or sign in to comment

You need to be a member in order to leave a comment

Create an account

Sign up for a new account in our community. It's easy!

Register a new account

Sign in

Already have an account? Sign in here.

Sign In Now


  • Similar Content

  • Latest Posts

    • Welcome!  How long have you had it? And what colour is it?
    • "CAD" version 1.0 It will have a 15mm lip around the top for 6 × 5 or 6mm nutserts and fixtures (two on each of the three straight edges), and some pinch weld on any exposed edges, it has three mounting points, one of the power steering reservoir bolts, and two on the rad support, my 120mm hole saw will make short work of hole for the silicone joiner, with ample room for some pinch weld  I've also got enough Carbuilders "peel and stick" heat shield to cover the outside of it at the coolant expansion tank and on the engine side, as pictured, and internally on the lid and where the fuse box is, I've also got some thin, about 3mm, black 3M single sided sticky foam stuff that was left over after sealing some door drafts at home to help seal the lid As for the shape, it "sort of" matches the shape of the fuse box, so shouldn't look to "out of place" The lower area and hole for the intake will need pinch weld with a balloon on it to fully seal the hole and bottom of it, that will happen after it has been fabricated so I know exactly what size is required  Filter service has been trialed,  and so far it was a simple process  Just need to get some alloy, and then head into work to use the guillotine and break press in the workshop Hopefully it should be sorted in a week or two Guestimated outlay will be under a $50 for the stuff I don't have on hand (alloy, 6mm nutserts, the pinch weld, and wrinkle paint) Disclaimer: That's what the "voices in my head" are telling me how the filter box should end up getting done......lets see if they know what they are talking about  
    • Have been polishing up the trailer rims as they had been sitting in the shed for a few years and are really in need of some love. This was after a couple of passes with chrome polish - coming up quite well ✅ .
    • Welcome aboard! Is your Skyline auto or manual? I'm assuming manual. Does it have any mods done yet?
    • Hey mate, the brown and grey plugs would usually go to the TPS, brown one goes on the bottom connector and grey is the top but isn't used unless the car is auto, your TPS looks different to mine though I've got a series 2 engine.
×
×
  • Create New...