Jump to content
SAU Community

Sandown To Surf Cruise Wrap Up Thread


Recommended Posts

Well

What a day. About 380 kms .

We kicked off at Sandown at 8.30 and i was home by 4 pm.

The weather stayed good for us but it was still cold ish.

We ended up with 18 cars and headed up in to the hills and worked our way down some very nice twistie

roads going through towns such as Yarra Junction, Warragul, Korumburra,Wonthaggi, Cape paterson, in to Inverloch.

Were we took a hour out to stroll around and have some lunch.. We caught the eye of a local in a VL and yes he had a BLOWOFF valve

And he let us know more than once. :)

After lunch we headed back through Leongatha Korumburra and headed up through Bena to Poowong into Drouin and stopped at the Longwarry BP

To say thanks for coming and talk about the day.

I think it went well and as long as you all did thats the main thing..

Thank you all for coming and hope to see you all next time.. Keep eye open for THE BLACK SPUR run....

Post ya pics up if you have any.

Thanks

Wayne (RCHOO )

SAU-vic Events Co-Ordinator..

Wayne thanks heaps for an awesome day mate..

Had a complete BALL....

I haven't had my car our for over 6 weeks i think and that was an awesome reminder of how much fun that thing can be...

Some awesome roads and some wicked country side.

Was tops to catch up with everyone and thanks again to Wayne for all his efforts organising the cruise.

Big thanks to Al for the lend of the rims :( scrubbed out semis sux :)

big thanks to Wayne for the awesome drive. im keeping those notes for future reference. pics up in a bit. gotta edit and upload 2 parties and a cruise's worth

EDIT: damn some ppl were running rich as. had my windows down most of the time and now my clothes smell like petrol!!

pitty u didnt wait another 5min wayne, I missed you guys. I drove down to portsea instead.

Sorry about that Chris.

We thought by 9.15 all would be there.

Next time hey..

Hope you had a good drive anyway..

WOW!!

What an awesome cruise/day!!

Massive thanks goes to Wayne for the time and effort taken; that was clearly evident on the cruise and notes. I think it is the first time in SAU history that no-one took a wrong turn, got lost, did a u-turn, or drove on a gravel road; top effort mate, it is greatly appreciated, those notes were spot on. :cool:

Thanks Mav for letting me crash at your place, made both Saturday night and today all that more enjoyable and easier to manage.

It was great to see a few cars at this cruise, to my knowledge all made it safely and without any incident.

I had the most fun i have ever had in my car for a VERY long time. The car performed flawlessly and effortlessly all day. Big thanks to EAS for putting together a tough package. Today was the first real test it had since it has been on the road and i was pushing it to my limits in some places and it still had room to breathe. I am sure in time i will be more confident and be able to go even harder :) The tyres were my weakest link today and will be sorted in time.

Well i am definitely looking forward to the next cruise, but it's going to be hard work, matching the enjoyment had today.

THANKS AGAIN WAYNE :rofl:

Only 3.5hrs sleep and i am still awake off the buzz from todays cruise :yes:

Top cruise today guys.

Big thanks to Wayne for the perfect organisation, you did a great job, like Al said it was done very well, mapping etc.

The route was great, apart from a couple of stretches with terrible surfaces through the day, apparently i had sparks coming from underneath my car...(exhaust scraping the ground)

I have to say the Bass street or whatever it was was the BEST run for the day, after stopping at the servo for a top up with the white 180, we pushed it and caught up just coming into Drouin, and with no traffic it was NUTS!

Yeah a couple of cars running VERY rich...! :cool:

Thanks guys.. :cool:

As long as you all enjoyed it thats the main thing.

Im keen to know how our International guest from Canada liked it.. That would of been a bit different for her..

As for the next cruise im allready on to it so i will keep you posted..

There will be Pics up soon..

Cheers.

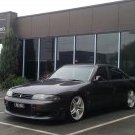
Thanks Wayne, it was an awesome day for my first official cruise and all. unfortunately i didn't get many good pics and without a passenger i could only get them when we slowed down but here's a few. can't wait for the next one, cheers!

post-44524-1222646159_thumb.jpg

post-44524-1222646172_thumb.jpg

post-44524-1222646295_thumb.jpg

post-44524-1222646305_thumb.jpg

Wayne you outdid yourself mate. One of the best cruises ive been on i reckon, directions were pinpoint perfect and even when we all got broken up in the begining due to the 100 or so red lights, we all found eachother. Top job :merli:

First time out with the XR and even though it was a pig to drive through some the twistys managed to keep up with you all. The "Fully Sik" pink VL with his super street dose pipe was a sight to see :laugh: and giggle for all of us.

As for our international canadian guest she really loved it. nothing like a girl that loves cars and enjoys a nice day out on the road. besides the cold winds she had a ball, and couldnt believe Australia was so beautiful. Forest to beach in 20 minutes she was amazed. Only sour note was her first kangaroo sighting was a dead one :laugh: which we inturn named 'RoadKill'

A great day out and thoroughly enjoyed.

Cheers

www.carbra.com.au

About $450 (i think/recall) custom made fitted perfectly. They measure for all cars even standard bras. You drop it off, go for a walk bunnings is just around the corner, enjoy a snag, walk back to get your car and in a few days or later that week they'll call you and say it's ready to be picked up.

Moving on, where's everybody's pics?? I've never actually seen my car wearing a bra before lol or in a cruise of any kind as this was my first one. love to see some pics please. oh and by the way if you guys were wondering what i was doing letting a few cars past now and then during the day it was because i was getting sick of following the same cars arse the whole time i needed some arse variety! :P

You need to wake up 15mins earlier Chris, pitty you were late mate, missed an awesome cruise.

My wife even came and wanted to get coffee which took ages, didn't expect anyone to be on time.

not a big deal anyway I spent some good time at my mates new place at Portsea who happened to be there, that was Sunday.

Create an account or sign in to comment

You need to be a member in order to leave a comment

Create an account

Sign up for a new account in our community. It's easy!

Register a new account

Sign in

Already have an account? Sign in here.

Sign In Now


  • Similar Content

  • Latest Posts

    • Did this end up working? Did you take some pictures?
    • And finally, the front lower mount. It was doubly weird. Firstly, the lower mount is held in with a bracket that has 3 bolts (it also acts as the steering lock stop), and then a nut on the shock lower mount itself. So, remove the 3x 14mm head bolts , then the 17mm nut that holds the shock in. From there, you can't actually remove the shock from the lower mount bolt (took me a while to work that out....) Sadly I don't have a pic of the other side, but the swaybar mounts to the same bolt that holds the shock in. You need to push that swaybar mount/bolt back so the shock can be pulled out past the lower control arm.  In this pic you can see the bolt partly pushed back, but it had to go further than that to release the shock. Once the shock is out, putting the new one in is "reverse of disassembly". Put the top of the shock through at least one hole and put a nut on loosely to hold it in place. Put the lower end in place and push the swaybar mount / shock bolt back in place, then loosely attach the other 2 top nuts. Bolt the bracket back in place with the 14mm head bolts and finally put the nut onto the lower bolt. Done....you have new suspension on your v37!
    • And now to the front.  No pics of the 3 nuts holding the front struts on, they are easy to spot. Undo 2 and leave the closest one on loosely. Underneath we have to deal with the wiring again, but this time its worse because the plug is behind the guard liner. You'll have to decide how much of the guard liner to remove, I undid the lower liner's top, inside and lower clips, but didn't pull it full off the guard. Same issue undoing the plug as at the rear, you need to firmly push the release clip from below while equally firmly gripping the plug body and pulling it out of  the socket. I used my fancy electrical disconnect pliers to get in there There is also one clip for the wiring, unlike at the rear I could not get behind it so just had to lever it up and out.....not in great condition to re-use in future.
    • Onto the rear lower shock mount. It's worth starting with a decent degrease to remove 10+ years of road grime, and perhaps also spray a penetrating oil on the shock lower nut. Don't forget to include the shock wiring and plug in the clean.... Deal with the wiring first; you need to release 2 clips where the wiring goes into the bracket (use long nose pliers behind the bracket to compress the clip so you can reuse it), and the rubber mount slides out, then release the plug.  I found it very hard to unplug, from underneath you can compress the tab with a screwdriver or similar, and gently but firmly pull the plug out of the socket (regular pliers may help but don't put too much pressure on the plastic. The lower mount is straightforward, 17mm nut and you can pull the shock out. As I wasn't putting a standard shock back in, I gave the car side wiring socket a generous gob of dialectric grease to keep crap out in the future. Putting the new shock in is straightforward, feed it into at least 1 of the bolt holes at the top and reach around to put a nut on it to hold it up. Then put on the other 2 top nuts loosely and put the shock onto the lower mounting bolt (you may need to lift the hub a little if the new shock is shorter). Tighten the lower nut and 3 upper nuts and you are done. In my case the BC Racing shocks came assembled for the fronts, but the rears needed to re-use the factory strut tops. For that you need spring compressors to take the pressure off the top nut (they are compressed enough when the spring can move between the top and bottom spring seats. Then a 17mm ring spanner to undo the nut while using an 8mm open spanner to stop the shaft turning (or, if you are really lucky you might get it off with a rattle gun).
    • You will now be able to lift the parcel shelf trim enough to get to the shock cover bolts; if you need to full remove the parcel shelf trim for some reason you also remove the escutcheons around the rear seat release and you will have to unplug the high stop light wiring from the boot. Next up is removal of the bracket; 6 nuts and a bolt Good news, you've finally got to the strut top! Remove the dust cover and the 3 shock mount nuts (perhaps leave 1 on lightly for now....) Same on the other side, but easier now you've done it all before
×
×
  • Create New...