Jump to content
SAU Community

Recommended Posts

Yep that's right, a massive branch dropped off a gumtree on to my car whilst it was parked at work. Only half an hour after I was asked to move it so the dump truck could get to a skip!!

No wind, no rain, the branch was healthy and not rotten. IT JUST DROPPED OFF!!! :thumbsup:

28102009161.jpg

28102009159.jpg

28102009157.jpg

The bonnet is f#*ked, the roof has two big dents in it, the front bar and grill are a little loose and the whole car is scratched but as far as I can tell that's the extent of it :P . All the glass is in tact. But I'm worried there is more damage, it looks straight but how can I tell if the chassis has been slightly bent or something?.

It's basically going to have to be a full respray once th panels are straight.

Fortunately it's all covered by insurance and they're coming to pick it up tommorow. Hopeflly it can all be fixed and there won't be any unseen problems left.

Insurance say that I can choose a repairer to get a quote from and they will compare with there own repairer. can anyone reccomend someone in Brizzy?

............dammit............

Link to comment
https://www.sau.com.au/forums/topic/293976-can-you-believe-my-luck/
Share on other sites

P and M motor body repairs in gordan street cleveland. They have done some great jobs in the past. Ill be getting my car resprayed there in a few months time. Or you could try JP's body shop which is up the road a bit. Also great work, great guy and knows his shit, brutally honest. Unfortunately he costs an arm and a leg.

Really sucks to hear about your car.

Does that mean no excess as you can identify the at fault tree.....LOL

Ha! Well they said no excess if they can prove neglegence by the property owner for not chopping the branch down earlier. But highly unlikely as the branch was seemingly healthy.

P and M motor body repairs in gordan street cleveland. They have done some great jobs in the past. Ill be getting my car resprayed there in a few months time. Or you could try JP's body shop which is up the road a bit. Also great work, great guy and knows his shit, brutally honest. Unfortunately he costs an arm and a leg.

Cool, cheers mate.

son of a bitch! . . .i had a actual house door fly into the side of my Stagea. not much damage just scuffed and scratched the paint, being pearl white i got a nice quote for work to fork out for, have to match the panel's.

I feel for ya dude :(

Looks like your baby will be ok though with a bit of tenderness.

The same thing happened in Camberwell, Vic. 2-3 days ago on reserve rd/burke near the council offices/tennis courts.

Tree branch is still sitting there (pick up your act boorondara council!).

Fell on a corolla or something, not that i care about the car, but felt for the owner...looked like the rear left quarter panel had taken a hit from biiiiiiiig baseball bat.

I've been parking away from the trees since the weather has got warmer in recent weeks/month fearing the they may fall on the Stag. Im assuming, due to lack of water over last couple years (global warming etc..) im sure the trees in any state/country are dry, less flexible and prone to snapping.

Nearly had a whole big f....k off tree fall on me April last year during the bad storms, also in Camberwell, the park opposite tandoori den. 50-100m from the corolla incident. Glad I wasn't 5-10 seconds earlier!

Did you buy gold lotto after that? Really bad luck mate. But at least you've got insurance.

Now there's another reason why I should park the car below a tree other than falling leaves/ bird shit and tree sap. =x

Ha! Well they said no excess if they can prove neglegence by the property owner for not chopping the branch down earlier. But highly unlikely as the branch was seemingly healthy.

Seems odd that the branch fell with no wind, could not have been that health if it just fell.

Have you got a photo of the branch that fell, where it split from the tree trunk, branch and tree. That will show there was any rot or if it had split prior.

Good luck.

Cheers

Andy

Yep that's right, a massive branch dropped off a gumtree on to my car whilst it was parked at work.

............dammit............

I hear ya brother!

I had a large tree branch fall and break over the roof of my Stag last year.

left 2 dents in the roof and big scratch marks from the roof all the way down to the grill where some of it resided.

I could pop one of the dents out and the scratch marks (mostly) came out after a few goes of Maguires scratch remover.

Bastard thing to have happen. You've got my sympathy.

Seems odd that the branch fell with no wind, could not have been that health if it just fell.

Have you got a photo of the branch that fell, where it split from the tree trunk, branch and tree. That will show there was any rot or if it had split prior.

Yeah it didnt look rotten or split at all, no dead leaves or anything either. But probly a good idea to take a photo just incase they can use it as evidence I guess.

I think as Stagea_Neo said, it's the time of year and the weather. Apparently gum trees are notorious for dropping branches at the start of summer if they havn't had enough water. So I'm told now anyway :)

Won't be parking under a tree any time soon.

Thanks for the comments guys.

Cheers,

Dave-

Hey that sucks..... but on the positive side, it could have been the thick end of a branch!

Make sure that you go to a really good painter, and try to get the whole car blown over.

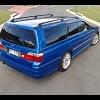
Bayside Blue is a bugger of a colour to match (grey base, colour and clear). I had a quarter panel re-done. It looks fine in sunlight, but under certain street lamps looks a slightly different shade.

Not as bad as some other colour matching I have seen though.

If your repairer wants / needs to use 2nd hand parts, make sure that they soda blast them.

If using new, a bonnet will take about 4 weeks to get!! So prepare for a long time in another car.

You have my sympathy.... another score for full comp insurance though.

Make sure that you go to a really good painter, and try to get the whole car blown over.

Bayside Blue is a bugger of a colour to match (grey base, colour and clear).

If your repairer wants / needs to use 2nd hand parts, make sure that they soda blast them.

If using new, a bonnet will take about 4 weeks to get!! So prepare for a long time in another car.

You have my sympathy.... another score for full comp insurance though.

Yeah I was wondering about panels, but I thought it would depend on who was doing it. That's really the only thing I'm worried about, is how well the repairer is going to do the job. Especially with the roof. I think I will be in as much contact with them as possible, to make sure I know exactly whats happeneing with it.

Cheers,

Dave-

Create an account or sign in to comment

You need to be a member in order to leave a comment

Create an account

Sign up for a new account in our community. It's easy!

Register a new account

Sign in

Already have an account? Sign in here.

Sign In Now


  • Similar Content

  • Latest Posts

    • Did this end up working? Did you take some pictures?
    • And finally, the front lower mount. It was doubly weird. Firstly, the lower mount is held in with a bracket that has 3 bolts (it also acts as the steering lock stop), and then a nut on the shock lower mount itself. So, remove the 3x 14mm head bolts , then the 17mm nut that holds the shock in. From there, you can't actually remove the shock from the lower mount bolt (took me a while to work that out....) Sadly I don't have a pic of the other side, but the swaybar mounts to the same bolt that holds the shock in. You need to push that swaybar mount/bolt back so the shock can be pulled out past the lower control arm.  In this pic you can see the bolt partly pushed back, but it had to go further than that to release the shock. Once the shock is out, putting the new one in is "reverse of disassembly". Put the top of the shock through at least one hole and put a nut on loosely to hold it in place. Put the lower end in place and push the swaybar mount / shock bolt back in place, then loosely attach the other 2 top nuts. Bolt the bracket back in place with the 14mm head bolts and finally put the nut onto the lower bolt. Done....you have new suspension on your v37!
    • And now to the front.  No pics of the 3 nuts holding the front struts on, they are easy to spot. Undo 2 and leave the closest one on loosely. Underneath we have to deal with the wiring again, but this time its worse because the plug is behind the guard liner. You'll have to decide how much of the guard liner to remove, I undid the lower liner's top, inside and lower clips, but didn't pull it full off the guard. Same issue undoing the plug as at the rear, you need to firmly push the release clip from below while equally firmly gripping the plug body and pulling it out of  the socket. I used my fancy electrical disconnect pliers to get in there There is also one clip for the wiring, unlike at the rear I could not get behind it so just had to lever it up and out.....not in great condition to re-use in future.
    • Onto the rear lower shock mount. It's worth starting with a decent degrease to remove 10+ years of road grime, and perhaps also spray a penetrating oil on the shock lower nut. Don't forget to include the shock wiring and plug in the clean.... Deal with the wiring first; you need to release 2 clips where the wiring goes into the bracket (use long nose pliers behind the bracket to compress the clip so you can reuse it), and the rubber mount slides out, then release the plug.  I found it very hard to unplug, from underneath you can compress the tab with a screwdriver or similar, and gently but firmly pull the plug out of the socket (regular pliers may help but don't put too much pressure on the plastic. The lower mount is straightforward, 17mm nut and you can pull the shock out. As I wasn't putting a standard shock back in, I gave the car side wiring socket a generous gob of dialectric grease to keep crap out in the future. Putting the new shock in is straightforward, feed it into at least 1 of the bolt holes at the top and reach around to put a nut on it to hold it up. Then put on the other 2 top nuts loosely and put the shock onto the lower mounting bolt (you may need to lift the hub a little if the new shock is shorter). Tighten the lower nut and 3 upper nuts and you are done. In my case the BC Racing shocks came assembled for the fronts, but the rears needed to re-use the factory strut tops. For that you need spring compressors to take the pressure off the top nut (they are compressed enough when the spring can move between the top and bottom spring seats. Then a 17mm ring spanner to undo the nut while using an 8mm open spanner to stop the shaft turning (or, if you are really lucky you might get it off with a rattle gun).
    • You will now be able to lift the parcel shelf trim enough to get to the shock cover bolts; if you need to full remove the parcel shelf trim for some reason you also remove the escutcheons around the rear seat release and you will have to unplug the high stop light wiring from the boot. Next up is removal of the bracket; 6 nuts and a bolt Good news, you've finally got to the strut top! Remove the dust cover and the 3 shock mount nuts (perhaps leave 1 on lightly for now....) Same on the other side, but easier now you've done it all before
×
×
  • Create New...