Jump to content
SAU Community

Recommended Posts

question for the engine builders and knowledgable..

just recently brought a GTR with built RB28, first time we put it on the dyno it split a wastegate hose and hit boost cut at over 30psi, now there is a tiny oil leak under the exhaust manifold between the head and block, been told its probibly stretched the head studs and we need to remove head to replace studs and get head checked etc etc

Excuse my ignorance for knowing f### all, but can't the head just be re-torqued ???? car still runs perfectly

If the above is needed, how would I expect to pay ?

Link to comment
https://www.sau.com.au/forums/topic/320996-stretch-head-studs/
Share on other sites

I'm no engine builder, but you'd want your head studs to be as top spec as possible. They're not THAT expensive, after all you don't want be cruising down the road and pop a head gasket, then have to fork out more to rip the head off, just cos you skimped out on the studs...

I say if they are in anyway damaged at all, replace them. Who knows, they might just need re-torquing, but i doubt it if the head has lifted enough to cause a leak. I'm surprised you didn't damage the bottom end at all, if boost was that high, how didn't you get heaps of detonation and end up with killed pistons?

Sorry to answer a question with a question, but why wasn't the boost monitored? i.e. surely the tuner saw that the boost was increasing out of sight, why didn't he stop the run when boost was spiking out of control?

Excuse my ignorance for knowing f### all,

Don't apologize man! That's what this forum's about!

just got off the phone from the workshop, after a more thorough inspection they are leaning towards a wrongly machined block or head , slightly to much removed on the outside of the oil gallery that feeds the head....only the smallest leak atm, not to many options with this one, not far off a full rebuild, pretty piss poor, engine has done less than 5000km and cost the previous owner over $50k

we're going to try chemi-weld or something similar as a patch, ( because I only just bought the car and can't afford a rebuild straight away :)

very pissed off

What turbo/s?

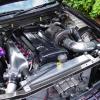
HKS step2 2.8 stroker, full counter crank and rods kit, CP pistons.

Brand new head from Nissan, Jun 272 in and ex cams, 10.8mm(?) lift, special retainers and all the jazz needed to support the cams and high revs, heads extensively ported.

Big dollar hypertune plenum and single throttle body setup

Custom alloy breather tank etc

Jun oil pump, N1 water pump, cant recall the brand of balancer, but its a good one.

Trust sump extension.

Turbonetics GTK-850 turbo and big Turbonetics external gate

What head gasket, MLS or copper ?...i have seen copper head gaskets needing a re-torque.

You shouldnt see this normally with a good mls though.

I'm not sure, I'll be ring the mechanic who built it tomorrow, I would think judging by the rest of the build, it would be a good one, doesn't appear to have skimped anywhere else..

The whole thing souds like a bit of a crock from the info you have provided.

Not from you personally but from the 'workshop'.

Stands out like dogs nuts...can't understand why the king of RB engineering ^ didn't pick it up instantly.

I build these engines all the time and i have a fair idea what has happened. Was it built locally?

Edited by Swiper the Fox
The whole thing souds like a bit of a crock from the info you have provided.

Not from you personally but from the 'workshop'.

Stands out like dogs nuts...can't understand why the king of RB engineering ^ didn't pick it up instantly.

I build these engines all the time and i have a fair idea what has happened. Was it built locally?

it was built in adelaide , I'm in perth..

please elaborate on whats happened

it was built in adelaide , I'm in perth..

please elaborate on whats happened

Ok..for a start there are NO oil feeds to the head on the exhaust side of the engine...so that statement they made to you is incorrect.

It was built using a fastner when correctly installed that can generate a maximum clamping force of 220,000psi under operating conditions below its yield strength.

The engine only saw 30psi of boost!...stretching a 12mm main stud takes a bit more than that.

My guess is one of these...incorrectly installed stud...probably bottomed out or incorrectly torqued , poorly cleaned head that has leaked oil onto the head gasket during installation compromising the seal or the block is split around the turbo oil feed.

thanks for your help..althou none of those options sound good ..

cheers

thanks for your help..althou none of those options sound good ..

cheers

just something to compare...i knocked up an engine from mostly used parts for my wife so she had a decent engine to race at the drags. It had 2nd hand Nissan head bolts and stock head gasket...

It was thrashed for over 3 years and won about a dozen trophys and made 465+awkw at around 35psi of boost!

Id never recommend anyone ever actually do this but it goes to show it not the sum of the parts used...its how they are put together that really counts the most.

boy aint that the truth

Create an account or sign in to comment

You need to be a member in order to leave a comment

Create an account

Sign up for a new account in our community. It's easy!

Register a new account

Sign in

Already have an account? Sign in here.

Sign In Now


  • Similar Content

  • Latest Posts

    • Hi, is the HKS  Tower Bar still available ? negotiable ? 🤔
    • From there, it is really just test and assemble. Plug the adapter cables from the unit into the back of the screen, then the other side to the car harness. Don't forget all the other plugs too! Run the cables behind the unit and screw it back into place (4 screws) and you should now have 3 cables to run from the top screen to the android unit. I ran them along the DS of the other AV units in the gap between their backets and the console, and used some corrugated tubing on the sharp edges of the bracket so the wires were safe. Plug the centre console and lower screen in temporarily and turn the car to ACC, the AV should fire up as normal. Hold the back button for 3 sec and Android should appear on the top screen. You need to set the input to Aux for audio (more on that later). I put the unit under the AC duct in the centre console, with the wifi antenna on top of the AC duct near the shifter, the bluetooth antenna on the AC duct under the centre console The GPS unit on top of the DS to AC duct; they all seem to work OK there are are out of the way. Neat cable routing is a pain. For the drive recorder I mounted it near the rear view mirror and run the cable in the headlining, across the a pillar and then down the inside of the a pillar seal to the DS lower dash. From there it goes across and to one USB input for the unit. The second USB input is attached to the ECUtec OBD dongle and the 3rd goes to the USB bulkhead connected I added in the centre console. This is how the centre console looks "tidied" up Note I didn't install the provided speaker, didn't use the 2.5mm IPod in line or the piggyback loom for the Ipod or change any DIP switches; they seem to only be required if you need to use the Ipod input rather than the AUX input. That's it, install done, I'll follow up with a separate post on how the unit works, but in summary it retains all factory functions and inputs (so I still use my phone to the car for calls), reverse still works like factory etc.
    • Place the new daughterboard in the case and mount it using the 3 small black rivets provided, and reconnect the 3 factory ribbon cables to the new board Then, use the 3 piggyback cables from the daughterboard into the factory board on top (there are stand offs in the case to keep them apart. and remember to reconnect the antenna and rear cover fan wires. 1 screw to hold the motherboard in place. Before closing the case, make a hole in the sticker covering a hole in the case and run the cable for the android unit into the plug there. The video forgot this step, so did I, so will you probably. Then redo the 4 screws on back, 2 each top and bottom, 3 each side and put the 2 brackets back on.....all ready to go and not that tricky really.      
    • Onto the android unit. You need to remove the top screen because there is a daughterboard to put inside the case. Each side vent pops out from clips; start at the bottom and carefully remove upwards (use a trim remover tool to avoid breaking anything). Then the lower screen and controls come out, 4 screws, a couple of clips (including 3 flimsy ones at the top) and 3 plugs on the rear. Then the upper screen, 4 screws and a bunch of plugs and she is out. From there, remove the mounting brackets (2 screws each), 4 screws on the rear, 2 screws top and bottom and 3 screws holding in the small plates on each side. When you remove the back cover (tight fit), watch out for the power cable for the fan, I removed it so I could put the back aside. The mainboard is held in by 1 screw in the middle, 1 aerial at the top and 3 ribbon cables. If you've ever done any laptop stuff the ribbon cables are OK to work with, just pop up the retainer and they slide out. If you are not familiar just grab a 12 year old from an iphone factory, they will know how it works The case should now look like this:
    • Switching the console was tricky. First there were 6 screws to remove, and also the little adapter loom and its screws had to come out. Also don't forget to remove the 2 screws holding the central locking receiver. Then there are 4 clips on either side....these were very tight in this case and needed careful persuading with a long flat screw driver....some force required but not enough to break them...this was probably the fiddliest part of the whole job. In my case I needed both the wiring loom and the central locking receiver module to swap across to the new one. That was it for the console, so "assembly is the reverse of disassembly"
×
×
  • Create New...