
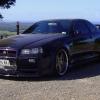
26/30 R34 Gtr **now With Results**
Announcements
-
Similar Content
-
-
Latest Posts
-
-
 Wow mate that's huge, congrats. Glad you found better people to deal with and all seems like it's going in the right direction.
 -
 The best setting for street is what gives the best tyres wear for your driving style Different tyres like different camber You want the whole surface of the tread to wear flat, if the inside of the tyre is wearing more than the outside reduce camber settings For toe, have the minimum amount to give the handling you want Caster, from my experience if you can adjust it, is as much as you can get without clearance issues And while -2.5° of camber on the front might work well with good tyres for "spirited" cornering, it may be too much for a street car Lots of front camber will effect braking Just like to much rear camber will effect rear traction (rwd), and braking When I set my Bogan Cruise Ship (VX SS) up for drags I tested how much tyre width I actually had in the rear by doing a hard launch (skid), it originally had -1.5° in the rear, and you could see that the tyre wasn't putting down alot of the tread, I maxed out the settings to get as little camber as I could with the OEM adjustment and some camber bushings and got it down to just under -0.5° with 0 toe, that gave me a fair bit more "rubber on the road" and helped it hook up for my 60' and my 0-100kph And with -1.5° in the front the big old boat handles fine on the street and my tyre wear is nice and even on both front and rear tyres (currently Hankook RS4's) As for semi slicks at the track, again, it depends on alot more IRT the suspension, the track and lots of other things, so, I'll leave that up to people who have more experience, especially with a AWD In saying this, street settings are pretty easy, just look at the tyre wear Meh, Necro thread, it's late at night, and I has been drinking beer
 -

-
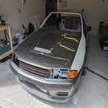
 Thought I'd give an update. There needs to be scarce details in some areas due to ongoing discussions. Here's the journey of trying to make the booked registration appointment (again). Sent a complaint to Car Inspect outlining the concerns and made some demands. Went to a service center in Geelong, got assaulted with bullshit items on the RWC, as you know. Tried to quote $2.5k AND wanted a structural report Only seemed to be one place around Geelong that does them, they demand $495 just to end up telling me it's f**ked, at least $11k to fix and tried to sell me his own Skyline in the process (bro, wtf?) Started stressing about what I'm supposed to do with this possible pile of steel. Awaiting that, I was sent an angel friend who works in Melbourne and knows real mechanics and body shops. They laughed at the reported quotes (don't get work done in Geelong) Car underwent some front surgery and brought back better They then sent it to the mechanics for RWC Registration appointment is two days away at this point. Mechanics pointed out two issues: driver's seat and shocks - that's it. He offered couple options and I chose coilovers. Frantically I scoured the jungle realm that is Facebook Marketplace (again). Found what looks to be a decent Series 1 seat actually - $100 Guy is friendly, offers to bring the seat with a colleague who's heading to Geelong (thanks man, that was cool) Seat arrived, looks good. Throw it in my car and drive to Melbourne and drop it to mechanic T-1 day, mechanic reckons job will be done for the fronts only, gets it done by 4PM Mechanic heads to get the coil-overs that night as a favour to help me make the appointment Get driven to Melbourne, drove the car back - RWC Unlocked! ✅ VicRoads tomorrow, the goal is close now. 🙂
-


Recommended Posts
Create an account or sign in to comment
You need to be a member in order to leave a comment
Create an account
Sign up for a new account in our community. It's easy!
Register a new accountSign in
Already have an account? Sign in here.
Sign In Now