Jump to content
SAU Community

Recommended Posts

Any real blockers or issues you see with this set-up. ie: is this a good idea?

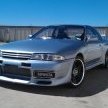
2001 Series2, R34 GTT Neo, Auto trans with stally/torque converter, GT3076 .82 rear housing, internally gated with a Nistune ?

Thinking 300rwkws and longevity.

Thoughts/comments on the good, bad and ugly of doing this.

Link to comment
https://www.sau.com.au/forums/topic/382011-r34-gt3076-auto-nistune/
Share on other sites

Thanks Jez. That was my main concern.

I was really concerend wether the NIStune and the Auto Transmission would work together.

I didn't know the Transmission had it's own ECU, so thanks for that info. Theoretically then it should all be good.

I'd hate to get it all together and then have issues.

Has anyone done this and whats your experience ?

The auto shift logic is apart of the engine ECU and it all works 100% fine after getting Nistune installed. My S2 Stagea uses the same RB25 NEO motor and basically the same gearbox, except mine has the 4WD transfer case. I have mine Nistuned, GT3582, 600cc injectors, Z32 MAF, yada yada yada.... and the auto still works perfectly fine.

the only thing i will warn you about is, after i first threw all the mods on the car i only ran a low boost 240kw tune until i sorted out a couple of issues. after about a month of this the auto was slipping like mad and taking ages to shift into the next gear, 1st to 2nd was the worst, and this was on the low boost tune! i took it into an auto workshop where they upgraded the valve body (shftkit) and tighten the bands and stuff like that. after that it was all ok and its still going good after nearly 3 years. So if you haven't given your auto any love yet i'd be expecting to with the extra power you want to make.

didn't the R34's come with an auto cooler? the stagea comes with a descent sized one in the front bar from factory, S2's only though.

The Transmission I bought to go in was rebuilt by MV, cost around $4k and had 2 months use prior to me buying it, so I'm hoping it's all goodness....

Unfortunately the fella who got the work done on the transmission wrote his car off shortly afterwards.

(and I got a GREAT deal) ;)

So this is what I have collected

- Z32 AFM

- A proper garret spec GT3076r kit from GCG with the .82a/r housing and 4inch surge slotted inlet

- Blitz SpecR dual solenoid boost controller, wiring and display

- Bosch 73LB(~750cc) EV14 injectors

- Full turbo back 3" exhaust system with a Kakimoto Regu 06&r Catback

- A tuned Nistune ECU (by Trent at Status/Chequered Tuning, 304rwkw) Came with all this kit.

- Nismo fuel pump.

- FMIC (fitted).

- Auto trans with stally/torque converter (MV built)

What else is needed besides time/effort and gaskets?

^ what he said, plus 10mm longer manifold studs too, they are 1.25 pitch long bit and 1.5 pitch short bit. And up the trans cooler size as mentioned by simon.

Do you have a line kit for the turbo? It will simplify things a lot.

90 degree 2-2.5 inch silicone bend for the compressor outlet and, depending on how you want to do the intake (3 inch or 4 inch) a 3-4 reducer and either an 80mm or 100mm straight joiner.

The spanner work to install it is pretty basic, mod the hot pipe by extending it about 100mm with a bit of straight 2.5 inch pipe, intake pipe, dump is the most time consuming if you do it yourself.

Edited by badhairdave

Any real blockers or issues you see with this set-up. ie: is this a good idea?

2001 Series2, R34 GTT Neo, Auto trans with stally/torque converter, GT3076 .82 rear housing, internally gated with a Nistune ?

Thinking 300rwkws and longevity.

Thoughts/comments on the good, bad and ugly of doing this.

piece of piss, got a few auto R34's around 270-320rwkw.... the auto starts to play up around the 300rwkw mark too so be aware. Last one we sent over to MV auto in SA and got a 3k stall aswell.

So this is what I have collected

- Z32 AFM

- A proper garret spec GT3076r kit from GCG with the .82a/r housing and 4inch surge slotted inlet

- Blitz SpecR dual solenoid boost controller, wiring and display

- Bosch 73LB(~750cc) EV14 injectors

- Full turbo back 3" exhaust system with a Kakimoto Regu 06&r Catback

- A tuned Nistune ECU (by Trent at Status/Chequered Tuning, 304rwkw) Came with all this kit.

- Nismo fuel pump.

- FMIC (fitted).

- Auto trans with stally/torque converter (MV built)

What else is needed besides time/effort and gaskets?

OOh snap, was micheal ok?

PS mental setup, would have made a killer auto driftcar the auto and tiptronic was that good.

Make sure you get someone to retune it for your car, dont trust another cars tune in yours.

i was gonna ask how does the stock r33 auto hold up?

im making 350kw at 26psi thru gt35 .82 on rb25det

manual is rooted, wouldnt mind throwing auto in hey.

They rate them for 350rwkw(MV R34 built box) , Bear in mind a auto will knock you down 20rwkw and then a converter will knock it down another 10 -20rwkw, although up to 3500, they retain lockup still

I woudn't bother with any electronic trans with a 3540 setup though..asking for trouble..... except for the a RE4013A out of the 300zx.

cheers\

darren

piece of piss, got a few auto R34's around 270-320rwkw.... the auto starts to play up around the 300rwkw mark too so be aware. Last one we sent over to MV auto in SA and got a 3k stall aswell.

What are the turbo setup/s and how much boost do you run in the cars you've made 320rwkw from trent?

cheers

darren

OOh snap, was micheal ok?

PS mental setup, would have made a killer auto driftcar the auto and tiptronic was that good.

Make sure you get someone to retune it for your car, dont trust another cars tune in yours.

Yeah Trent both donor car owners are ok but Both skylines were sold off in parts.

All of the kit except the built auto trans was off one car. I think he got about 4-5000kms of use.

The other vehicle sub 2000kms with the transimission.

I'll check out where your shops at and book some time when I'm ready.

Cheers.

Create an account or sign in to comment

You need to be a member in order to leave a comment

Create an account

Sign up for a new account in our community. It's easy!

Register a new account

Sign in

Already have an account? Sign in here.

Sign In Now


  • Similar Content

  • Latest Posts

    • Stock ECU (or more accurately stock tune) absolutely refuses to go over 10psi and behaves like you have seen. The Nistune is the same if it is the stock tune. If the Nistune chip has been tuned, the resulting tune could be literally anything for any combination of parts. The Nistune just makes the stock ECU Tunable.
    • So stock ECU does not like anything above 10 psi?  That Nistune one is just for "try" if it will be any different, I know it need to be tune for that. I know but YOU may know about these problem but i/we dont. They few little Skylines here let alone people who know anything about tham so that is why iam asking here  
    • So now we have a radiator with no attachments whatsoever. It lifts up with a particularly tight spot between the drivers side air box mount and the lower radiator outlet, but if you've got this far you will sort that too. This is the lower mounts with the rad out so you can see where the rubber bushes go, it is a straight shot upwards Done! Assembly is the reverse of disassembly, with blood less likely to be shed.
    • Right, onto the second last trick. The Air Con condenser is mounted to the front of the radiator and stays in the car when the radiator is removed. There are 2x 10mm headed self tappers holding the top of the condenser to the radiator, remove those The bottom of the condenser is attached to the radiator with clips. You need to lift the condenser out of those clips and clear (up, then forward). f**ked if  could work out how to do that last bit with the front bumper on. I hope you can, and you share the trick.  Bumper removal probably deserves its own thread one day once I've recovered the will to live, but basically you need to remove the wheels, front inner guard liners (clips and 10mm headed bolts), the self tapper between the guard and the bumper at the rearmost point of the bumper (same as an R32 that bit), any remaining clips at the top/front of the grill, an absolute bastard design with a plate that holds the top of the bumper above the headlight each side (only 1 bolt which is tricky to get to, but the plate catches 2 places on the bumper and must be removed....carefully!) and push clips between the bumper and guard under the headlight. If you've done all that you will be faced with wiring for the fog lights on both sides and in ADM Q50 RS at least, 4 nasty tight plugs on the driver's side for the ADAS stuff. So, the clips at the bottom look like this on drivers side (looking from the front) And on the passenger side (also from the front), you can see this one is already out Clearance on both of these are super tight; the condenser needs to move up but the upper rad support mount prevents that, and the radiator can't move down far because it is (rubber) mounted. Once you achieve the impossible and drop the condenser off those mounts so it does not stop the rad moving, you are good to go
    • OK, next the shroud needs to come off and there are a couple of tricks. Firstly, there is a loom from near the passenger side headlight to the fans, coolant temp sensor etc and there is no plug to undo.  In my case I was OK to leave the shroud on top of the engine so I just undid the passenger side fan plug and about 10 of the clips which gave enough free wire to put it aside. The fan plugs were super tight, the trick I used was a small falt screwdriver to push down on the release tab, then a larger flat screwdriver to lever the plug out of the fan unit....be careful with how much force you apply! If you need to remove the shroud altogether for some reason you will have to deal with all the plugs (tight) and clips (brittle)....good luck. I removed all of the clips and replaced them with cable ties that I will just cut next time. Also, in the Red Sport / 400R at least, the intake heat exchanger reservoir hose is bolted to the shroud in 2 places with 10mm headed bolts; so remove them (the hose stays in the car; no need to undo it at the t fittings down at the radiator lower mount. Once you've dealt with the HX hose and the wiring loom, there are 3x 10mm headed self tappers holding the top of the shroud to the radiator; remove those.   The shroud then lifts out of the bottom mounts where it sits on the radiator, up and onto the engine out of the way. Simples
×
×
  • Create New...