Jump to content
SAU Community

Recommended Posts

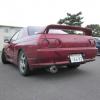
I am wondering what ECU tuning solution I should get for my car. 1999 R34 GT-T

specs:

RB25DET NEO

1.3mm head gasket

Bosch 550cc fuel injectors

GT-R fuel pump

HKS GT-RS Turbine

Tomei Type A Poncams 252 IN/EX 9.15 lift

Blitz FMIC

Blitz 2 core radiator

Blitz advaced intake

Blitz 90mm front pipe

Aut0bahn 99 exhaust collector (on the ass of the turbo)

OBX Racing exhaust manifold

HKS 90mm catback exhaust

Tomei exhaust side cam pulley

HKS timing belt

N1 waterpump

MAF: Z32,Q45 or MAFLESS (different ECU different situation)

These are the only 2 solutions that can be tuned nearby to me. Any opinions on the pros and cons between the two?

Link to comment
https://www.sau.com.au/forums/topic/403337-apex-i-power-fc-vs-hks-fcon-v-pro/
Share on other sites

Everybody tunes power fc's and they work well, so my vote would be for that. A lot of people on here run them and have experience with them, so if you ever needed help etc with it, there will be a lot more info available for the power fc.

I don't know a lot about the fcon, I think scottynm35 might be running one though. Maybe pm him or perhaps he will reply to this thread.

Edited by Mitcho_7

Whichever the tuner is more comfortable with is the choice.

No idea why you would put a 1.3mm gasket in that will drop the comp ratio for a GT-RS though, just hurts performance :/

It was my understanding that stock head gaskets fail if they are exposed to higher boost and power levels, so a metal one is the best alternative. If this is wrong I would be happy to learn better.

If i were in japan id be knocking on smokey Nagata's door!! Pretty sure my brothers car has been in his shop, has a "Top secret" computer and a GT28 and pulls off high 12sec quarters . on 12psi too.. its a mystery to me, every time he squirts it , it feels like it keeps picking up more and more power.

so go see smokey :whistling:

Edited by SliverS2

if your in japan go the HKS f-con....sensational computer, its just aussies that aren't trained to use and hence why everyone goes the power fc.

your talking 32x32 mapping, launch control and a whole heap of other great things vs the outdated and limited power fc.

hence why here in aus I changed from a pwoer fc to a haltech with similar specs to the f-con

I use one but there is no support in Melbourne at all. The Fcon is a great option but HKS have a habit of screwing every dollar from the customer, so compare the full costs including tune. Perhaps there are other tuners around you that can tune with knock off software?

It was my understanding that stock head gaskets fail if they are exposed to higher boost and power levels, so a metal one is the best alternative. If this is wrong I would be happy to learn better.

They won't fail with 18psi and a GT-RS (250rwkw). Everyone else around here runs them stock.

By putting in a big 1.3mm all you've done is hurt the comp ratio which will affect response and require more boost for the same power :/

It was my understanding that stock head gaskets fail if they are exposed to higher boost and power levels, so a metal one is the best alternative. If this is wrong I would be happy to learn better.

Not the case, its all in the tune. There are a few cars here reeling off 4-500hp on stock headgaskets. My dads old 350rwkw R33 ran a stock headgasket.

Edited by Super Drager

Thanks all for the info. I wouldn't go to Top Secret 1because its far away and 2 because tuning fees are insanly high here:

The Power FC for the r34 is really expensive compared to those for earlier models or GT-R Skylines because of demand, not many R34 GT-T's were produced so the POWER-FC for them is pretty rare here. The HKS F-CON V Pro I can get the unit, harness, temp sensor, and pressure sensor all together for the same cost as the POWER-FC however the F-CON is required to go to a tuner to even get running because of the license required for the software. That is my main detractor for that. I was also looking at NISTUNE as a possiblity due to its low cost and user friendlyness.

Edited by debusan

out of interest apexi are now selling brand ECR33 and ER34 PFCs - no idea how, or what is different, but nengun stock them again

414BN032 + 415-A030 Nissan - Skyline - ECR33/RB25DET - MT - 93/8-98/4

414BN033 + 415-A030 Nissan - Skyline - ER34/RB25DET - MT - 98/5-01/5

so its no longer "second hand only" for these models, avaialble new, with EL hand conrtoller from most apexi dealers

this is the first i have heard of it, but it looks legit

ER34's have a totally different type of plug on their harness compared to an R33.

well obviously.....

but the point of the post was nengun.com are stocking and selling brand new powerfcs for ECR33 and ER34

so you can buy it new. this has only changed recently. they were discontinued for about 1.5 years or more

If you are not constantly modifying your car then HKS F -con is very popular with imported big power GTRs and top GTR tuners here. If you are in Japan tuning should be widely available but if you want to stay local then if you don't need a tune too often then the expense should be manageable.

out of interest apexi are now selling brand ECR33 and ER34 PFCs - no idea how, or what is different, but nengun stock them again

414BN032 + 415-A030 Nissan - Skyline - ECR33/RB25DET - MT - 93/8-98/4

414BN033 + 415-A030 Nissan - Skyline - ER34/RB25DET - MT - 98/5-01/5

so its no longer "second hand only" for these models, avaialble new, with EL hand conrtoller from most apexi dealers

this is the first i have heard of it, but it looks legit

Thanks a lot for bringing up this site man. I never heard of it before nad have been using strictly yahoo Auctions to buy things locally in Japan. I picked up the POWER-FC from them and saved a bundle of cash. It would have been twice as much had I ordered it on Yahoo or from a dealer. Cheers and good looking out.

Create an account or sign in to comment

You need to be a member in order to leave a comment

Create an account

Sign up for a new account in our community. It's easy!

Register a new account

Sign in

Already have an account? Sign in here.

Sign In Now


  • Similar Content

  • Latest Posts

    • From there, it is really just test and assemble. Plug the adapter cables from the unit into the back of the screen, then the other side to the car harness. Don't forget all the other plugs too! Run the cables behind the unit and screw it back into place (4 screws) and you should now have 3 cables to run from the top screen to the android unit. I ran them along the DS of the other AV units in the gap between their backets and the console, and used some corrugated tubing on the sharp edges of the bracket so the wires were safe. Plug the centre console and lower screen in temporarily and turn the car to ACC, the AV should fire up as normal. Hold the back button for 3 sec and Android should appear on the top screen. You need to set the input to Aux for audio (more on that later). I put the unit under the AC duct in the centre console, with the wifi antenna on top of the AC duct near the shifter, the bluetooth antenna on the AC duct under the centre console The GPS unit on top of the DS to AC duct; they all seem to work OK there are are out of the way. Neat cable routing is a pain. For the drive recorder I mounted it near the rear view mirror and run the cable in the headlining, across the a pillar and then down the inside of the a pillar seal to the DS lower dash. From there it goes across and to one USB input for the unit. The second USB input is attached to the ECUtec OBD dongle and the 3rd goes to the USB bulkhead connected I added in the centre console. This is how the centre console looks "tidied" up Note I didn't install the provided speaker, didn't use the 2.5mm IPod in line or the piggyback loom for the Ipod or change any DIP switches; they seem to only be required if you need to use the Ipod input rather than the AUX input. That's it, install done, I'll follow up with a separate post on how the unit works, but in summary it retains all factory functions and inputs (so I still use my phone to the car for calls), reverse still works like factory etc.
    • Place the new daughterboard in the case and mount it using the 3 small black rivets provided, and reconnect the 3 factory ribbon cables to the new board Then, use the 3 piggyback cables from the daughterboard into the factory board on top (there are stand offs in the case to keep them apart. and remember to reconnect the antenna and rear cover fan wires. 1 screw to hold the motherboard in place. Before closing the case, make a hole in the sticker covering a hole in the case and run the cable for the android unit into the plug there. The video forgot this step, so did I, so will you probably. Then redo the 4 screws on back, 2 each top and bottom, 3 each side and put the 2 brackets back on.....all ready to go and not that tricky really.      
    • Onto the android unit. You need to remove the top screen because there is a daughterboard to put inside the case. Each side vent pops out from clips; start at the bottom and carefully remove upwards (use a trim remover tool to avoid breaking anything). Then the lower screen and controls come out, 4 screws, a couple of clips (including 3 flimsy ones at the top) and 3 plugs on the rear. Then the upper screen, 4 screws and a bunch of plugs and she is out. From there, remove the mounting brackets (2 screws each), 4 screws on the rear, 2 screws top and bottom and 3 screws holding in the small plates on each side. When you remove the back cover (tight fit), watch out for the power cable for the fan, I removed it so I could put the back aside. The mainboard is held in by 1 screw in the middle, 1 aerial at the top and 3 ribbon cables. If you've ever done any laptop stuff the ribbon cables are OK to work with, just pop up the retainer and they slide out. If you are not familiar just grab a 12 year old from an iphone factory, they will know how it works The case should now look like this:
    • Switching the console was tricky. First there were 6 screws to remove, and also the little adapter loom and its screws had to come out. Also don't forget to remove the 2 screws holding the central locking receiver. Then there are 4 clips on either side....these were very tight in this case and needed careful persuading with a long flat screw driver....some force required but not enough to break them...this was probably the fiddliest part of the whole job. In my case I needed both the wiring loom and the central locking receiver module to swap across to the new one. That was it for the console, so "assembly is the reverse of disassembly"
    • But first....while I was there, I also swapped across the centre console box for the other style where the AV inputs don't intrude into the (very limited !) space.  Part# was 96926-4GA0A, 284H3-4GA0B, 284H3-4GA0A. (I've already swapped the top 12v socket for a USB bulkhead in this pic, it fit the hole without modification:) Comparison of the 2: Basically to do the console you need to remove the DS and PS side console trim (they slide up and back, held in by clips only) Then remove the back half of the console top trim with the cupholders, pops up, all clips again but be careful at the front as it is pretty flimsy. Then slide the shifter boot down, remove the spring clip, loose it forever somewhere in the car the pull the shift knob off. Remove the tiny plastic piece on DS near "P" and use something thin and long (most screwdrivers won't fit) to push down the interlock and put the shifter down in D for space. There is one screw at the front, then the shifter surround and ashtray lift up. There are 3 or 4 plugs underneath and it is off. Next is the rear cover of the centre console; you need to open the console lid, pop off the trim covering the lid hinge and undo the 2rd screw from the driver's side (the rest all need to come out later so you can do them all now and remove the lid) Then the rear cover unclips (6 clips), start at the top with a trim tool pulling backwards. Once it is off there are 2 screws facing rearwards to remove (need a short phillips for these) and you are done with the rear of the console. There are 4 plugs at the A/V box to unclip Then there are 2 screws at the front of the console, and 2 clips (pull up and back) and the console will come out.
×
×
  • Create New...