Jump to content
SAU Community

Recommended Posts

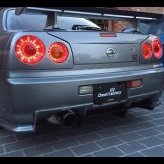
I know this is ‘Skylines Australia’ – but I also know that all of us appreciate the legendary Skyline GTR wherever it may be. This thread is an opportunity for me, on behalf of Jash Krishna, to showcase his MINES built and tuned – 2001 R34 GTR V-Spec II .


This GTR has been given the complete MINES treatment by its previous owner. It has a Stage 2 MINES Engine (630Hp) and has installed NISMO S-Tune suspension and a Brembo 6 Piston brake package...and so much more.

‘I FLY’ now calls the beautiful Fiji Islands its home. It gets treated very well by Jash and has the upmost respect on our roads. Jash fuels this car with Gull 98 which is specially imported into the country. The car shares its garage currently with a Toyota Supra which was a demo car for Alpine Japan.

Fiji might be known to some as one of the friendliest tourist destination spots in the world; however our car culture is starting to emerge with talent attracting international attention. We currently have 3 BNR34, one of which is a Bayside Blue Nur spec.

Okay, enough talk – I leave you all with some shots of Jash’s GTR. Hope you all enjoy :)

266284_10150216483402163_2468308_o.jpg

260112_241444362532279_2185795_n.jpg

44602_425846247162_3947967_n.jpg

196961_10150101734597163_6838666_n.jpg

196279_10150101734062163_1379908_n.jpg

196205_10150101726642163_6402692_n.jpg

190631_10150101727072163_6719590_n.jpg

189615_10150101743697163_2599323_n.jpg

189575_10150101742537163_3871566_n.jpg

184823_10150101742977163_1423561_n.jpg

183623_10150101727217163_4393531_n.jpg

173055_10150104870887163_6109503_o.jpg

173055_10150104870867163_7702862_o.jpg

173055_10150104870862163_434205_o.jpg

172917_501755042162_8348648_o.jpg

172917_501755032162_6159829_o.jpg

172003_492840647162_5325171_o.jpg

134007_480184957162_5355794_o.jpg

Edited by MrFijiGold
  • Like 1
Link to comment
https://www.sau.com.au/forums/topic/423583-mines-tuned-bnr34/
Share on other sites

Beautiful car mate,

what are the roads like in Fiji?

Thanks buddy.

The roads are pathetic. We have some beautiful coastal scenery but alas, the roads are not up to the task of being worthy for such cars. There are certain pieces of tarmac where the car gets to stretch its legs :yes:

The Kings Hwy, Queens Hwy and main cities/towns are all near the coast Raj.

What do you do to stop the salty air from accumulating? Rinse, rinse, rinse...?

Queens Hwy is the 80% coastal - you will go through Villages and main towns on this road. (Suva, Sigatoka, Nadi and Rakiraki are all coastal towns). Kings Hwy will take you through rain forest's (Suva - Rakiraki) - excellent 4WD-ing.

That being said, the towns/cities are located not as close to the sea. Rinse, rinse, rinse is always the safest option :)

Been to Fiji, Terry?

Hey mate beutifull car! Will be in fiji next year in april would love to meet up and check out your cars

Thanks buddy - I'll pass your comments on to Jash. The boys back home would love to show off our rides and see what you all think :)

he has to go down that driveway every day? ouch!

beautiful car

That driveway was rebuilt in concrete for the GTR. Approach angle in the pic looks far worse then it actually is (pic was taken like that on purpose I think)

I was born in Lautoka, still have family there.

How the hell do you afford such cars LOL. Would hate to drive it there though, Sydney is bad enough!

Congrats on the purchase mate. If I ever win lotto I'll get something similar :P

Mate! Your Fiji born :cheers: This car is from Lautoka - haha. As I mentioned, this car belongs to a good buddy of mine, Jash. He has owned some pretty awesome cars - WRX STI, Supra, GTR, etc etc..

Ah yes, the lotto - Im also looking forward to that day :P

love everything bar the steering wheel :P

:)

In all, thanks for all your comments guys - appreciate all the positive comments. :happy:

Raj,

Does Jash have to stay within 200Km of home with this remarkable car and thus refill with the Gull 98?

Do Fiji roads have corrugations outside of its home city? If so, how does the S-Tune suspension handle them?

Wow mate, it's been said and I will say it again ... Beautiful car! Aesthetics, mods, colour ... the list goes on. Absolutely fantastic! I think we should come to Fiji for a visit ay.

:cheers: Thanks for the comments buddy. Always welcome to Fiji!

Raj,

Does Jash have to stay within 200Km of home with this remarkable car and thus refill with the Gull 98?

Do Fiji roads have corrugations outside of its home city? If so, how does the S-Tune suspension handle them?

Jash rarely goes outside Lautoka. However, he does have problems waiting for the fuel to arrive.

The S-Tunes are definitely not suited for Fijian roads, he drives it on the main roads in and around town. My mates and I run a small online community of motoring enthusiasts on Facebook - and I will get them to get me some photos of roads/cruise pics/events that we organize so I can share them. :thumbsup:

Very nice car. I think the previous owners name was Nick. There is a decent build thread on this car on the Pommie GTR forum.

Yep. Previous owner was Nick from GTR UK forums. Well documented thread.

Front pipe is interesting!

So much goodness in one car.

All MINES spec :yes:

Whats the specs on the car mate

Where do I start? I've copy/pasted the specs for you.

Mines VX Air Filter (panel in stock airbox)

Mines VX-ROM

HKS EVC 6

600cc Injectors

Mines AFM's

Nismo Plenum

Nismo Inlet Pipes

Nismo Intercooler

Nismo I/C hard pipes

Upgraded Fuel pump

Mines Stage II engine:

Cams (Mines) IN 260°/lift 10.2 mm, EX 252°/LIFT 9.5mm

Valve spring Strengthened

Valve guide PBB

Valve seat Beryllium CU

Seat cutting Machined

Valve reface Machined

Modification of Port Machined

Combustion chamber adjusting Machined

Head balancing plane research Machined

Head gasket Metal

Cylinder head bolt Strengthened

Crank bolt Strengthened

Piston (Tomei) Lightweight forged

Connecting rod (Tomei) Lightweight Forged

Crank processing and balance (Mines) D counter section form modification

Crank WPC processing Machined

Pulley balance Machined

Block balancing plane research Machined

Dummy boring Machined

Plateau horning/honing Machined

Oil pump Reimax

Timing belt Strengthened

Oil pan baffle Mines

Thermostat Nismo

Sparkplug NGK

Water pumP 34 N1

Wrapping

HKS GT2530 turbines

HKS Actuators

Tomei Exhaust Manifold

Mines Outlet Pro II

Mines Front pipe Pro

Mines Super Catalyzer II

Mines VX Professional Titanium II Exhaust

Nismo Coppermix Stage II clutch

HKS Oil cooler

Uprated radiator

Mines Carbon air box duct

Garage Defend carbon cooling panel

Samco coolant hoses

Augmnet Bonnet dampers

Brembo 6-pot monoblock calipers, 356mm Rdd discs front

Brembo 4-pot calipers, Rdd discs rear

Nismo S-Tune Suspension and stabliser bars

Nismo LMGT4 wheels (19*9.5) with Bridgestone RE-01R typres (275/30ZR19)

Nismo MFD2

Nismo 320kph dials

Nismo GT Tail lights

Nismo carbon B-Pilar trim

Nismo Aero kit

Nismo carbon rear spoiler

Do they still sell re01r's in Japan? Very nice car.

I wouldn't have a clue buddy :ermm:

Thanks for all the comments - Jash is absolutely loving the response.

Create an account or sign in to comment

You need to be a member in order to leave a comment

Create an account

Sign up for a new account in our community. It's easy!

Register a new account

Sign in

Already have an account? Sign in here.

Sign In Now


  • Similar Content

  • Latest Posts

    • Hi, is the HKS  Tower Bar still available ? negotiable ? 🤔
    • From there, it is really just test and assemble. Plug the adapter cables from the unit into the back of the screen, then the other side to the car harness. Don't forget all the other plugs too! Run the cables behind the unit and screw it back into place (4 screws) and you should now have 3 cables to run from the top screen to the android unit. I ran them along the DS of the other AV units in the gap between their backets and the console, and used some corrugated tubing on the sharp edges of the bracket so the wires were safe. Plug the centre console and lower screen in temporarily and turn the car to ACC, the AV should fire up as normal. Hold the back button for 3 sec and Android should appear on the top screen. You need to set the input to Aux for audio (more on that later). I put the unit under the AC duct in the centre console, with the wifi antenna on top of the AC duct near the shifter, the bluetooth antenna on the AC duct under the centre console The GPS unit on top of the DS to AC duct; they all seem to work OK there are are out of the way. Neat cable routing is a pain. For the drive recorder I mounted it near the rear view mirror and run the cable in the headlining, across the a pillar and then down the inside of the a pillar seal to the DS lower dash. From there it goes across and to one USB input for the unit. The second USB input is attached to the ECUtec OBD dongle and the 3rd goes to the USB bulkhead connected I added in the centre console. This is how the centre console looks "tidied" up Note I didn't install the provided speaker, didn't use the 2.5mm IPod in line or the piggyback loom for the Ipod or change any DIP switches; they seem to only be required if you need to use the Ipod input rather than the AUX input. That's it, install done, I'll follow up with a separate post on how the unit works, but in summary it retains all factory functions and inputs (so I still use my phone to the car for calls), reverse still works like factory etc.
    • Place the new daughterboard in the case and mount it using the 3 small black rivets provided, and reconnect the 3 factory ribbon cables to the new board Then, use the 3 piggyback cables from the daughterboard into the factory board on top (there are stand offs in the case to keep them apart. and remember to reconnect the antenna and rear cover fan wires. 1 screw to hold the motherboard in place. Before closing the case, make a hole in the sticker covering a hole in the case and run the cable for the android unit into the plug there. The video forgot this step, so did I, so will you probably. Then redo the 4 screws on back, 2 each top and bottom, 3 each side and put the 2 brackets back on.....all ready to go and not that tricky really.      
    • Onto the android unit. You need to remove the top screen because there is a daughterboard to put inside the case. Each side vent pops out from clips; start at the bottom and carefully remove upwards (use a trim remover tool to avoid breaking anything). Then the lower screen and controls come out, 4 screws, a couple of clips (including 3 flimsy ones at the top) and 3 plugs on the rear. Then the upper screen, 4 screws and a bunch of plugs and she is out. From there, remove the mounting brackets (2 screws each), 4 screws on the rear, 2 screws top and bottom and 3 screws holding in the small plates on each side. When you remove the back cover (tight fit), watch out for the power cable for the fan, I removed it so I could put the back aside. The mainboard is held in by 1 screw in the middle, 1 aerial at the top and 3 ribbon cables. If you've ever done any laptop stuff the ribbon cables are OK to work with, just pop up the retainer and they slide out. If you are not familiar just grab a 12 year old from an iphone factory, they will know how it works The case should now look like this:
    • Switching the console was tricky. First there were 6 screws to remove, and also the little adapter loom and its screws had to come out. Also don't forget to remove the 2 screws holding the central locking receiver. Then there are 4 clips on either side....these were very tight in this case and needed careful persuading with a long flat screw driver....some force required but not enough to break them...this was probably the fiddliest part of the whole job. In my case I needed both the wiring loom and the central locking receiver module to swap across to the new one. That was it for the console, so "assembly is the reverse of disassembly"
×
×
  • Create New...