Jump to content
SAU Community

Recommended Posts

  • 1 year later...

I read not to long ago that the guy actually died.

He wasn't driving at the time, he actually had a friend driving because he was intoxicated.

The friend lost control and hit a tree passenger side on.

Yes, he did, he lived on the margin.

There are many life situations, so i abandoned my blog here for some extent period. To begin with, i was on the verge of selling my car, but, thank God it didn't happen...and i continue. Having looked in my pocket i got that only ECU i can afford for that sum of money is APEXi Power Fc.

As friend of mine said "the best ECU is, you local tuner can handle." I bought ECU and commander, for tune i need dataloggit also, so i have a question - should i buy it to tune whenever i need or just lend it for tune and do furthermore adjustments by commander ?

Also i aggregate lots of small things like gaskets,belts, shims,sensors like EGT, oil temp, etc. My woman will get my arse burned and kick me out of home - because i spent alotta money :whistling:

Quality control !

xmx1WrACILg.jpg

Passed !

7N-AbgSxSt0.jpg

Edited by vulgar_russian
  • Like 3

Welcome back mate, good to see you back here!

The Power FC is certainly a very capable ECU still. Your tuner should have no issues with this but I would leave all the tuning to him and not fiddle with anything afterwards without getting the go ahead from him, that is if he is a competent tuner.

One last thing, more pics!

Thanks Josh !

Sure, all tune will be conducted by tuner. i'm wondering - should i make adjustments afterwards, depending on weather conditions ?

Pics are compulsory !)))

  • 3 weeks later...
  • 9 months later...

Finally, I am ready to strip car to the bones (including windshields), get rid of every rust spot and paint whole car, i think about Lexus white pearl - 077, does anybody have experience of painting Bcnr33 in that colour ?

Upd : Colour is called "Starfire Pearl"

post-51267-1189778241.jpg

Starfire Pearl on the left.

Edited by vulgar_russian
  • 3 weeks later...

Hey mate, awesome pics of a beautiful city. I am a high school history teacher and teach my senior students about the Romanov Dynasty and the Russian Revolution. If you have more pictures or videos please post these up, along with your awesome "Russian GTR" haha. All the best and post pics and more information about your build whenever you can.

All the best.

  • Like 1
  • 2 months later...

Hey, good luck with the repaint. I like pearl white personally. I went to St Petersburg this year, top place, loved it.

OMG Maaan ! You must contacted me, I'd have shown you the city ! )

Hey mate, awesome pics of a beautiful city. I am a high school history teacher and teach my senior students about the Romanov Dynasty and the Russian Revolution. If you have more pictures or videos please post these up, along with your awesome "Russian GTR" haha. All the best and post pics and more information about your build whenever you can.

All the best.

Hi, nice to hear, you interested in Russia's history, I'll certainly try, cheers !

  • Like 1

Finally I've reached the point, disassembling, followed repainting and resurrection of the body.

7d1fa06s-960.jpg

inception

2b1fa06s-960.jpg

ef1fa06s-480.jpg

boot

89fa06s-960.jpg

The main pain are door sills, as it's impossible to find door sills in decent condition in Russia atm, I decided to cut all rustjunk and wield them, changing rusted areas for new metal, creating new ones piece by piece, certainly making them much stronger than they were before.The same way I'll do to the hood ridges.

Also i've managed to find almost new original nismo front lip and nismo r-tune sidesсirts.

615fa06s-960.jpg

9d5fa06s-960.jpg

235fa06s-960.jpg

Which was aproved by strict authenticity control =)

fd13246s-960.jpg

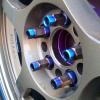
Also I've managed to procure 3 sets wheel nuts made from titan, the famous Mill Spec Grade 5 titan is BT14, this is BT20 material. produced by one of russian military plants, I do believe its strongest you can by for money, i have 2 spare sets, if anybody want them, pm me, price due to our currency rate is decent for this.

1st

ed0d67as-960.jpg

The secont set, cones are removable.

bd0d67as-960.jpg

the third set removable cones.

d30d67as-960.jpg

to be continued.

Edited by vulgar_russian
  • 2 weeks later...

Hola Amigos !

I have opportunity to buy ATS twin plate carbon clutch,
but saler dont know exactly what product he has,
the only information i have, it is from gtr. How can I identify it ?
Disks of 3,6 and 3,4 mm thick.jsg2nl.jpg

2u89vv5.jpg

11v2z4h.jpg

2s8mw4m.jpg

mjsrra.jpg

v7qey8.jpg

  • 2 months later...

Finally i'm getting car from paintshop.

All rust was expelled, door sills was rebuilded with 3,6 mm thick metal.

About colour, i found amaizing guy, god of mixing, base was toyota 077 colour, he managed to 100% satisfy me.

077 is rather warm, much yellow pigment makes it look like ivory, we managed to get cold pearl colour without any blink of yellow and blue shade, green and crimson purple grain, sunk deep into base by special method of coating , big amount of black pigment made car look almost polished aluminium at some angle of view.

For now the only thing to do is to install bodykit.

I decided to install kinugawa 3076 modifyed turbo.

iRq6s78yQko.jpgTUiXGINBNbA.jpgg8ePNa4bqy0.jpg0bflVMVB2Kg.jpgMhC7dX-Ikcc.jpgQ4pCa6HTdYQ.jpg

  • Like 1

Create an account or sign in to comment

You need to be a member in order to leave a comment

Create an account

Sign up for a new account in our community. It's easy!

Register a new account

Sign in

Already have an account? Sign in here.

Sign In Now


  • Similar Content

  • Latest Posts

    • Did this end up working? Did you take some pictures?
    • And finally, the front lower mount. It was doubly weird. Firstly, the lower mount is held in with a bracket that has 3 bolts (it also acts as the steering lock stop), and then a nut on the shock lower mount itself. So, remove the 3x 14mm head bolts , then the 17mm nut that holds the shock in. From there, you can't actually remove the shock from the lower mount bolt (took me a while to work that out....) Sadly I don't have a pic of the other side, but the swaybar mounts to the same bolt that holds the shock in. You need to push that swaybar mount/bolt back so the shock can be pulled out past the lower control arm.  In this pic you can see the bolt partly pushed back, but it had to go further than that to release the shock. Once the shock is out, putting the new one in is "reverse of disassembly". Put the top of the shock through at least one hole and put a nut on loosely to hold it in place. Put the lower end in place and push the swaybar mount / shock bolt back in place, then loosely attach the other 2 top nuts. Bolt the bracket back in place with the 14mm head bolts and finally put the nut onto the lower bolt. Done....you have new suspension on your v37!
    • And now to the front.  No pics of the 3 nuts holding the front struts on, they are easy to spot. Undo 2 and leave the closest one on loosely. Underneath we have to deal with the wiring again, but this time its worse because the plug is behind the guard liner. You'll have to decide how much of the guard liner to remove, I undid the lower liner's top, inside and lower clips, but didn't pull it full off the guard. Same issue undoing the plug as at the rear, you need to firmly push the release clip from below while equally firmly gripping the plug body and pulling it out of  the socket. I used my fancy electrical disconnect pliers to get in there There is also one clip for the wiring, unlike at the rear I could not get behind it so just had to lever it up and out.....not in great condition to re-use in future.
    • Onto the rear lower shock mount. It's worth starting with a decent degrease to remove 10+ years of road grime, and perhaps also spray a penetrating oil on the shock lower nut. Don't forget to include the shock wiring and plug in the clean.... Deal with the wiring first; you need to release 2 clips where the wiring goes into the bracket (use long nose pliers behind the bracket to compress the clip so you can reuse it), and the rubber mount slides out, then release the plug.  I found it very hard to unplug, from underneath you can compress the tab with a screwdriver or similar, and gently but firmly pull the plug out of the socket (regular pliers may help but don't put too much pressure on the plastic. The lower mount is straightforward, 17mm nut and you can pull the shock out. As I wasn't putting a standard shock back in, I gave the car side wiring socket a generous gob of dialectric grease to keep crap out in the future. Putting the new shock in is straightforward, feed it into at least 1 of the bolt holes at the top and reach around to put a nut on it to hold it up. Then put on the other 2 top nuts loosely and put the shock onto the lower mounting bolt (you may need to lift the hub a little if the new shock is shorter). Tighten the lower nut and 3 upper nuts and you are done. In my case the BC Racing shocks came assembled for the fronts, but the rears needed to re-use the factory strut tops. For that you need spring compressors to take the pressure off the top nut (they are compressed enough when the spring can move between the top and bottom spring seats. Then a 17mm ring spanner to undo the nut while using an 8mm open spanner to stop the shaft turning (or, if you are really lucky you might get it off with a rattle gun).
    • You will now be able to lift the parcel shelf trim enough to get to the shock cover bolts; if you need to full remove the parcel shelf trim for some reason you also remove the escutcheons around the rear seat release and you will have to unplug the high stop light wiring from the boot. Next up is removal of the bracket; 6 nuts and a bolt Good news, you've finally got to the strut top! Remove the dust cover and the 3 shock mount nuts (perhaps leave 1 on lightly for now....) Same on the other side, but easier now you've done it all before
×
×
  • Create New...