Jump to content
SAU Community

Recommended Posts

Hey Everyone, :)

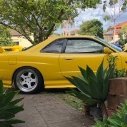
I got my turbo back zorst done last night and after around 50-100mtres of driving the turbo blew within under 1second. I suspect that the dump pipe was not made correctly to spec and the turbo over pressurised because the internal wastegate was kept shut, I did not have any signs of wear or anything whatsoever before entering un mentionable exhaust workshop. I was at stock boost (5-7.5psi) and then after the smallest of thrashes in 1st gear BANG. ceramic everywhere. Does any1 know what could cause this? Is it exhaust guys fault, hes reluctant to use insurance to look at it because he reckons his measurements were dead on after double checking the dump pipe. I don't know what to do...

If I do end up needing to buy a new turbo, I want to go hi-flow if I dont get a brand new one from nissan. What turbo do you think is best for under 1000 dollars (pre shipping)?

Thanks for all your help in advance guys,

Paul

EDIT: Car is a R33 Series 2 Manual Turbo. 125,000kms stock turbo (not boosted).

Edited by Pauly33GTS-t
Hey Everyone, :)

I got my turbo back zorst done last night and after around 50-100mtres of driving the turbo blew within under 1second. I suspect that the dump pipe was not made correctly to spec and the turbo over pressurised because the internal wastegate was kept shut, I did not have any signs of wear or anything whatsoever before entering un mentionable exhaust workshop. I was at stock boost (5-7.5psi) and then after the smallest of thrashes in 1st gear BANG. ceramic everywhere. Does any1 know what could cause this? Is it exhaust guys fault, hes reluctant to use insurance to look at it because he reckons his measurements were dead on after double checking the dump pipe. I don't know what to do...

If I do end up needing to buy a new turbo, I want to go hi-flow if I dont get a brand new one from nissan. What turbo do you think is best for under 1000 dollars (pre shipping)?

Thanks for all your help in advance guys,

Paul

EDIT: Car is a R33 Series 2 Manual Turbo. 125,000kms stock turbo (not boosted).

Mate that sucks! sorry to hear it. I dont know much about that sor tof thing to make a comment on what caused it.

In terms of highflow for under 1k , sliding performac eis ur best bet. Check out the traders section there should be a slide add in there.

For under a grand you really only have the slide highflow as an option.

Regarding the failure, I'd be guessing without seeing the dump pipe but i doubt the turbo failed due to overboosting, more likely the turbine has been knocked/fractured when the install happened and has failed once the turbine speed got up.

Yep, they will highflow it even with a busted wheel... just make sure to read the Journal Bearing Vs Ball Bearing turbo thread before you spend your money.. cause there is a ball bearing highflow group buy atm...

cheers

This sounds like a classic case of heat shock. How long did you allow for the car to warm up before booting it? They do need a little while. I know the urge to try it out is great straight after an upgrade, but you need to at least give it a few hundred metres, preferably a couple of kays, before lighting the burner.

The ceramic turbine is most susceptible when still relatively cool, and the opened up zorst will allow the thing to spin faster so both will add up to crap in the cat and no whoosh.

Try Slide but he may be out of 25 kits. Check his thread.

yeh dude it was warming up for around 3 mins before i took it out, the turbo i dont know tho. it shouldnt have gone past at most 10psi if there was a psi increase, it went RIGHT past it. (and i couldnt pull off foot in time)

Edited by Pauly33GTS-t

Well No.1 there is a problem with overboosting if it went right past 10psi, actuator staying closed?

No.2 Who knows what boost it hit, a combination of relatively cool idle exhaust temps, then a big first gear hit, big boost = big turbo RPM + large exhaust temp change = recipe for ceramic failure.

No.3 May have been some damage done to the wheel when installing exhaust, a fracture or complete breakage causing unbalances wheel and it eating itself on the walls of the turbo.

Best get a sliding performance turbo if your looking for a cheap 'upgrade' replacement turbo.

Fixxxer :P

My armchair-expert advice (as a slide turbo user) is to grab a turbo of Aaron (slide) here on these forums, awesome things they are. Might take some time, but send him a PM to see where he is with stock and order timeframes etc. Slide FTW!!11!!!11

As for the boost going straight past 10psi, sounds like unlimited boost, as paulr33 mentioned.... seems as if they have hooked up the vacuum lines incorrectly. I did this once myself and was lucky to notice the boost guage showing me 1 bar of boost, in my instance it was like this for 1 second but didnt blow the turbo (45000kms less usage then yours - may have had something to do with it).

When turbo came off I was surprised to see that it was in such good condition, 66skylineGT took one look and snapped it up for his Rb20det '69 'Line.

Damn man, probably a fault from the exhaust place - get the vacuum lines checked out asap (I recommend in their presence) by a skyline mechanic (maybe a local sau expert?) and go from there.

Does your new dump pipe happen to have a wastegate and turbo gas seperator?? im thinking that possibly it isnt a very good quality dump pipe and that somehow the seperator is blocking the wategate flap from fully opening hence causing it to overboost and blow the turbo!

that is what I thought innitially freek but when I looked at the dump pipe after the turbo had gone, he measured it in front of me and apparently "it could not have been so"

so if the wastegate actuator was not working, then causing X boost then it must be their fault for doing that. only a fu*(*)(# moron whos )(*#&_( could do such a think as this. these people supposed to do this stuff for a living they cant make mistakes, its other peoples money they are playing with. I should have gone to ET and payed an extra 200. I've learnt for next time.

Just a squirt above 10psi should not have hurt the turbo.

There are many people who have had it spike to 14/16psi for a second without much of an issue.

If the car was already warm... even then 100meteres really isnt there far.

Its probably just your turbos time to die really.

Not a person can predict when it will die, its just one of those things.

I have a couple of theories:

1/ As Ash has just mentioned; just could be rootten timing and it was about to let go even b4 the exhaust was done. I had my std turbo set to 13psi full-time for one year and had no problems, but i was willing to play the game of "turbo russian roulette" :laugh: .

2/ Easiest way to check if the exhaust was responsible, would be to disconnect the actuator from the wastegate flap, by removing the pin. Then check to see whether the flap has full motion and does not hit the exhaust. Should only take a few mins to check and will clear or condem the w/shop in question.

I have also heard good things about Slide, but never used him myslef.

Good Luck

hey mate, yes the flap was opening and closing, couldnt have been the dumps fault. so it was probably damage to wheel during install or just its time to die... now im getting brand new GT3040 Turbo, SS Manifold from the USA all for 800 dollars AU delived to my door. I have found the ultimate contact and he owes me a favour so this I think warrants it.

I'll get the 3040 in 2 weeks and itll go straight on and yeh thats it... thanks for all your suggestions to the fault, it was very interesting running it by the guy who custom made my dump and installed it.

Create an account or sign in to comment

You need to be a member in order to leave a comment

Create an account

Sign up for a new account in our community. It's easy!

Register a new account

Sign in

Already have an account? Sign in here.

Sign In Now


  • Similar Content

  • Latest Posts

    • From there, it is really just test and assemble. Plug the adapter cables from the unit into the back of the screen, then the other side to the car harness. Don't forget all the other plugs too! Run the cables behind the unit and screw it back into place (4 screws) and you should now have 3 cables to run from the top screen to the android unit. I ran them along the DS of the other AV units in the gap between their backets and the console, and used some corrugated tubing on the sharp edges of the bracket so the wires were safe. Plug the centre console and lower screen in temporarily and turn the car to ACC, the AV should fire up as normal. Hold the back button for 3 sec and Android should appear on the top screen. You need to set the input to Aux for audio (more on that later). I put the unit under the AC duct in the centre console, with the wifi antenna on top of the AC duct near the shifter, the bluetooth antenna on the AC duct under the centre console The GPS unit on top of the DS to AC duct; they all seem to work OK there are are out of the way. Neat cable routing is a pain. For the drive recorder I mounted it near the rear view mirror and run the cable in the headlining, across the a pillar and then down the inside of the a pillar seal to the DS lower dash. From there it goes across and to one USB input for the unit. The second USB input is attached to the ECUtec OBD dongle and the 3rd goes to the USB bulkhead connected I added in the centre console. This is how the centre console looks "tidied" up Note I didn't install the provided speaker, didn't use the 2.5mm IPod in line or the piggyback loom for the Ipod or change any DIP switches; they seem to only be required if you need to use the Ipod input rather than the AUX input. That's it, install done, I'll follow up with a separate post on how the unit works, but in summary it retains all factory functions and inputs (so I still use my phone to the car for calls), reverse still works like factory etc.
    • Place the new daughterboard in the case and mount it using the 3 small black rivets provided, and reconnect the 3 factory ribbon cables to the new board Then, use the 3 piggyback cables from the daughterboard into the factory board on top (there are stand offs in the case to keep them apart. and remember to reconnect the antenna and rear cover fan wires. 1 screw to hold the motherboard in place. Before closing the case, make a hole in the sticker covering a hole in the case and run the cable for the android unit into the plug there. The video forgot this step, so did I, so will you probably. Then redo the 4 screws on back, 2 each top and bottom, 3 each side and put the 2 brackets back on.....all ready to go and not that tricky really.      
    • Onto the android unit. You need to remove the top screen because there is a daughterboard to put inside the case. Each side vent pops out from clips; start at the bottom and carefully remove upwards (use a trim remover tool to avoid breaking anything). Then the lower screen and controls come out, 4 screws, a couple of clips (including 3 flimsy ones at the top) and 3 plugs on the rear. Then the upper screen, 4 screws and a bunch of plugs and she is out. From there, remove the mounting brackets (2 screws each), 4 screws on the rear, 2 screws top and bottom and 3 screws holding in the small plates on each side. When you remove the back cover (tight fit), watch out for the power cable for the fan, I removed it so I could put the back aside. The mainboard is held in by 1 screw in the middle, 1 aerial at the top and 3 ribbon cables. If you've ever done any laptop stuff the ribbon cables are OK to work with, just pop up the retainer and they slide out. If you are not familiar just grab a 12 year old from an iphone factory, they will know how it works The case should now look like this:
    • Switching the console was tricky. First there were 6 screws to remove, and also the little adapter loom and its screws had to come out. Also don't forget to remove the 2 screws holding the central locking receiver. Then there are 4 clips on either side....these were very tight in this case and needed careful persuading with a long flat screw driver....some force required but not enough to break them...this was probably the fiddliest part of the whole job. In my case I needed both the wiring loom and the central locking receiver module to swap across to the new one. That was it for the console, so "assembly is the reverse of disassembly"
    • But first....while I was there, I also swapped across the centre console box for the other style where the AV inputs don't intrude into the (very limited !) space.  Part# was 96926-4GA0A, 284H3-4GA0B, 284H3-4GA0A. (I've already swapped the top 12v socket for a USB bulkhead in this pic, it fit the hole without modification:) Comparison of the 2: Basically to do the console you need to remove the DS and PS side console trim (they slide up and back, held in by clips only) Then remove the back half of the console top trim with the cupholders, pops up, all clips again but be careful at the front as it is pretty flimsy. Then slide the shifter boot down, remove the spring clip, loose it forever somewhere in the car the pull the shift knob off. Remove the tiny plastic piece on DS near "P" and use something thin and long (most screwdrivers won't fit) to push down the interlock and put the shifter down in D for space. There is one screw at the front, then the shifter surround and ashtray lift up. There are 3 or 4 plugs underneath and it is off. Next is the rear cover of the centre console; you need to open the console lid, pop off the trim covering the lid hinge and undo the 2rd screw from the driver's side (the rest all need to come out later so you can do them all now and remove the lid) Then the rear cover unclips (6 clips), start at the top with a trim tool pulling backwards. Once it is off there are 2 screws facing rearwards to remove (need a short phillips for these) and you are done with the rear of the console. There are 4 plugs at the A/V box to unclip Then there are 2 screws at the front of the console, and 2 clips (pull up and back) and the console will come out.
×
×
  • Create New...