Jump to content
SAU Community

Recommended Posts

At least the clutch should this time, couldn't hold a second burn out last time. Plus I wanna hear what the commentator says and crowds reaction, he was struggling to work out the hell was going on with GTRsean's 85 civic.

update time,

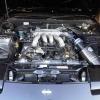
car runs well, apart from the expected small things. it's now apparent that grip is now an issue, not in a straight line sense but in lateral grip (although it does chirp into third). some of this well be remedied by suspension as the rear needs to be raised and front needs further dampening. most of the problem seems to because the car has so much torque response it's easily unsettled, and i know i can get more out the car with extra lateral grip and be faster out of the corners as well as more stable. going to try test fitting GTR offset 17*9.5 to see if they clear the inner suspension, and hopefully will be able to significantly increase front tire width at the same time.

time to pick wheels!. anybody got suggestions?

my mate is gonna do this conversion to his s14 soon, might pm you brah regarding more info. nismo lmgt4 or xd9s are killer. imo stay 17 x 9, cr kais are cheap enough with a half decent offset. I reckon enkei RP01 are also a good choice that wont stretch the budget. i got polished blitz type 03 rims atm and r33 gtr for the track.

Edited by nismokid

Loving the build mate looking at doing VH45DETT in my 33 later this year hopefully. But I've got a GTS-4 so it'll be AWD and its already running 18x10 + 18 wheels front and rear ready for putting down the power :)

Do you mind if I ask how much it has cost you to build so far or a rough breakdown on prices, obviously you've saved a bit on labour doing alot yourselves??

Edited by ShyBoi

Problem is cost lol.

All the little stuff adds up, and before you know it 20+K gone!!

Rough break down: (not including car)

VH45DE complete $2200

custom exhaust, custom extractors plus labour $3700

Z32 Gbox $500

os gikken twin plate clutch/flywheel $2500

tailshaft $500

adapter plate for bellhousing and machining $1800

eng mounts $250

x member $200

thermos and radiator $700

custom metal bonnet $1800

Labour $2000

Other stuff was replaced too, so more $$$

5 stud conversion $500

discs $600

4 pot 296mm upgrade $400

master cylinders clutch/brake $230

electric power steer $200

Misc crap and other labour to finish car $5000

Engineering, total $1800

Rego, plates $1200

Could of gone cheaper bits too, but we wanted an over engineered, reliable car, and that is what he's got now.

Just look at a holden driveline then a skyline one, I'd pick the jap way hands down!

Problem is cost lol.

All the little stuff adds up, and before you know it 20+K gone!!

This is true... I had to order endless little bits and wait ages each time from Nissan Japan/USA. Just today I found out I'm missing a fuel dampener so there's another 2 weeks gone :down:

Easily spent 20 grand on the swap already, haven't even looked at engineering yet

Edited by ichizora

haven't taken it to the drags yet, but even I will struggle to beat a 4wd launch from a r34 GTR, especially one that's as responsive as Sean's. if a GTR doesn't launch it, i have a good chance, just ask Sloan lol.

test fitted gtrseans r34 rims on back as well as sloans 17*9.5 xd9's

what does everyone think, should go an 18 or 17, personally i think the 17's look to small. and i can run a 275 on the back with room for more when running 18's

post-38774-0-73844400-1300764509_thumb.jpg

post-38774-0-63779900-1300764529_thumb.jpg

190RWKW with exhaust, intake and completely stock standard ecu.

18's still look great especially with the width at the back of the car!

Around $2000 for R34GTR wheels by the way.....I'm keeping mine :)

So R34 GTR wheels with 275's at the back and maybe 245's at the front?

post-12712-0-25363200-1300770137_thumb.jpg

190RWKW with exhaust, intake and completely stock standard ecu.

18's still look great especially with the width at the back of the car!

Around $2000 for R34GTR wheels by the way.....I'm keeping mine :)

So R34 GTR wheels with 275's at the back and maybe 245's at the front?

we don't even know if the 18's will fit in front, at least not till this weekend anyway. but if they do i'll be looking for a set of 18's. still don't know what design though. 180sx's can never have enough GTR parts.

stay tuned for the new fuel tank, estimates look like it will in the range of 90-100 liters, which will be good because it gets 300km's to a tank now. hopefully will get that started in a month or so. new fuel tank will be shortened on the right hand side for duel 3in exhaust, and raising boot floor to get extra fuel space.

  • 3 weeks later...

project 450sx is about to start it's second stage. just bought 32gtr v-spec brembo front brakes with two piece rotors and a complete 32gtr rear sub frame from FATZ (much appreciated!). this conversion will be also modifying the front guards so i can fit a approx +15 offset 9 inch wide wheel on the front (because GTR offset wheels hit the front suspension). If it didn't stop before it will now, this also means I'll need to modify the tail-shaft............again.

I think you'll want to look at weight distribution and brake bias Josh.

The GTR is a VERY nose heavy car, especially in comparison to the 450SX. I'm thinking with only Brembos up front, the front is going to be WAYYYY over braked.

Create an account or sign in to comment

You need to be a member in order to leave a comment

Create an account

Sign up for a new account in our community. It's easy!

Register a new account

Sign in

Already have an account? Sign in here.

Sign In Now


  • Similar Content

  • Latest Posts

    • Did this end up working? Did you take some pictures?
    • And finally, the front lower mount. It was doubly weird. Firstly, the lower mount is held in with a bracket that has 3 bolts (it also acts as the steering lock stop), and then a nut on the shock lower mount itself. So, remove the 3x 14mm head bolts , then the 17mm nut that holds the shock in. From there, you can't actually remove the shock from the lower mount bolt (took me a while to work that out....) Sadly I don't have a pic of the other side, but the swaybar mounts to the same bolt that holds the shock in. You need to push that swaybar mount/bolt back so the shock can be pulled out past the lower control arm.  In this pic you can see the bolt partly pushed back, but it had to go further than that to release the shock. Once the shock is out, putting the new one in is "reverse of disassembly". Put the top of the shock through at least one hole and put a nut on loosely to hold it in place. Put the lower end in place and push the swaybar mount / shock bolt back in place, then loosely attach the other 2 top nuts. Bolt the bracket back in place with the 14mm head bolts and finally put the nut onto the lower bolt. Done....you have new suspension on your v37!
    • And now to the front.  No pics of the 3 nuts holding the front struts on, they are easy to spot. Undo 2 and leave the closest one on loosely. Underneath we have to deal with the wiring again, but this time its worse because the plug is behind the guard liner. You'll have to decide how much of the guard liner to remove, I undid the lower liner's top, inside and lower clips, but didn't pull it full off the guard. Same issue undoing the plug as at the rear, you need to firmly push the release clip from below while equally firmly gripping the plug body and pulling it out of  the socket. I used my fancy electrical disconnect pliers to get in there There is also one clip for the wiring, unlike at the rear I could not get behind it so just had to lever it up and out.....not in great condition to re-use in future.
    • Onto the rear lower shock mount. It's worth starting with a decent degrease to remove 10+ years of road grime, and perhaps also spray a penetrating oil on the shock lower nut. Don't forget to include the shock wiring and plug in the clean.... Deal with the wiring first; you need to release 2 clips where the wiring goes into the bracket (use long nose pliers behind the bracket to compress the clip so you can reuse it), and the rubber mount slides out, then release the plug.  I found it very hard to unplug, from underneath you can compress the tab with a screwdriver or similar, and gently but firmly pull the plug out of the socket (regular pliers may help but don't put too much pressure on the plastic. The lower mount is straightforward, 17mm nut and you can pull the shock out. As I wasn't putting a standard shock back in, I gave the car side wiring socket a generous gob of dialectric grease to keep crap out in the future. Putting the new shock in is straightforward, feed it into at least 1 of the bolt holes at the top and reach around to put a nut on it to hold it up. Then put on the other 2 top nuts loosely and put the shock onto the lower mounting bolt (you may need to lift the hub a little if the new shock is shorter). Tighten the lower nut and 3 upper nuts and you are done. In my case the BC Racing shocks came assembled for the fronts, but the rears needed to re-use the factory strut tops. For that you need spring compressors to take the pressure off the top nut (they are compressed enough when the spring can move between the top and bottom spring seats. Then a 17mm ring spanner to undo the nut while using an 8mm open spanner to stop the shaft turning (or, if you are really lucky you might get it off with a rattle gun).
    • You will now be able to lift the parcel shelf trim enough to get to the shock cover bolts; if you need to full remove the parcel shelf trim for some reason you also remove the escutcheons around the rear seat release and you will have to unplug the high stop light wiring from the boot. Next up is removal of the bracket; 6 nuts and a bolt Good news, you've finally got to the strut top! Remove the dust cover and the 3 shock mount nuts (perhaps leave 1 on lightly for now....) Same on the other side, but easier now you've done it all before
×
×
  • Create New...