Jump to content
SAU Community

Recommended Posts

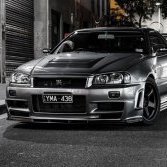
I keep saying i'll show some of Vu's work whenever the DT Panels threads pop up, but just haven't got around to it.

It's really just in response to "those" threads which we see from time to time. So here is my car, sprayed in 2006 i believe? around sept/oct, so coming up to 4 years.

The body kit was actually sprayed at a DIFFERENT time to the car (a year later, maybe more?), so we can get a judge of paint matching as well.

All detailing products from Final Inspection.

This is the car after it's detail. 1 x pass of FI Orange pad with Menzerna IP 3.01, 1 x pass of FI Black with Menzerna Final Finish - LSP is 2 x Final Inspection 'Seal'.

Flat panels (bonnet/bootlid/roof) had a bit mor FI orange passes with the IP 3.01. It's not 100% perfect, but i think you'll agree she's looking alright ;)

and the ubiquitous reflection shots :P No photoshopping, these are actually the panels on my car

IMG_1446.jpg

this is the roof

IMG_1447.jpg

bonnet

IMG_1448.jpg

shit you not, this is just my cars bonnet

IMG_1449.jpg

sun spots to show any imperfections

IMG_1450.jpg

trying to show off the metallic flake, sun shots will show the swirls/spider webbing/marring etc

IMG_1451.jpg

Final Inspection Seal is a high clarity sealant. This is just straight paint correction, no filler products have been used at all.

IMG_1452.jpg

reflections shots don't always tell the full story, so i tried to get more sun shots

IMG_1453.jpg

Checkout the bootlid and even the rear windscreen got a machine polish and wax (1 x FI Seal, 1 x P21s carnauba wax)

IMG_1454.jpg

IMG_1455.jpg

This is the front passenger guard i believe. Trying to show a proper paint correction. Again no filler products have been used, this is the actual condition of the paint

IMG_1456.jpg

not quite full sun...

IMG_1457.jpg

love the side mirror reflection in this

IMG_1458.jpg

sparkle sparkle

IMG_1459.jpg

something about the shape of front guards. Just show of a good detail so well, great depth and gloss

IMG_1460.jpg

not to forget the bonnet again either :)

IMG_1461.jpg

i did do the entire car :)

IMG_1462.jpg

IMG_1463.jpg

just got back from a drive to get some E85, so the back of the car is a little dusty

IMG_1464.jpg

mmm more silky Seal goodness

IMG_1465.jpg

chrome finish anyone :D

IMG_1466.jpg

IMG_1468.jpg

can't even tell where the car stops and the garage begins almost :D

This should see 6-8 months of protection with a good washing procedure. Enough to last throughout winter ready for a summer detail :)

Link to comment
https://www.sau.com.au/forums/topic/321493-paint-by-dt-panels-detail-by-me/
Share on other sites

It's a combination of both, decent paint and decent detailing...you can't really polish a turd. To be honest I'd rather see a paint job's quality through undetailed (just washed) photos, because mirror shiny waxes and sealants hide imperfections IMO rather than showing them (depends on the imperfection you're looking for, as some dints will show regardless).

Above paint job looks very good for the money he paid, I will certainly consider a respray at DT come the time to repair my hail damage.

any respray will need a detail, even the high end sprays. Some just happen to have good detailers to finish it off before they give it to you.

it's by no means a show quality paint job, just as i've said a lot, it's a good job at a good price.

swirls and spider webs aren't exactly a result of the spray job. This really is the paint as it is. It's only a 2 stage correction, topped by a sealant that has no fillers, so i'm not hiding anything. Yes there is more gloss, but things like peel/colour matching etc are going to be there regardless whether it's detailed or not.

When you start wet-sanding etc, then yes... that's not exactly the job that you've seen come off the gun. But a light correction like this, with a no filler LSP, is basically showing the paint job without marks induced by washing.

Create an account or sign in to comment

You need to be a member in order to leave a comment

Create an account

Sign up for a new account in our community. It's easy!

Register a new account

Sign in

Already have an account? Sign in here.

Sign In Now


  • Similar Content

  • Latest Posts

    • Hi...so a "development" here aswell The swap is "done" and car went "test drive" BUT it seems the clutch(maybe gearbox?) is a little bit sad? I bought this clutch kit https://justjap.com/products/xtreme-heavy-duty-organic-clutch-flywheel-kit-nissan-skyline-r31-r32-r33-push-type "Problem" is that the first gear is hard to put into and it seems that the clutch is not disengaged. It was not the problem with the old clutch...(or like sometime the first gear would not get as easy specialy when the fluid was cold) So? Can it be like...bad "install" or is the clutch wrong ((it should not have been) i done research to get the right one) Or is this "normal" with new clutch and needs to be break in? 
    • @Duncan I can try  and thanks i did not thought about VIN and part numbers for 33/34. @GTSBoy yeah it looks like iam gonna do that  
    • Forgot to include this but this is the mid section of my steering rack that looks like it has a thread/can be turned with that notch mentioned in the post:
    • Hey everyone, Wanted to pick some brains about this issue I'm having with rebuilding my 33 rack (PN is 49001-19U05). All of the tutorials/videos I've seen online are either R34 or S Chassis racks which seem to be pretty straightforward to disassemble but this process doesnt carry over to my rack. Few of the key differences that I've noted The pinion shaft on the other racks bolt on with 3 torx bolts: Whereas my rack bolts on with 2 allen head bolts: These changes are pretty inconsequential but the main difference is how you pull the actual rack out of the housing. The other skyline/s chassis racks can be taken out by tapping the rack out of the body with a socket and it just slides right out. I'm unable to do that with my rack because there's a hard stop at the end that doesn't let the seal/shaft be tapped out. Can also see a difference in the other end of the rack where mine has a notch that looks like you're able to use a big wrench to unthread 2 halves of the rack whereas the other racks are just kinda set in with a punch. My rack: Other racks: TLDR; Wanted to know if anyone has rebuilt this specific model of steering rack for the R33 and if there were any steps to getting it done easier or if I should just give this to a professional to get done. Sorry if this post is a bit messy, first one I've done.
    • I would just put EBC back on the "I would not use their stuff" pile and move on.
×
×
  • Create New...