Jump to content
SAU Community

Recommended Posts

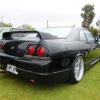
Owned this for 4-5 years now, served a couple of years daily/street skid duty, then pull it off the road with the purchase of my new D40 Navara, until I figured out what to do with it.

10432106_10204142403094864_5690024402880

IMG_0986.jpg

I Did some circuit racing and some drifting, and mate drove it at the 2014 skyline nats while i was overseas in malaysia, so when I got back, I ripped the whole car apart and stripped it back to a bare hollow shell, and started building something that could survive anything I can put it through, and still be a blast to drive.

1485106_10204672519228551_51193520510550

10734185_10204672517428506_3261961633965

10525666_10152483160526169_4424239221079

f9f899da-4068-47cd-98ea-633627f3a373.jpg

And here we are today.

specs

Body

Seam/Spot welded chassis
Boostworx CAMS spec full weld in cage

Type M Front bar/sideskirts/pods/wing

Origin 25mm FRP front fenders

Knight Racer 35mm GTR Full rear quarters

S14 Ganador copy mirrors

8000K HID kit,

Respray in factory black

Interior
Velo Viper seat in black, weld in floor mount rails, Velo Harness
Sparco Steering wheel/Lifeline Detachable hub kit/Attain shift knob
Racepak IQ3 Dash, Moroso Switch panel

Aluminium sheetmetal dash and rear firewall, Lifeline Firebomb extinguisher system

Engine / driveline
Rebuilt RB25 motor - CP Pistons/Spool Rods/ARP Hardware/Greddy Metal Head Gasket/Camtech 264/268 9mm cams, HKS cam gear, Performance Springs valve springs
K+N Pod, Trust TD06SL2-20G 10cm turbo/GReddy High-mount Stainless Manifold/Tial MV44 Wastegate
Plazmaman FMIC And piping
1 piece dump/front/3 inch straight pipe, Jun BL Blast pipe
Pierberg lift pump, Surge Tank, Bosch 044, XSpurt 1000cc Injectors, Aeroflow Fuel Rail, Aeroflow Regulator, E85 Fuel
Haltech PS2000 ECU, Haltech Wideband
Nismo GMAX twin plate clutch/Braided clutch line/urethane gearbox mount/Nismo pivot ball, Attain Solid Shifter
Nismo 2 way LSD, alloy diff mounts
Alloy radiator/Silicone Hoses/Nismo Thermostat/N1 water pump/GKTech fan
HKS oil cooler kit with filter relocation

Derale Power Steering Cooler
Optima Dry Cell Battery

Wheel and Tyres
Enkei RPF1 wheels in silver, 18x9.5 +15 (-5 with 25mm spacer) and 18x10.5 +15 (-20 with 35mm spacer)
215/40 and 235/40 Tyres

Suspension/Brake setup - FRONT
Cusco Comp S coilovers – 10kg
Cusco Adj. Upper arms
Cusco Adj. tension Rods

Cusco Tension Rod Brace
Nismo Tower Bar w/master cyl. brace

Kids Heart Free-dom Knuckles

KTS Tie rod Ends

Ikeya Formula Tie rods

DMAX Lock spacers

RDA Slotted rotors

ABC Braided Lines

Project MU HC+Pads

Suspesion/Brake setup - REAR
Cusco Comp S Coilovers – 8kg
Cusco Rear upper arms with eccentric lockouts
Cusco Traction Rods

Cusco Drag Links (HICAS Remval)

Solid Cradle Bushes

GKTech Subframe bracing kit

RDA Slotted rotors
ABC Braided Lines
Project MU HC+Pads

Project MU Handbrake drum shoes

Car is currently sitting waiting to have dash finished, then just paint interior, fully rewire car, wire in haltech and tune. Car is just running a basic loom of headlights/taillights/brakelights/single speed wiper/indicators/power windows and hazards. Haltech is being wired up in full stand alone, there is no factory wiring left at all.

Also seriously needs an alignment, paint needs to be wet sanded and buffed, all the glass put back in, and 1000 other small things. Don't need to buy anything for it though.

Right now, its covered in an inch of dust, and I haven't worked on it in 3 months, but now I'm motivated again, so when I get it back Ill screw it together and see what happens.

IMG_1180.jpg

IMG_1299.jpg

Im currently looking around at some new wheels and tyres, some 18x10's and 18x12's, and switching to semi's at a minimum

I don't know exactly what Ill use it for, but looking at doing hillclimbs, some circuit racing, maybe some more drifting. It'll still see some street duties from time to time, but not too often.

so yeah, not reinventing the wheel, just something super fun to drive that I haven't spent the national debt building.

  • Like 2

yeah, its just re-assembly, wire up the body loom, wire up the haltech, and plumb in the fuel lines, and all the littler things that need to be buttoned up.

Im a big fan of trust turbos as well, made 270 on 19 psi on 98 with a shit exhaust and no cams, now with straight pipes/cams/more boost and e85 I'm pretty keen to see the result.

and after being at the adelaide motorsport festival all day today, I'm keen as a f**king bean to get it finished now.

Interior is totally bare. Like, nothing atm. Getting a simple alloy sheetmetal dash bent up, and a new rear firewall for CAMS. Hopefully have it back this week.

This is what it looked like while building the seat rails.

IMG_1197.jpg

this is when it was a street car...

IMG_0989.jpg

Ill take some pics when I get it back and I've painted the interior and started bolting stuff in.

Ill be selling the RPF1's, if I can find something to take their place.

  • Like 1
  • 1 month later...

So, Finally got it back home.

Work starts first thing tomorrow morning. Clean up and paint interior, and start putting everything in, and get the car ready for wiring.

The pictures make the cage look like its at funny angles...

post-27211-0-66824800-1449817289_thumb.jpg

post-27211-0-81130000-1449817307_thumb.jpg

post-27211-0-01207800-1449817328_thumb.jpg

  • 3 weeks later...

Modified-baseplate.jpg

See the little "cock" at the front point of the mirror? Cut that flush with the rest of the leading edge. Thats it.

I cut mine, but have yet to fill the little gap it left. It's on the to do list. Got the idea from adam and the run-it-hard boys and girls... Mine are just the $99 GKTech reps.

Dash looks even better now it's painted and has all the racepak etc. mounted.

Been busting ass all holidays, car is almost fully assembled, just got a few small jobs left to do and some touching up of paint and it's ready for wiring, cams and tuning.

Will take some up to date pics when I head back to work monday, My iPhone (work phone) stopped working first day of holidays and there's been no-one around to sort out a new one.

Been peaceful but. ;)

Edited by R31 drift pig

Was the limit with the guard flare I had and ride height. Was rubbing still on a couple of harder turns at malalla. Even with dampers wound right up. Was also running pretty serious camber haha. Could have rolled/flared more and gone wider, but I didn't need/want to. 235/40 on a 10.5 is MY perfect size, as is 215/40 on a 9.5. :nyaanyaa:

10.5's now have a 35mm spacer, and a 25mm up front, so am looking around at other wheel options, namely 12 inches wide, probable stay with 9.5 or maybe a 10 up front. Need to take some measurements etc after its aligned with the knuckles etc. in.

I haven't taken any better pics, took one yesterday arvo in bad light, shows that something's getting done haha.

Will take some better ones on the weekend out in the light.

post-27211-0-16206500-1452074043_thumb.jpg

Edited by R31 drift pig

Would love to see these Meisters on your car....

post-59293-0-56013300-1452097064.jpg

So would I... but A) Im worried about damaging them, Might try looking for something not so hard to replace, and B)Ill need to buy at least 6 wheels, front steer pair and 2 x pairs for the rear, so once again, not so expensive. I may just end up buying another pair of 10.5 RPF1's, Ive looked at rota's/XXR's/Concave concepts etc, but my enkeis only weigh 8kg's, so it's a fair bit of unsparing weight to add.

Keep me in mind when/if it comes time to sell your current set of rpf1s

I will.... and the 15 other people who've said they wanted them haha. but Ill keep you in mind.

I have no idea what Im going to do with wheels to be honest, Ill see what happens when I get it aligned and pull all of the camber out of the rear and if I need more grip. Might just need a decent semi in 235/40 and call it good.

As a side note.... Lexan Windows. Its happening. And no electric windows is just one more system I can delete from the car.

Edited by R31 drift pig
  • 4 weeks later...

So, little update....

Interior is all painted etc, bar the doors, all suspension arms are now in and everything is buttoned up, fuel system is finished, glass is going back in next week, just need to do a few other small odds and ends like mount the haltech etc, and its ready to go for body wiring, then cams in/haltech wire in and tuning. Reckon this thing'll go ok with 350kw's....

IMG_1451.jpg

And I sold my Enkei's to a mate for his BA XR8 ute, so now Im on the hunt for wheels. It's currently perched on jack stands and it makes me sad haha.

May be rota 18x10/18x12's, May bring a set or 17x10/18x12 SSR SP1's out of japan, may get a set of 188.5/18x9.5 VS-KF's widened to 10/12, haven't quite decided yet. Depends how much i want to spend and what tyres I run etc... ill sort something in the next couple of weeks.

Show a few pics of your fuel system, particularly the surge tank, how you mounted the fuel pump and what was done with the fuel lines.

It's a good looking car, seem to have covered your bases pretty well with a lot of good bits. I'm interested to see how far the 20G compressor spec will go for flow (read: max power output). I reckon it will have great response, and even if you're capped at 300kW it's got the makings of a quick club car.

Thanks for the kind words... was actually your car that gave me the idea for the interior colour. Mines a machinery grey paint, super hard wearing, doesn't mark etc.

The fuel system is one thing about this car I'm not very happy with, surge tank arrangements in 33's are always ugly, and mines no exception> I am a bit OCD about it though haha..

surge is currently on the passenger side, tried to put it where the battery used to be (Battery is now on the passenger floor, with fire suppression system) but I couldn't get nutserts to fit through that panel. The hoses now run up across the old battery tray, and down into the factory hardline, up to the front, into an aeroflow fuel rail.

IMG_1452.jpg

Im still in two minds about removing the current system, cutting out the floor, and putting a cell, but trying not to spend money i don't have to, Id like to drive it at some point. Aeromotive do a nice cell with an inbuilt swirl pot and 1000hp or 1500hp fuel pump, but at nearly $1500, I'm a bit hesitant to spend the money; Although I know Im limited to how much further I can go with one 044, so anything more than this will require more money spent regardless.

Im pretty keen to see what the 20g'll do, mine's a SL2 model, so will go a bit higher. I previously made 270w's on 98, with a shitty exhaust and blocked cat, the car my kit came off off made 300 on 98, so with decent sized cams like i have, E85, and a decent tune, reckon ill see 330-340 fairly easy. At the end of the day though, it's only a number. Car was actually pretty quick with 270kw's, just had no grip haha. Full boost is around 3400-3500RPM, and previous limiter was 7200rpm, new limiter will be 8000 rpm, so gives a pretty sizeable power band to play with. And the gearbox/diff ratios etc all seem pretty nice to work with, its a lot of fun to drive around malalla.

Just need to keep working and finish off all the little tedious bits and pieces, so when wiring etc. begins, it's fairly straight forward. And with my 1st child arriving in 10 weeks, I've got a lot of work to do before then haha.

Edited by R31 drift pig

G'day, Ben


Your humorous topic title caught my attention. I then saw the track photos and realised it's an SA based car. Then the penny dropped... the black beast from Boostworx! I've had a decent look over your 33 a couple of times whilst it was in at BW.


I've known Shaun for years, well before BW existed. My burgundy 33 is a regular there and was sharing workshop space with your car for a fair portion of 2015.


I'm keen to see the end result of your build. I'll be sure to check back from time to time.


Cheers,


Matt


Hi matt, Very familiar with your car too! I started going to shaun just after he opened BW, remember your car was always on the hoist closest to the door? I was driving RX7's back then haha.\

Mine's fair rough compared to yours, but i didn't build it to be too pretty, Ill probably fix some of the average bodywork after it's finished and blow another coat of paint over it.

It should be back @ BW in the next couple of months, once the body wiring is finished, Shaun's sticking in the cams for me and wiring in and tuning the Haltech for me.

Cheers for the kind words, keeps me plugging away. ;)

Create an account or sign in to comment

You need to be a member in order to leave a comment

Create an account

Sign up for a new account in our community. It's easy!

Register a new account

Sign in

Already have an account? Sign in here.

Sign In Now


  • Similar Content

  • Latest Posts

    • Did this end up working? Did you take some pictures?
    • And finally, the front lower mount. It was doubly weird. Firstly, the lower mount is held in with a bracket that has 3 bolts (it also acts as the steering lock stop), and then a nut on the shock lower mount itself. So, remove the 3x 14mm head bolts , then the 17mm nut that holds the shock in. From there, you can't actually remove the shock from the lower mount bolt (took me a while to work that out....) Sadly I don't have a pic of the other side, but the swaybar mounts to the same bolt that holds the shock in. You need to push that swaybar mount/bolt back so the shock can be pulled out past the lower control arm.  In this pic you can see the bolt partly pushed back, but it had to go further than that to release the shock. Once the shock is out, putting the new one in is "reverse of disassembly". Put the top of the shock through at least one hole and put a nut on loosely to hold it in place. Put the lower end in place and push the swaybar mount / shock bolt back in place, then loosely attach the other 2 top nuts. Bolt the bracket back in place with the 14mm head bolts and finally put the nut onto the lower bolt. Done....you have new suspension on your v37!
    • And now to the front.  No pics of the 3 nuts holding the front struts on, they are easy to spot. Undo 2 and leave the closest one on loosely. Underneath we have to deal with the wiring again, but this time its worse because the plug is behind the guard liner. You'll have to decide how much of the guard liner to remove, I undid the lower liner's top, inside and lower clips, but didn't pull it full off the guard. Same issue undoing the plug as at the rear, you need to firmly push the release clip from below while equally firmly gripping the plug body and pulling it out of  the socket. I used my fancy electrical disconnect pliers to get in there There is also one clip for the wiring, unlike at the rear I could not get behind it so just had to lever it up and out.....not in great condition to re-use in future.
    • Onto the rear lower shock mount. It's worth starting with a decent degrease to remove 10+ years of road grime, and perhaps also spray a penetrating oil on the shock lower nut. Don't forget to include the shock wiring and plug in the clean.... Deal with the wiring first; you need to release 2 clips where the wiring goes into the bracket (use long nose pliers behind the bracket to compress the clip so you can reuse it), and the rubber mount slides out, then release the plug.  I found it very hard to unplug, from underneath you can compress the tab with a screwdriver or similar, and gently but firmly pull the plug out of the socket (regular pliers may help but don't put too much pressure on the plastic. The lower mount is straightforward, 17mm nut and you can pull the shock out. As I wasn't putting a standard shock back in, I gave the car side wiring socket a generous gob of dialectric grease to keep crap out in the future. Putting the new shock in is straightforward, feed it into at least 1 of the bolt holes at the top and reach around to put a nut on it to hold it up. Then put on the other 2 top nuts loosely and put the shock onto the lower mounting bolt (you may need to lift the hub a little if the new shock is shorter). Tighten the lower nut and 3 upper nuts and you are done. In my case the BC Racing shocks came assembled for the fronts, but the rears needed to re-use the factory strut tops. For that you need spring compressors to take the pressure off the top nut (they are compressed enough when the spring can move between the top and bottom spring seats. Then a 17mm ring spanner to undo the nut while using an 8mm open spanner to stop the shaft turning (or, if you are really lucky you might get it off with a rattle gun).
    • You will now be able to lift the parcel shelf trim enough to get to the shock cover bolts; if you need to full remove the parcel shelf trim for some reason you also remove the escutcheons around the rear seat release and you will have to unplug the high stop light wiring from the boot. Next up is removal of the bracket; 6 nuts and a bolt Good news, you've finally got to the strut top! Remove the dust cover and the 3 shock mount nuts (perhaps leave 1 on lightly for now....) Same on the other side, but easier now you've done it all before
×
×
  • Create New...