Jump to content
SAU Community

Recommended Posts

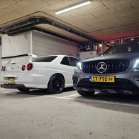
After purchasing the kit 2 weeks back, i sent it in to get sprayed and fitted, and it came back last nite all done. Im real happy with the look i've got. I didnt want to change the front bar, as i didnt want to lsoe the factory blinkers and spot lights, as i use them heaps, so i ended up getting a front lip, which compliments the front bar. This was supplied from the top guys as Powerplay imports

For the side skirts i went through (www.fibrecrazy.com) to get these, and considering they were fibreglass the fitment was perfect, they didnt need any work to fit them, apart from the sanding. These are veilside E1's.

And finally for the rear pods, they are guniene east bear items, also supplied from Powerplay imports. These guys stock some awesome stuff, and i cant thank them enough for supplying 2 of the 3 items.

It looks pretty good in pics, but in person it looks nuts as you can see the detail. Oh and these were jsut quick snaps this morning before work on my phone, i will take decent pics this wkend :thumbsup:

kit3.jpg

kit2.jpg

kit1.jpg

Edited by mr_crust
Link to comment
https://www.sau.com.au/forums/topic/118358-bodykit-fitted/
Share on other sites

looks really POO!!

lol nah looks very nice mate... when i saw the skirts i was like nOooOOOO not a veilside kit... then realised they looked nothing like VS skirts and i was just blind... S2 33s always look good with a front lip ext. on them... that one more so :D

Link to comment
https://www.sau.com.au/forums/topic/118358-bodykit-fitted/#findComment-2178475
Share on other sites

well the wheels are 18", and i only purchased them 2months back, so im not getting anything bigger, and as i drive this everyday i dont wanna lose the ride quality.

as for lowering it, im scared to do it, ive had the kit for 1 day and i left my missues place and i already scraped under the frotn lip at stock height, so if i lower it, its only gonna be for show purposes.

Link to comment
https://www.sau.com.au/forums/topic/118358-bodykit-fitted/#findComment-2181206
Share on other sites

Create an account or sign in to comment

You need to be a member in order to leave a comment

Create an account

Sign up for a new account in our community. It's easy!

Register a new account

Sign in

Already have an account? Sign in here.

Sign In Now


  • Similar Content

  • Latest Posts

    • Ah. OK. I take it back. I hadn't looked closely at the R33/4 arms and presumed that GKTech did as GKTech do everywhere else, which is to use sphericals there. The poly bushings are made to be 100% interchangeable, should use the standard bolt just fine. Every other bush in every other place in pretty much every other car, does.
    • @silviaz Ok cool, so much easier with a video. I can see why this video would be confusing for new players.   It is obvious that this entire bonnet is going to be resprayed, have a look in the background around 2:05, you can see a bunch of bare metal on the left side of the bonnet.  It's not an issue for the primer being laid down on the non-prepped clear on the bonnet. It will be sanded off at a later stage.  This might not be obvious to new players, but working on bare metal and factory paint in this instance, the factory paint is like a mountain and the bare metal is a huge valley. The bonnet needs to be levelled flat before it receives it's final stage of colour and clear coat. During this levelling process, the primer that is landing on the clear that you are worried about will be removed.  Also, this guy is out of control. Zero PPE while spraying, maybe he is a good example overall about what not to do lol.
    • Ok I FINALLY found a video lol. This took way longer than it should have as I could have sworn I saw multiple videos like this. I kept finding the completely opposite (the correct way of doing this). I wouldn't be surprised if I f**ked this up somehow.  I just realised where I've been getting confused and even with other things I work on. I haven't been doing things the regular way instead I'm going a roundabout way of doing things, like putting epoxy primer first then filler for example instead of putting just filler then primer on top of that, then wondering what happens if I get that primer on the clear coat that I haven't sanded yet. This was a bit of an epiphany 😂  But anyways, here this video. Time stamp, 2:56, some of the primer lands on the paint unscuffed above. You can see from the reflection it looks shiny.  
    • It does, this part circled in red. I assume the OEM bolt might not work well with the poly bushing because the dimensions may be different?
    • The J arm doesn't have bushes either. Assuming that by "J arm" you mean the part of the upright that runs down from the upper arm's outer bushes to the top of the hub. That has a kingpin style bearing in it. If you meant the lower control arm, it has 1 bush, at its inner end. If you have PU in there, that is superior to Nismo rubber. If you meant the caster/tension rod - it has 1x bush at the front end, and again PU is superior to Nismo rubber. But as I said above, I would definitely get the GKTech arms for that, as sphericals slay all other options there.
×
×
  • Create New...