Jump to content
SAU Community

Recommended Posts

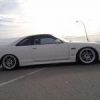
I thought I would post about my 1996 R33 skyline gts-t m-spec since I have owned it for 7 years and don't look to be getting rid of anytime soon.

Its a series 2 so it has the nicer interior and ABS brakes and currently has 136,000 genuine kms on it.

History

The car was imported to Australia in 1999. That owner kept the car until 2004. The second owner kept the car until 2007, where I bought it and have had it ever since. I spent months looking for a good clean 33, the previous owner was in his mid 30's and had 3 or 4 cars all kept in his garage where he hardly drove this Skyline. I bought it from Melbourne and had Nizzpro go over the car for me before I bought it.

My car came with 124,000 km on the clock, Tein coilovers, 3" exhaust and 19" Buddy Club wheels.

I have done quite a few mods, with more mods and updates to come.

First pics is the car advertised on car sales. Other pics, back home in Adelaide with my nephew.

post-59293-0-74033600-1405390903_thumb.jpg

post-59293-0-06087800-1405390961_thumb.jpg

post-59293-0-16458700-1405390975_thumb.jpg

Link to comment
https://www.sau.com.au/forums/topic/445659-r377-m-spec-r33-gts-t-build/
Share on other sites

  • 2 weeks later...
  • 4 weeks later...

In late 2010 i ordered some 18" Enkei RPF1 and tires from tirerack.com. Dunlop Direzza Sport Z1 Star Spec 235/40/18 and 265/35/18 X 2. Came to $1100 US delivered, just coming in at under the $1000 mark to save import tax

http://www.caranddriver.com/comparisons/dunlop-direzza-sport-z1-star-spec-page-3

April 2012

http://web.archive.org/web/20120410143301/http://www.tirerack.com/tires/surveyresults/surveydisplay.jsp?type=EP

wet-tire-test-dunlop-direzza-sport-z1-st

Edited by R377

After the Tune Agent tie rods etc I bought Whiteline front and rear sway bars with Swaybar link kit-spherical rod end.

With each mod I drove the car around for months to see what advantage it gave over the original part beforehand. The sway bars were great bang for buck, I would recommend them for anyone wanting their car to handle better.

The Swaybar link kit-spherical rod end's were solid and made my car too stiff and harsh for the road. I later replaced these and notice a big difference with comfort on the roads.

Just got my car back. New NPC clutch installed, fuel pump and 1000cc Bosh injectors tuned with new Link ECU to take E85. Got the car home. Took it out on the w/e only to come home by tow truck.

Was leaking coolant from the back of the motor. Had another look tonight and I can see the hose but really, really difficult to get to.

This is first time in seven years my Skyline has ever let me down. Can't help but think maybe the workshop knocked the hose when taking the gearbox off to install my clutch ?

  • 1 year later...

I installed the coilovers myself and had Pedders Suspension Morphett Vale fit front and rear camber kit.

With the new Direzza tyres, coilovers, camber kit and alignment I was very happy with the way it handled. Was a massive difference to when I first got it with Tein's, 19" Buddy Club wheels with Kumho KU31 tyres.

After only a few drives there was a horrible knocking noise coming from under the car. I jacked up the car and went over all the nuts and suspension but couldn't find anything wrong with it. I took it back to Pedders Morphett Vale and they couldn't find anything wrong with it. I went home again and went over everything. It still made that noise so I took it back again to Pedders. They couldn't find the noise and sent me to a diff specialist. Still couldn't find the noise so I gave up and just let the car sit for 6 months.

I then rang Pedders Morphett Vale who I found out had closed. I then went to Marion. As my car was still a bit hard I thought I would replace the solid Swaybar link kit with nolathane. This made the car less harsh and the annoying noise had actually gone.

I asked Marion Pedders to lower my car a little (not stupid) and align it. When I picked it up, it was heaps low. The manager there assured me it wasn't too low and wouldn't rub or scrape. After going for my first drive it was scraping really bad and over a pothole hit and cracked the paint on the front guard.

I took it back to Marion Pedders, who told me they raised it and it drove nicely. I drove it out and instantly noticed it pulled to the left. I drove back, they told me they were too busy so we decided to book it in another time.

I dropped it off next week for 4 days, only to pick it up and nothing had changed. I rang them and they told me they were flat out but would do it in a couple of weeks. I booked it in again, picked it up, got assured it was good and didn't pull to the left only to find out they hadn't even touched it again....

I was going to write a complaint letter to Pedders but just couldn't be bothered. Marion was 20-25 mins drive for me.

I booked it into Andy's Tyrepower at Seaford. They have done quite a few drift and circuit cars. I was happy with their alignment and the car drove great after they had set it all up again after the Marion headache...

Edited by R377

Here is my R33 Skyline GTS-t with 18" Enkei RPF1

http://www.sau.com.au/forums/topic/84208-wheel-sizes-offsets-for-skylines/page-123

Front 18X9.5 + 15. 235 tyre with -3 degrees of camber

Rear 18x10 + 38 (5mm spacer) 265 tyre with -2 degrees of camber.

I could just squeeze my fingernail under the rear guard.

Thanks to Joey for his advice on wheel fitment (he is still offering advice on here)

Car looks tough with them wheels and stance :thumbsup: I'd never go to Pedders or any of them Franchise places, it can be hard to find a good place to get knowledgeable professionals to work on your car. Took me a couple of years to find a good Tuner after going thru the big name rip off's, glad it finally worked out for you.. ;)

Edited by AngryRB
  • Like 1
  • 5 months later...
  • 9 months later...
  • 1 month later...
On 08/06/2016 at 2:57 PM, Nate888 said:

How much inside clearance was there with the rear wheels?


Moved house and just got my pit and garage set up and concreted.  Pulled car over the pit, with my current setup I reckon there was approx 25mm at the front and about 15mm at the back - thats from inside of wheel to the strut.

Might look at new wheels to see if i can go a bit wider on the wheels and tyres...


  • 4 weeks later...


Finally got some power out of my car back in 2014.  As some of you know I ordered a Forced Performance HTA turbo from Jacky Chan - CJ Motors.  I could of got it about the same price ordering from the USA but thought I would support local australian business.

Jacky Chan sent me the wrong turbo, then lots of back and forth with him claiming it was the right turbo.  After months of his lies, I had enough and had to seek legal action.  I had run out of time, money and patience so I went with a Hypergear ss2 with stock manifold and internal wastegate.

It did make 295rkwk on e85 and 279kw on pump fuel.  Could of made a bit more, but was tuned safe and rich


dyno.279kw.pump.fuel.jpg

  • Like 2

Create an account or sign in to comment

You need to be a member in order to leave a comment

Create an account

Sign up for a new account in our community. It's easy!

Register a new account

Sign in

Already have an account? Sign in here.

Sign In Now


  • Similar Content

  • Latest Posts

    • Nah, that is hella wrong. If I do a simple linear between 150°C (0.407v) and 50°C (2.98v) I get the formula Temperature = -38.8651*voltage + 165.8181 It is perfectly correct at 50 and 150, but it is as much as 20° out in the region of 110°C, because the actual data is significantly non-linear there. It is no more than 4° out down at the lowest temperatures, but is is seriously shit almost everywhere. I cannot believe that the instruction is to do a 2 point linear fit. I would say the method I used previously would have to be better.
    • When I said "wiring diagram", I meant the car's wiring diagram. You need to understand how and when 12V appears on certain wires/terminals, when 0V is allowed to appear on certain wires/terminals (which is the difference between supply side switching, and earth side switching), for the way that the car is supposed to work without the immobiliser. Then you start looking for those voltages in the appropriate places at the appropriate times (ie, relay terminals, ECU terminals, fuel pump terminals, at different ignition switch positions, and at times such as "immediately after switching to ON" and "say, 5-10s after switching to ON". You will find that you are not getting what you need when and where you need it, and because you understand what you need and when, from working through the wiring diagram, you can then likely work out why you're not getting it. And that will lead you to the mess that has been made of the associated wires around the immobiliser. But seriously, there is no way that we will be able to find or lead you to the fault from here. You will have to do it at the car, because it will be something f**ked up, and there are a near infinite number of ways for it to be f**ked up. The wiring diagram will give you wire colours and pin numbers and so you can do continuity testing and voltage/time probing and start to work out what is right and what is wrong. I can only close my eyes and imagine a rat's nest of wiring under the dash. You can actually see and touch it.
    • So I found this: https://www.efihardware.com/temperature-sensor-voltage-calculator I didn't know what the pullup resistor is. So I thought if I used my table of known values I could estimate it by putting a value into the pullup resistor, and this should line up with the voltages I had measured. Eventually I got this table out of it by using 210ohms as the pullup resistor. 180C 0.232V - Predicted 175C 0.254V - Predicted 170C 0.278V - Predicted 165C 0.305V - Predicted 160C 0.336V - Predicted 155C 0.369V - Predicted 150C 0.407V - Predicted 145C 0.448V - Predicted 140C 0.494V - Predicted 135C 0.545V - Predicted 130C 0.603V - Predicted 125C 0.668V - Predicted 120C 0.740V - Predicted 115C 0.817V - Predicted 110C 0.914V - Predicted 105C 1.023V - Predicted 100C 1.15V 90C 1.42V - Predicted 85C 1.59V 80C 1.74V 75C 1.94V 70C 2.10V 65C 2.33V 60C 2.56V 58C 2.68V 57C 2.70V 56C 2.74V 55C 2.78V 54C 2.80V 50C 2.98V 49C 3.06V 47C 3.18V 45C 3.23V 43C 3.36V 40C 3.51V 37C 3.67V 35C 3.75V 30C 4.00V As before, the formula in HPTuners is here: https://www.hptuners.com/documentation/files/VCM-Scanner/Content/vcm_scanner/defining_a_transform.htm?Highlight=defining a transform Specifically: In my case I used 50C and 150C, given the sensor is supposedly for that. Input 1 = 2.98V Output 1 = 50C Input 2 = 0.407V Output 2 = 150C (0.407-2.98) / (150-50) -2.573/100 = -0.02573 2.98/-0.02573 + 47.045 = 50 So the corresponding formula should be: (Input / -0.02573) + 47.045 = Output.   If someone can confirm my math it'd be great. Supposedly you can pick any two pairs of the data to make this formula.
    • Well this shows me the fuel pump relay is inside the base of the drivers A Pillar, and goes into the main power wire, and it connects to the ignition. The alarm is.... in the base of the drivers A Pillar. The issue is that I'm not getting 12v to the pump at ignition which tells me that relay isn't being triggered. AVS told me the immobiliser should be open until the ignition is active. So once ignition is active, the immobiliser relay should be telling that fuel pump relay to close which completes the circuit. But I'm not getting voltage at the relay in the rear triggered by the ECU, which leaves me back at the same assumption that that relay was never connected into the immobiliser. This is what I'm trying to verify, that my assumption is the most likely scenario and I'll go back to the alarm tech yet again that he needs to fix his work.      Here is the alarms wiring diagram, so my assumption is IM3A, IM3B, or both, aren't connected or improper. But this is all sealed up, with black wiring, and loomed  
×
×
  • Create New...