
Skyline Drivetrain And Suspension In 1948 Studebaker

Announcements
-
Similar Content
-
-
Latest Posts
-
 Could you message me please. Cheers
 -

By Dose Pipe Sutututu · Posted
Not fine enough, only good as a pre filter. You need like a 10 micron. FWIW I run a 40 micron pre filter then before the rail, there's a 10 micron (maybe finer, can't remember). -
 OK, so. Look very closely at this. Here is a snip of the ECU diagram. Note that the VSS (Vehicle Speed Signal) input to the ECU is sent from the speedo head. The speed sensor on the gearbox (whether auto or manual) is connected to the speedo, and the speedo converts that AC voltage signal to a 0-5V DC PWM signal that the ECU reads. Pin 58 is NOT used by the ECU. It is used by the TCU. And unlike Duncan's thought on the matter, I would think that the only comparison done (by the TCU) would between trans output shaft speed and engine rpm. This so that the TCU can know whether the lockup converter is doing its thing, the clutches are managing shifts appropriately, etc etc. I would be willing to bet that the only speed signal you need to intercept with any speed cut defender, regardless of auto or manual transmission, would be the VSS into pin 29. That is the only speed signal available on a manual. And here is the rub. Your car is a manual. So why are we even having this conversation. There is NO speed signal input on pin 58 on your car right now and it runs just fine. That should tell you how important that pin is for your manual ECU.
 -
 well, here's hoping it is off to a good home, looks like the new owner got a steal
 -

By robbo_rb180 · Posted
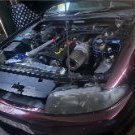
That's the last time I'll see the 180sx. It's off to Victoria do keep an eye out for it down there.
-


Recommended Posts
Create an account or sign in to comment
You need to be a member in order to leave a comment
Create an account
Sign up for a new account in our community. It's easy!
Register a new accountSign in
Already have an account? Sign in here.
Sign In Now