Jump to content
SAU Community

Recommended Posts

Hello fellow enthousiasts,

I would like to introduce myself as a newbie.

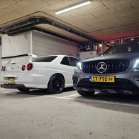
My name is Hafid and I am from the Hague, The Netherlands. I am 34 years old and recently the proud owner of a white Nissan Skyline R34 GT+T auto from 2000. As a daily I drive a 2018 GLC220d. This is my first JDM machine, I did have a few European project cars before, though.

I don't want to say the car was neglected, but many upgrades were done on a budget and my goal is to get it in great condition and complete. 

My plans are as follow:

- Manual swap with a CD009 6 speed transmission (planned next week)

- Z-tune bodykit for a GT-R look

- Wrap or paint to gunmetal grey 

- Big brake kit 350z or 370z

- Complete the turbo conversion. Currently the power is limited to approx 250 bhp due to the gearbox not being able to cope. When manual converted, retune to approx 320 bhp. Hopefully with some future upgrades, get to around 450bhp. 


The little things I want to do or are missing

- Install a tablet on the MFD location displaying ECU stats

- Watercool the turbo (no idea why it is not yet cooled)

- Missing the washer reservoir (due to FMIC placement) Currently missing the reservoir :(

- Some nice seats

- Install cat or extra muffler. Currently it's obnoxiously loud (screamer pipe)

- Oil catch can 

- Horn was not working, aftermarket steering wheel. Clockspring was missing, recently bought

I am not really a streetracer or in extreme need for speed but I do want to take it on the track every now and then. To be fair, most of the upgrades are for the looks because from my perspective the R34 still is one of the most beautifull cars ever.

Hope to receive and give some good tips from the forum!


2023-09-05 10_23_56-Foto - Google Foto's en nog 5 andere pagina's - Werk - Microsoft​ Edge.png

  • Like 4

@Predator1 the engine runs extremely smooth and apart from the tune to get the power to around 320 bhp and the future plans to get it to 450 I don't really have any other wishes. I'm no extreme speedfreak on the roads and want it to be as reliable and fun as possible. But the engine is most definitely also on the list as mentioned above. 

I already purchased the bodykit and started assembly on the front. It is a cheap aftermarket bodykit so the fitment was absolutely hideous. I will be bringing the whole lot to a bodyshop for fitting, aligning and modifying to get it spot on: 

image.thumb.png.13a0f68b6cb83c4d9a392700152e4f0b.png

13 minutes ago, Hafidel36 said:

It is a cheap aftermarket bodykit so the fitment was absolutely hideous. I will be bringing the whole lot to a bodyshop for fitting, aligning and modifying to get it spot on: 

image.thumb.png.13a0f68b6cb83c4d9a392700152e4f0b.png

Sometimes the correct decision is to stop throwing good money after bad :( 

If the company that sold that kit had a picture on their site of it fitting correctly, I'd be chasing a refund (false advertising) and going down another path. 

I can't see your 'cheap' body kit being cheap after you've paid the bodyshop to make it fit. 

As someone who is waiting on a bonnet and bumper of that style myself, I would very much love to confirm you didn't get it where I am waiting mine from.......

On 10/09/2023 at 4:03 AM, Hafidel36 said:

What do you mean? Do you have a photo? 

Get square shrouds for your projectors, e.g.: https://lightwerkz.net/search?type=product&q=square+shroud

makes it look nicer (the panasquare also has DRL build in, Porsche Panamera based from back in the day).

  • 1 month later...

Update 1:

Fitted the CD009 6speed gearbox with a PMC Motorsport adapter set and clutch kit. Lots of modifications were needed, but install done by the tuner.


Also removed the Nissan ECU and now running completely on ECUMASTER ECU. Shifter fork got pushed way back, so am thinking of a solution to get it centered again.

WhatsApp Image 2023-10-16 at 11.38.31.jpeg

  • Like 1

Update 2: Fitted R33 GTST brake set all around. Not yet the full big brake setup I wanted, but got a very good deal on them and they are much nicer than the original GT brake. Calipers painted in metallic gold.

PXL_20231105_145356786.jpg

  • Like 1

Update 3:

3d scanned the dash to fit a custom screen on the MFD location. Got it engineered and will be 3d printing it and hope to get a nice wrap to get the same finish as the original dash. This will be a nice custom solution for all types of displays :) 

2023-11-07 11_28_31-Foto - Google Foto's en nog 6 andere pagina's - Werk - Microsoft​ Edge.png

WhatsApp Image 2023-11-07 at 10.46.58.jpeg

  • Like 3

Update 4:

Fitted a oil catch can with an open air vent. Ordered the wrong hose connections though :) so need adapters for the valve cover breathers. Does anyone know what the original diameter is?

WhatsApp Image 2023-11-02 at 15.43.33.jpeg

  • Like 1
On 07/11/2023 at 9:30 PM, Hafidel36 said:

Update 3:

3d scanned the dash to fit a custom screen on the MFD location. Got it engineered and will be 3d printing it and hope to get a nice wrap to get the same finish as the original dash. This will be a nice custom solution for all types of displays :) 

2023-11-07 11_28_31-Foto - Google Foto's en nog 6 andere pagina's - Werk - Microsoft Edge.png

WhatsApp Image 2023-11-07 at 10.46.58.jpeg

This looks super cool! 

  • Like 1
  • 2 weeks later...
1 minute ago, GoHashiriya said:

Nice! There seem to be a fair few of these in the Netherlands. I'm moving to NL next month and shipping my car (R34 GTT) from Japan this month. 

Nice! The JDM community in the Netherlands is pretty active. You will feel more than welcome I'm sure :D! Make sure you bring along a sh*tload of special parts to bribe us. 😂

2 minutes ago, Hafidel36 said:

Nice! The JDM community in the Netherlands is pretty active. You will feel more than welcome I'm sure :D! Make sure you bring along a sh*tload of special parts to bribe us. 😂

I was selfish and bought a load of crap for my car before sending it (it's at the port now). A spare set of Recaros (SR3 Le Mans) I was planning to use in my E90 but I'm not sure anymore, the R34 has Bride Zeta 4s. I'm lucky as my company is Japanese so I can order stuff through the Japan office pretty easily - perfect for bribery.   

The company has put me in Maastricht until July, then I've gotta figure sh*t out on my own. Probably will move somewhere more central like Utrecht/Den Bosch when the rental contract is up.

Honk if you see me:

   image.thumb.jpeg.dbee20c223a37ca917fd8c71f244e067.jpeg

Create an account or sign in to comment

You need to be a member in order to leave a comment

Create an account

Sign up for a new account in our community. It's easy!

Register a new account

Sign in

Already have an account? Sign in here.

Sign In Now


  • Similar Content

  • Latest Posts

    • Stock ECU (or more accurately stock tune) absolutely refuses to go over 10psi and behaves like you have seen. The Nistune is the same if it is the stock tune. If the Nistune chip has been tuned, the resulting tune could be literally anything for any combination of parts. The Nistune just makes the stock ECU Tunable.
    • So stock ECU does not like anything above 10 psi?  That Nistune one is just for "try" if it will be any different, I know it need to be tune for that. I know but YOU may know about these problem but i/we dont. They few little Skylines here let alone people who know anything about tham so that is why iam asking here  
    • So now we have a radiator with no attachments whatsoever. It lifts up with a particularly tight spot between the drivers side air box mount and the lower radiator outlet, but if you've got this far you will sort that too. This is the lower mounts with the rad out so you can see where the rubber bushes go, it is a straight shot upwards Done! Assembly is the reverse of disassembly, with blood less likely to be shed.
    • Right, onto the second last trick. The Air Con condenser is mounted to the front of the radiator and stays in the car when the radiator is removed. There are 2x 10mm headed self tappers holding the top of the condenser to the radiator, remove those The bottom of the condenser is attached to the radiator with clips. You need to lift the condenser out of those clips and clear (up, then forward). f**ked if  could work out how to do that last bit with the front bumper on. I hope you can, and you share the trick.  Bumper removal probably deserves its own thread one day once I've recovered the will to live, but basically you need to remove the wheels, front inner guard liners (clips and 10mm headed bolts), the self tapper between the guard and the bumper at the rearmost point of the bumper (same as an R32 that bit), any remaining clips at the top/front of the grill, an absolute bastard design with a plate that holds the top of the bumper above the headlight each side (only 1 bolt which is tricky to get to, but the plate catches 2 places on the bumper and must be removed....carefully!) and push clips between the bumper and guard under the headlight. If you've done all that you will be faced with wiring for the fog lights on both sides and in ADM Q50 RS at least, 4 nasty tight plugs on the driver's side for the ADAS stuff. So, the clips at the bottom look like this on drivers side (looking from the front) And on the passenger side (also from the front), you can see this one is already out Clearance on both of these are super tight; the condenser needs to move up but the upper rad support mount prevents that, and the radiator can't move down far because it is (rubber) mounted. Once you achieve the impossible and drop the condenser off those mounts so it does not stop the rad moving, you are good to go
    • OK, next the shroud needs to come off and there are a couple of tricks. Firstly, there is a loom from near the passenger side headlight to the fans, coolant temp sensor etc and there is no plug to undo.  In my case I was OK to leave the shroud on top of the engine so I just undid the passenger side fan plug and about 10 of the clips which gave enough free wire to put it aside. The fan plugs were super tight, the trick I used was a small falt screwdriver to push down on the release tab, then a larger flat screwdriver to lever the plug out of the fan unit....be careful with how much force you apply! If you need to remove the shroud altogether for some reason you will have to deal with all the plugs (tight) and clips (brittle)....good luck. I removed all of the clips and replaced them with cable ties that I will just cut next time. Also, in the Red Sport / 400R at least, the intake heat exchanger reservoir hose is bolted to the shroud in 2 places with 10mm headed bolts; so remove them (the hose stays in the car; no need to undo it at the t fittings down at the radiator lower mount. Once you've dealt with the HX hose and the wiring loom, there are 3x 10mm headed self tappers holding the top of the shroud to the radiator; remove those.   The shroud then lifts out of the bottom mounts where it sits on the radiator, up and onto the engine out of the way. Simples
×
×
  • Create New...