


ob1
-
Posts
217 -
Joined
-
Last visited
-
Days Won
1 -
Feedback
100%
Content Type
Profiles
Forums
Events
Gallery
Media Demo
Store
Everything posted by ob1
-
I was the other way - if anything, i would cut the bumper, not the reo for roadworthy and insurance reasons, but i really didnt want to do either. I was seriously considering the Cooling Pro kit (over the Blitz kit) because it was a bit smaller and cheaper, but in the end my measurements said it wouldn't fit without cutting. I'm 99% certain that no-one on here can claim to have installed either of those without any cutting at all (and still fit the undertray plastic). If they have i'd like to hear the trick to it My estimate is the total size of the cooling pro intercooler is ~72cm x 32cm including end tanks and the return pipe. My measurements showed me i could go for a max. length cooler of 76cm x 30cm, or a max height option of 65cm x 36cm, both of which would avoid any cutting. The CP kit just misses out on both options. The theory behind the vertical flow cooler is: - having a large surface area core and short tubes (vertical flow) is better for flow/pressure drop than having small surface area and long tubes (horrizontal flow) for the same given volume - most of the cooling is performed in the first few inches of travel through the core, so tubes dont need to be all that long. I'm not a thermodynamicist, but the theory seemed sound There's a lot of anecdotal evidence via Google that supports these points. If you cut the reo, you wont have to change the fan - you will get the extra forward room you will need to avoid hitting the centre of the fan axle. With the no-cut option, i definitely had to change the fan. There is less than 10mm gap as it is.
-

R34 Factory Aero Kit, Intercooler Install Question
ob1 replied to neopowered34's topic in Engines & Forced Induction
i have that bar and i wanted the same deal - FMIC without cutting. Check out my work thread here: http://www.skylinesaustralia.com/forums/topic/424157-r34-gtt-fmic-with-no-bodywork-cutting/ -
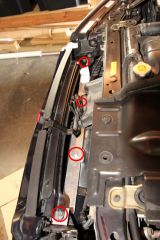
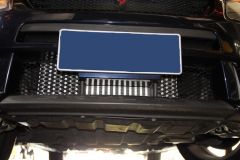
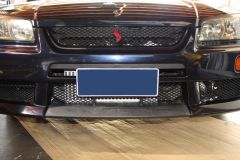
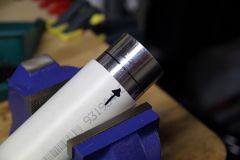
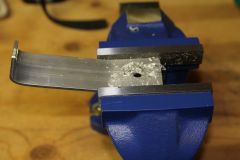
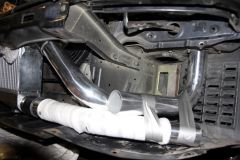
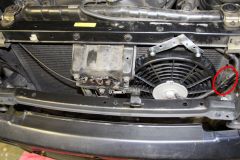
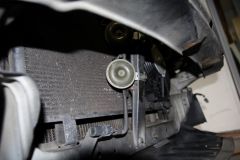
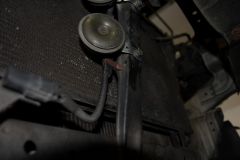
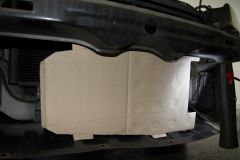
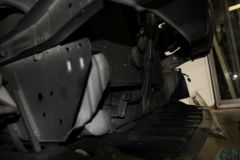
I'm looking for modest power gains from a a highflow turbo and wanted to install a return flow FMIC, but absolutely didn't want to cut any reo or bumper. I have the factory Nismo bodykit, which looked to me like it left HEAPs of room for a FMIC, so long as you found the right size/shape. I felt the off-the-shelf kits were all going to be too big and involve at least some cutting, so i went down the path of customising the fitting and piping to suit a specific cooler. Additionally, i have been reading about the flow benefits from using a vertical flow intercooler with a short/fat air pathway so i trawled the net for a not-too-big, not-too-expensive vertical flow to suit. Some of the items that were close, but not quite right - either for size or price: http://www.cxracing.com/mm5/merchant.mvc?Screen=PROD&Store_Code=CXR&Product_Code=IC0005&Category_Code=IC30CO http://www.cxracing.com/mm5/merchant.mvc?Screen=PROD&Store_Code=CXR&Product_Code=IC0002-A&Category_Code=IC30CO http://www.ebay.com.au/itm/464x154x90mm-Intercooler-Core-/380512779982#ht_2022wt_1139 http://www.treadstoneperformance.com/product.phtml?p=33&cat_key=63&prodname=TRV185++Series+Intercooler++720HP http://turboaddictionparts.com/catalog/18-x-6-x-2-75-intercooler-2-5-inlet-and-outlet.html http://www.ebay.com/itm/CXRacing-25-5x13x3-5-Turbo-FMIC-Intercooler-3-Inlet-Outlet-Ford-Mustang-/330666349041?pt=Motors_Car_Truck_Parts_Accessories&vxp=mtr&hash=item4cfd4011f1 but what i ended up with: Frozen Boost vertical flow Core size: 18.25"x6"x3.5" = ~6.3ltrs core volume (compared to ~3.8 for stock SMIC) Here's the process i went through to get that cooler to fit. 1. take off the bumper and remove the SMIC. 2. What i realised early on is that the horns and the radiator fan are the only 2 things intruding on a big empty space begind the front bar. With these out of the way, there is a HEAP of space: 3. Made some new horn brackets to bend them back out of the way: 4. I picked up a slimline 10" thermo fan on special from Supercheap to replace the much thicker stock one. Given that the electric fan is really just a backup fan and rarely comes on, i didnt need anything massive as a replacement. The connection to the stock loom was via a generic waterproof 2-wire plug/socket from Jaycar (circled). Just snip the old connector off and keep it with the old fan, then crimp on the new connector, making sure the polarity is correct so the fan spins the right way . The brackets for the new fan look a little dodgy (i might paint them black to make them less obvious), but they are strong enough. The brackets use the same hole and bolt as the stock fan. 5. With the horns moved and new fan, there is still plenty of room: 6. Test fit with a cardboard cutout before buying the intercooler. The dimensions on the website, along with the pictures allowed me to get the outline very close before ever laying hands on it. The key to this intercooler's size is that it's not too long (no reo cutting) and thicker than most kits (good flow/cooling). 7. Once i was sure the cooler would fit, i went ahead and ordered it and an assortment of pipe pieces, silicone joints and t-clamps to suit (all from the same place). I basically just hung the cooler from the crossbar and reo using rope and wire to test fit it, then made some aluminium brackets for it. The top bracket runs the whole way across the intercooler space. It bolts onto the body at either end and to the cooler at 2 points in the middle. I had to pick up some bolts (m8?) and washers, since none came with the cooler. Bracket was made from 40x3mm aluminium bar and was just cut, drilled and bent in a vice with hand tools. 8. the third point of attachment was a bracket for the bottom of the cooler that goes to one of the bottom bolt holes left by the old radiator fan. This is the bracket, but i dont have a pic of where it bolts to: 9. Once the cooler was 100% in place with the final brackets, i worked on the pipe routing. I had a rough idea in my mind which way the pipes would run, although it ended up being quite different Having a mixture of pipe and silicone bend angles made it easy to get the optimum pipe run. Here's some pipe test fitting so i could visualise before cutting: 10. pipe had to be cut to size with just a hacksaw. I used a piece of snug fitting PVC as a template to draw a neat circle around the pipe. Once the pieces were cut, they got the rough edges filed down, then a good rinse through with water to remove any filings. 11. here's the finished pipe run. In the end, the pieces that were required were 1. 60deg silicone 2. 90deg pipe 3. 90deg silicone 4. straight pipe going up to the stock rubber joint 5. straight silicone 6. 45deg pipe 7. 45deg silicone 8. 90deg pipe 9. 90deg silicone instead of the stock ~80deg rubber joint. 10. the bottom cooler bracket. I haven't had any of the pipe joints beaded yet, but they have no problem holding onto stock boost levels as they are. I may need to bead them after getting the high flow done. 12. all nice and neat behind the bumper: 13. and even the plastic undertray still bolts up (only just) BOM: 10" thermo fan - $40 fan wiring plug - $7 fan and horn brackets - $5 Intercooler, pipes, silicone and clamps - US$482 (shipped) Intercooler bracket stock - $12 Intercooler nuts and washers - $5 TOTAL: ~$550, plus a day's work to fabricate and fit. Overall i'm very happy with the end result. It was a fun little project and i got exactly what i was after.
-
installing a FMIC without cutting bodywork
-
-
From the album: R34 GTT FMIC intercooler install
-
From the album: R34 GTT FMIC intercooler install
-
From the album: R34 GTT FMIC intercooler install
-

From the album: R34 GTT FMIC intercooler install
-
From the album: R34 GTT FMIC intercooler install
-

From the album: R34 GTT FMIC intercooler install
-
From the album: R34 GTT FMIC intercooler install
-
From the album: R34 GTT FMIC intercooler install
-
From the album: R34 GTT FMIC intercooler install
-
From the album: R34 GTT FMIC intercooler install
-
From the album: R34 GTT FMIC intercooler install
-
From the album: R34 GTT FMIC intercooler install
-
From the album: R34 GTT FMIC intercooler install
-
Measuring Injector Duty Cycle Via Consult Port
ob1 replied to mrsr32's topic in Engines & Forced Induction
continuous, or just for a single sample? I've seen some strange spikes with weird numbers, but not continuously i.e. i think it was a reading error rather than a real problem. Also, all the different pieces of software ive tried read the same. -
sounds like fun, except for too many cars on track! How do you go with 20+ cars at once?
-
probably too late now, but....this sort of intermediate connection should be OK, as the extra resistance imparted by your "quick connect" system should only be a fraction of an ohm, which wont upset the AFM output voltage. Did you end up doing it this way?
-
sorry if it's been asked before, but how did you get the telemetry into the video?
-
hehehe, that was me. I was doing significantly more boring stuff (than playing with an r35) at the computer shop next door. Nice ride.
-
nevermind...picked up a good condition leather seat with rails from a local wreckers for $80!
-
a bump an a clarification...here's some examples of seats i would have taken, but missed out on: $84 http://cgi.ebay.com.au/ws/eBayISAPI.dll?Vi...=tab%3DWatching $100 http://cgi.ebay.com.au/ws/eBayISAPI.dll?Vi...=tab%3DWatching $100 http://cgi.ebay.com.au/ws/eBayISAPI.dll?Vi...=tab%3DWatching $80 http://www.skylinesaustralia.com/forums/R3...ts-t260169.html Ive had a few PMs, but i'm really not interested unless the quality and price is comparable to the above. When i said i want "fairly clean", i should have made it clear that rips and tears are not OK. I will be having kids play on this and a tear will go thru the whole seat in no time with them thx.
-
i didnt, but not really interested anyway. I'm teaching myself to weld and i will be making something like this: http://forums.overclockers.com.au/showthre...d=1#post8759706 cheers.


