
Nzmo32 R32 Gtr Build Up.
Announcements
-
Similar Content
-
-
Latest Posts
-
 My budget has already blown way out but I've got most of the big-ticket items out of the way haha I just got the box back from the shop, got them to inspect it and install one of those refresh kits with all new syncros and bearings so should feel much nicer. But yeah if there's a weak point it'll be the gearbox, I'm gonna roll with it for now and hope it holds together. Do have an Xtreme organic sprung twinplate clutch to go in so if/when the box lets go I'll be back open for suggestions haha
 -
 Dose salivating at the prospect of being able to recommend a gearbox upgrade!
 -

By Dose Pipe Sutututu · Posted
I sense an out of control build thread coming up lololol. That 450kW goal will end up being 600 to 700kW LOL. -
 Nice, thanks for sharing your progress....that's a pretty long list you are putting into it!
 -
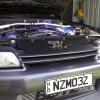
 Decided to upgrade my pressurised plastic coolant expansion tank for a fancy pants alloy version The OEM versions can get brittle, even the new plastic one I got when I first got the car is a starting to show signs of "stress" I wasn't cheap, but it is basically unbreakable
-


Recommended Posts
Create an account or sign in to comment
You need to be a member in order to leave a comment
Create an account
Sign up for a new account in our community. It's easy!
Register a new accountSign in
Already have an account? Sign in here.
Sign In Now