
Leaderboard


Popular Content
Showing content with the highest reputation since 17/07/25 in all areas
-
There's not a great deal to report here .... except ...... FOR .... LSD!!! I bought a Quaife LSD from the UK and shipped it here .... Wish I'd just bought locally cause the shipping and duty was $700! But there were so many diffs used in the E90s I just wanted to be absolutely certain I was getting the right one so I spoke with a supplier in the UK who builds race cars and they have heaps of experience with the E90s. I pulled the diff out which was seriously awesome - I've never done anything like that before, I must have watched 1000 videos on YT about it as well as consulting the Bentley manual. It was super easy in the end. The diff was delivered to the awesome folks at Hornsby Diffs and will be back in a few weeks. I also replaced the diff bushings with some Nolathane ones. Really looking forward to getting it back and getting back to the track or even the skidpan.6 points
-
I'm not normally one for posting random videos, but I thought we'd all appreciate the honesty about how broken our cars tend to be lol. Genuine skyline life here.4 points
-
Seat of the pants assessment of the new intake: The car is way less "doughy" when hitting the loud pedal, especially off idle when stopped or in traffic, I did use a cheapo lazer thermal thingo to measure the temp around where the pod filter got its air, it was between 55 - 60°C, in saying this the car was shut off and not moving, so the OEM intake pipe was not supplying any fresh air to where the pod was when the car was at least moving A weird bonus was induction noise on the throttle in the cabin increased a bit, I was worried that I was actually going to lose some of that induction noise I love so much, outside though, when I got the daughter to do a WOT drive by pass for me, the induction noise has increased alot when on the throttle, not quite ITB doort, but well up there I'm extremely happy with the results and have been exploring the country roads in the region As for house mods: 1.New front fence is up and is awesome, it really upgraded how the joint looks from the street, and the added security is nice 2. Electricians have replace some interior lights, and with more lighting in the garage, a few new motion detecting lights out the front above the garage, front room, and at the front door, which I have already found heaps helpful coming and going, also now has fancy pants CCTV all round the house The only hold point for power though is the solar and batteries due to supply issues, although this will happen over the next few weeks 3. I have done a heap of landscaping out the front and I'm almost ready to do a new small retaining wall with some nice blocks to replace the brick and cemented in rocks around the raised garden beds cemented in river stone "was the fashion at the time" the house was built. I currently have a pallet of retaining wall blocks and 2 bulka bags of 20mm blue metal to replace the wood chip that is in the raised garden beds around the house 4. I now have 3 big raised garden beds for out the back to grow some vegetables, about 70cm high, 200cm long and 100cm wide 5. My 2 compost bins are already pretty full with brown, green and kitchen waste from the landscaping I'vedone so far, but they will probably take a few months to break down, so anything else that gets chopped, trimmed, and kitchen waste will just start filling the base of the raised garden beds to about 30cm before I start throwing 40cm of good compost, and stuff, for the vegetables to grow in, I'll need a few ton of compost and soil, but the local supplier can sent me bulka bags of the stuff Basically the logs, wood chips and a few strategically placed rocks for drainage, will give the beds some good organic materials down low to break down over time, and they will hold moisture during the warmer months to save the water in my big arse water tank if we don't get alot of rain So, all in all, the car and house mods are going well, and I'm really enjoying being retired, I sleep in too 0700 and slowly plod around inside until I feel like actually doing anything, and only work in the yard for as long as want, which has actually been alot over the last few weeks, although when you look at it, it seems that not a huge amount of work has been done, until I look at the before I started the work pics Happy days and good times indeed4 points
-
A few small updates since the previous post and lessons. I decided to do a little interior light upgrade on the 110. I quite like the iilumo items, even if they're a bit of a premium over other brands. You'll also note the Stedi Fogs, that will go into the S15 fog lights as I needed to match the bulbs since I got the new ones earlier. I hope they fit as the body is quite a bit longer than your normal bulb. Annoyingly, I managed to trip the fuse, which normally wouldn't be an issue until I located the fuse. I can't say I've ever come across this. I had lucked out that someone nearby had a spare, but oddly enough Toyota dealerships seem to keep this in stock. I ordered some to keep in my stash and as luck would have it, someone else nearby tripped the same fuse so I passed on the favour. I also did a little service on the 110 ahead of some additional work coming up. It's been annoying that Goleby's stopped carrying this particular HKS filter for the 110, so now I need to keep them on order from Japan. I also took the opportunity to install a bash plate and number plate riser. The plate riser is such a cheap but nice fix to help really tidy up the car. I'm tempted to now also replace my headlights, on this car. Both items were from Project Aero. I also needed to replace the rear tyres on the 110, and after trying to get it aligned learnt that I need to replace some bushes in the front end, so that's next. Closing out this update with a nicer picture as always!4 points
-
So, I put my boat on a boat. First of all, I'm going to come out and say it. Why is Tasmania not considered a holy goal, an apex that all road-legal modified cars go to, to experience? This place is an absolute wonderland of titanic proportions. If people are already getting club runs for once in a lifetime 30 person cruises to Tassy then I've never seemed to see it. It is like someone replaced the entire place with an idyllic wonderland for cars, and all of the people living there with paid actors who are kind, humble, and friendly. Dear god. After doing a lap of almost all of the place I've found that it's a great way to find out all of the little things that the car isn't doing quite right and a great way to figure it all out. All in all, I drove for 4 hours a day for a week and nothing broke. I didn't even need to open the engine bay. This is by all means a great success, but it has left me with a list of things to potentially address. I also now have a 3D printed wheel fitment tool which annoyingly hasn't got any threads in it to actually assemble it. I might be able to tape it together to check the sizing I actually want to use, but it'll likely involving pulling the shocks out to properly measure travel at least at the front, and probably raise the car while I'm at it, at least in the rear. I scraped on quite a few things and I'm not sure how else to go about it. I was taking anything with a bump at what felt like 89 degree angles. And address those 10 other tasks. And wash the car. God damn it is dirty. And somehow, the weather was perfect the entire time - And because I was on the top of Mt Wellington it turns out it was very much about to freeze up there. I did something I typically never do and took some photos up there in what must have been -10 and the foggy felt like suspended ice, rather than mere fog. If you own a car in Australia, you owe it to yourself to do it.3 points
-
3 points
-
Woot! My diff is done! I just need to finish doing a wheel bearing while the exhaust and shaft is out of the way, pick it up and hopefully put it in next weekend!3 points
-
As discussed in the previous post, the bushes in the 110 needed replacing. I took this opportunity to replace the castor bushes, the front lower control arm, lower the car and get the alignment dialled in with new tyres. I took it down to Alignment Motorsports on the GC to get this work done and also get more out of the Shockworks as I felt like I wasn't getting the full use out of them. To cut a very long story short, it ended up being the case the passenger side castor arm wouldn't accept the brand new bush as the sleeve had worn badly enough to the point you could push the new bush in by hand and completely through. Trying a pair of TRD bushes didn't fix the issue either (I had originally gone with Hardrace bushes). We needed to urgently source another castor arm, and thankfully this was sourced and the guys at the shop worked on my car until 7pm on a Saturday to get everything done. The car rides a lot nicer now with the suspension dialled in properly. Lowered the car a little as well to suit the lower profile front tyres, and just bring the car down generally. Eternally thankful for the guys down at the shop to get the car sorted, we both pulled big favours from our contacts to get it done on the Saturday. Also plugged in the new Stedi foglights into the S15, and even from a quick test in the garage I'm keen to see how they look out on the road. I had some concerns about the length of the LED body and whether it'd fit in the foglight housing but it's fine. I've got a small window coming up next month where I'll likely get a little paint work done on the 110 to remove the rear wing, add a boot wing and roof wing, get the side skirt fixed up and colour match the little panel on the tail lights so that I can install some badges that I've kept in storage. I'm also tempted to put in a new pair of headlights on the 110. Until then, here's some more pictures from Easter this year.3 points
-
Also build this EH ute with 370z motor and gearbox with a couple of turbos just for fun.3 points
-
If you are getting that sort of fuel usage, you might as well be back in the stagea3 points
-
OK, so again it has been a bit of a break but it was around researching what had been done since I didn't have access to Neil's records and not everything is obvious without pulling stuff apart. Happily the guy who assembled the engine had kept reasonable records, so we now know the final spec is: Bottom end: Standard block and crank Ross 86.5mm forgies, 9:1 compression Spool forged rods Standard main bolts Oil pump Spool billet gears in standard housing Aeroflow extended and baffled sump Head Freshly rebuilt standard head with new 80lb valve springs Mild porting/port match Head oil feed restrictor VCT disabled Tighe 805C reground cams (255 duration, 8.93 lift) Adjustable cam gears on inlet/exhaust Standard head bolts, gasket not confirmed but assumed MLS External 555cc Nismo injectors Z32 AFM Bosch 023 Intank fuel pump Garret 2871 (factory housings and manifold) Hypertune FFP plenum with standard throttle Time to book in a trip to Unigroup3 points
-
A proper clutch/plate type mechanical diff with quite a lot of pre-load and high locking % is better for drifting. Much more consistent in its behaviour. A helical can be annoyingly vague and inconsistent in how it responds under the sorts of abuse found in drifting.3 points
-
Hi, Marek here 🙋♂️. I finally fulfilled my longtime dream - recently bought Stagea and now waiting for it to arrive in Poland. There's only few of these in my country, and one of the owners recommended mi this forum as a source of all the info i'd need since now i own one so here i am.3 points
-
Ive converted a few clusters for the R33 with 320km/h dials. On the back there are some pads which can be bridged or unbridged (using solder or wick braid) to calibrate it. There is one bridge which is for MPH <> KPH; and there are combinations of bridges to offset it. There is probably a diagram For example; this is my conversion for a 180km/h dial to a 320km/h dial (I put custom GT-R dials on it with the GTS25t layout) If you have J2 soldered (assuming the S clusters have a similar config to the R clusters); you may need to remove that solder3 points
-
Update 3: Hi all It's been a while. Quite a lot of things happened in the meantime, among other things the car is (almost) back together and ready to be started again. Things that I fixed or changed: Full turbo removal, fitting back the OEM turbo oil hardlines. Had to do quite a bit of research and parts shopping to get every last piece that I need and make it work with the GT2860 turbos, but it does work and is not hard to do. Proves that the previous owner(s) just did not want to. While I was there I set the preload for the wastegates to 0,9bar to hopefully make it easier for the tuner to hit the 370hp I need for the legal inspections that will follow later on. Boost can always go up if necessary. Fitted a AN10 line from the catch can to the intake hose to make the catchcan and hopefully the cam covers a slight vacuum to have less restrictive oil returns from the head and not have mud build up as harshly in the lines and catch can. Removed the entire front interior just shy of the dashboard itself to clean up some of the absolutely horrendous wiring, (hopefully) fix the bumpy tacho and put in LED bulbs while I was there. Also put in bulbs where there was none before, like the airbag one. I also used that chance to remove the LED rpm gauge on the steering column, which was also wired in absolute horror show fashion. Moved the 4in1 Prosport gauge from sitting in front of the OEM oil pressure gauge to the center console vents, I used a 3D printed vent piece to hold that gauge there. The HKB steering wheel boss was likely on incorrectly as I sometimes noticed the indicator reset being uneven for left vs. right. In the meantime also installed an airbag delete resistor, as one should. Installed Cube Speed premium short shifter. Feels pretty nice, hope it'll work great too when I actually get to drive. Also put on a fancy Dragon Ball shift knob, cause why not. My buddy was kind enough to weld the rust hole in the back, it was basically rusted through in the lowermost corner of the passenger side trunk area where the wheel arch, trunk panel and rear quarter all meet. Obviously there is still a lot of crustiness in various areas but as long as it's not rusted out I'll just treat and isolate the corrosion and pretend it's not there. Also had to put down a new ground wire for the rear subframe as the original one was BARELY there. Probably a bit controversial depending on who you ask about this... but I ended up just covering the crack in the side of the engine block, the one above the oil feed, with JB Weld. I used a generous amount and roughed up the whole area with a Dremel before, so I hope this will hold the coolant where it should be for the foreseeable future. Did a cam cover gasket job as the half moons were a bit leaky, and there too one could see the people who worked on this car before me were absolute tools. The same half moons were probably used like 3 times without even cleaning the old RTV off. Dremeled out the inside of the flange where the turbine housing mates onto the exhaust manifolds so the diameter matches, as the OEM exhaust manifolds are even narrower than the turbine housings as we all know. Even if this doesn't do much, I had them out anyways, so can't harm. Ideally one would port-match both the turbo and the manifold to the gasket size but I really didn't feel up to disassembling the turbine housings. Wrapped turbo outlet dumps in heat wrap band. Will do the frontpipe again as well as now the oil leak which promted me to tear apart half the engine in the first place is hopefully fixed. Fitted an ATI super damper to get rid of the worn old harmonic balancer. Surely one of the easiest and most worth to do mods. But torquing that ARP bolt to spec was a bitch without being able to lock the flywheel. Did some minor adjustments in the ECU tables to change some things I didn't like, like the launch control that was ALWAYS active. Treated rusty spots and surface corrosion on places I could get to and on many spots under the car, not pretty or ideal but good enough for now. Removed the N1 rear spats and the carbon surrounding for the tailpipe to put them back on with new adhesive as the old one was lifting in many spots, not pretty. Took out the passenger rear lamp housing... what do you know. Amateur work screwed me again here as they were glued in hard and removing it took a lot of force, so I broke one of the housing bolts off. And when removing the adhesive from the chassis the paint came right off too. Thankfully all the damaged area won't be visible later, but whoever did the very limited bodywork on this car needs to have their limbs chopped off piece by piece. Quite a list if I do say so myself, but a lot of time was spent just discovering new shit that is wrong with the car and finding a solution or parts to fix it. My last problem that I now have the headache of dealing with is that the exhaust studs on the turbo outlets are M10x1.25 threaded, but the previous owner already put on regular M10 nuts so the threads are... weird. I only found this out the hard way. So now I will just try if I can in any way fit the front pipe regardless, if not I'll have to redo the studs with the turbos installed. Lesson learned for the future: Redo ALL studs you put your hands on, especially if they are old and the previous owners were inept maniacs. Thanks for reading if you did, will update when the engine runs again. Hope nothing breaks or leaks and I can do a test drive.3 points
-
Evening, wanted to pop in and finally register to say hi to everyone here on SAU! It's been a while since I've been active on a forum, but back in the day I used to be relatively active on ClubLexus and other hobby-related forums. I'm glad to see SAU is still around, since with the advent of Facebook and Discord it seems forums aren't what they once were. As a recent new owner of an S1 260RS Stagea, I've found so many older guides and helpful tips from SAU that I figured I needed to join and say a grave thank you. My recent acquisition has only become legal in the US for the past year, and knowing that similar car enthusiasts from across the pond have already figured out the kinks and tricks to get these 25+ year old cars running well. I look forward to diving into more of the SAU forums as well as hopefully contribute some info myself for future posterity. As a pic tax, here is one of the few good photos I have of my Stagea. I hope to get way more in the future!3 points
-
Update all thanks to the workshop manual, it lead me back to checking fuses as mentioned central locking and door open lights worked when acc was switched on. diagram attached shows two points of power 1. ACC and 2. Batt with the later being fused (#28) I did check the fuses using a multimeter but I must have stuffed that up also. Went back and checked the batt fuse in interior fuse box and you wouldn’t believe it… a blown fuse. replaced fuse and everything is now working as it should including the climate control thank you all with your positive insight and knowledge.3 points
-
I can ship Nismo floor mats to you: https://www.oemsoko.co.jp/products/nismo-floor-mats-for-skyline-r33-bcnr33-stagea-wgnc34?_pos=1&_sid=9278c1467&_ss=r3 points
-
You're retired Mark, on bin night, go for a walk, kind of like you're doing the beep test. Put one rock in the first neighbours, come back, get another rock, go to the second neighbours, repeat over many weeks. All rocks eventually gone...3 points
-
I like they don't raise their hands into the air when they shift their sequential boxes, seems to be a thing here in Australia lol...2 points
-
I hear that would involve some nice country road drives into the hills for Mark...2 points
-
I thought I'd come back and add something I JUST learned. A Toyota LandCruiser with a 1HZ, mates perfectly with a bottle of Nulon brake fluid. As in, it perfectly screws in. Great make shift funnel when you cut the bottom of it off. This may work for your Corolla. Unfortunately, tipping a 10L drum is much harder than a 4 to 6L bottle, and they no longer include the easy pour tap which was just perfection to use previously.2 points
-
But not with the Wrist Twist!2 points
-
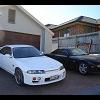
Got the passenger door on plus the master cylinder and booster. Loaded up to take it home. At home, the colour changes a lot in the light.2 points
-
Final update!!! Got the front bar fitted and sprayed and all sorted now. My cutouts worked great and the indicators aren’t just falling off. 😂2 points
-
i will be there 😁2 points
-
If the forester is anything like our old 2007 GTB Liberty, I could near on run ling Long's and "rate them", as no matter what, it just hung to the road, even when abusing it in a hard launch in the wet, or throwing it at corners.2 points
-
Well, apparently they do fit, however this wont be a problem if not because the car will be stationary while i do the suspension work. I was just going to use the 16's to roll the old girl around if I needed to. I just need to get the E90 back on the road first. Yes! I'm a believer! 🙌 So, I contacted them because the site kinda sucks and I was really confused about what I'd need. They put together a package for me and because I was spraying all the seat surfaces and not doing spot fixes I decided not to send them a headrest to colour match, I just used their colour on file (and it was spot on). I got some heavy duty cleaner, 1L of colour, a small bottle of dye hardener and a small bottle of the dye top coat. I also got a spray gun as I needed a larger nozzle than the gun I had and it was only $40 extra. From memory the total was ~$450 ish. Its not cheap but the result is awesome. They did add repair bits and pieces to the quote originally and the cost came down significantly when I said I didn't need any repair products. I did it over a weekend. The only issues I had were my own; I forgot to mix the hardener into the dye two coats but I had enough dye for 2 more coats with the hardener. I also just used up all the dye because why not and i rushed the last coat which gave me some runs. Thankfully the runs are under the headrests. The gun pattern wasn't great, very round and would have been better if it was a line. It made it a little tricky to get consistent coverage and I think having done the extra coats probably helped conceal any coverage issues. I contacted them again a few months later so I could get our X5 done (who the f**k thought white leather was a good idea for a family car?!) and they said they had some training to do in Sydney and I could get a reduced rate on the leather fix in the X5 if I let them demo their product on our car. So I agreed. When I took Bec in the E39 to pick it up, I showed them the job I'd done in my car and they were all (students included) really impressed. Note that they said the runs I created could be fixed easily at the time with a brush or an air compressor gun. So, now with the two cars done I can absolutely recommend Colourlock. I'll take pics of both interiors and create a new thread.2 points
-
Nah that is not actually a lot. Just painting my GTR frontend and the little bits to make sideskirts/nismo flare pieces work correctly/fit on the sedan/mount up correctly came to about $7000. Is it a lot? Sure. None of this is economical. Economy would be shelling the car and buying a 2010 Corolla to commute in. The perspective of all of this is different.2 points
-
Remember, take original quote. Double it. Then add a bit more. It's how any project goes.2 points
-
Some updates here. I pulled the entire interior out, minus some trim to respray the seats with Colourlock dye. It turned out really nice though I accidentally let the dog in the car after and she scratched up the front seat. This is what it looked like before, the colour was just washing out everywhere but thankfully the leather was in good nic. Then after the respray And after the bloody dog jumped in The headliner is out waiting to be retrimmed, but it will stay out now until Nov - see why below. I replaced the stereo/headunit with a period-styled Android headunit. I have no after pics, but I'll get some. This is because of the missing pixels. I tried to fix this twice with replacement ribbon cables but couldn't. Also the bluetooth interface I'd bought for this was crap. Then there's the rusty roof. Pics and info in this other thread. I have decided to get this repaired professionally, but I'll update that thread. This is why the headliner will stay out for now. I'll be getting the roof and bonnet resprayed at the same time the rust is fixed. I also had an interesting issue with my drivers door lock. For a small period I was having issues getting any 12v power to the car - I mean *any*. It would have no dash lights, nothing. It happened while I was at the shops and I couldn't get in the car. So, we had 2 problems. The most pressing here is that I was locked out. I have only a single physical key hole on the car, the drivers door and no amount of turning would unlock the car. Surely it doesn't need power for this? The second issue is why am I losing all power periodically, The battery isn't dead, its almost like the battery isn't even there. Two issues that were surprisingly easy to fix. You fellow BMW over-engineering lovers will appreciate this. The lock in the door has 5 states; mechanical lock, electric lock, neutral, electric unlock, mechanical unlock achieved at -90 degrees, -45 degrees, 0 degrees, 45 degrees and 90 degrees. Although, the unlock is towards the front of the car, so opposite for LHD countries. Sticking the key in and turning 45 left or right is what is used 99% of the time. It activates the central locking etc. 90 degrees is for dead battery access and, obvs, only un/locks the one door. But because the mechanical lock is never used and is 27 years old, it seizes up. I was totally unable to turn the key far enough to get to the mechanical unlock (At the time of locking myself out, I didn't even know this was a thing). I eventually did it with some vicegrips and teflon spray. I made a quick vid for other E39 peeps. The battery issue is totally new to me also - It wasn't making sufficient contact between the post and the terminal. The terminal was bolted on tight, but the car wouldn't have power. After checking the battery with my multimeter I accidentally contacted the terminal and the battery post and the car got power. The battery was only a few years old and in good condition. I cleaned the post and the terminal with a wire brush, bolted it back on tight and never had the issue again. I'm still surprised that despite having solid contact it didn't work. Also, the car was getting Warragamba sized pools of water in the back when it rained. My initial concern was another rust problem. But when I went out on Weds while it was raining and while I had no headliner in I could see a steady stream of water coming through the roof mounted aerial. As this aerial is for the (now removed) car phone I pulled it out and whacked a blanking grommet in the hole. It seems fine now. I'm thinking I might get the hole permanently filled when the rust is fixed. Moving forward and things in progress; The tailgate needs some attention. I have taken all the trim off to clean it all and address some small rust spots. I have partially done all of this but I'll finish it up hopefully this weekend. As all the trim are now entirely devoid of trim clips I have bought a heap of strong velcro and I'm hoping it does a good enough job as any of this trim in good condition is super expensive and usually in Europe as we dont have many of the wagons here. Suspension and brakes!!! This is exciting. In the front; New control arms New sway bar links New lower Eibach springs (the only modification I'm planning on this car) M Sport shocks (these came with the car and will replace the longer shocks in the car) New top mounts Used 540i calipers (stock brakes suck!) New 540i disks and pads (22x296 mm for 528 and 30x334 mm for 540i) New front wheel bearings (thank all that is holy for bolt on bearings!) Annnnd in the back; New control arms New sway bar links Adjustable air suspension arms (fool the car into what the current height is so the self levelling suspension can match the new front ride height) New ball joints I'll also be doing a brake fluid flush while I'm in there. I'm planning on switching the car over to the 16's that came with it so I can clean up and respray the M Sport 17's. They've lost a lot of colour over the years and have some gutter rash. None of this will start until the E90 is back.2 points
-
From there, it is really just test and assemble. Plug the adapter cables from the unit into the back of the screen, then the other side to the car harness. Don't forget all the other plugs too! Run the cables behind the unit and screw it back into place (4 screws) and you should now have 3 cables to run from the top screen to the android unit. I ran them along the DS of the other AV units in the gap between their backets and the console, and used some corrugated tubing on the sharp edges of the bracket so the wires were safe. Plug the centre console and lower screen in temporarily and turn the car to ACC, the AV should fire up as normal. Hold the back button for 3 sec and Android should appear on the top screen. You need to set the input to Aux for audio (more on that later). I put the unit under the AC duct in the centre console, with the wifi antenna on top of the AC duct near the shifter, the bluetooth antenna on the AC duct under the centre console The GPS unit on top of the DS to AC duct; they all seem to work OK there are are out of the way. Neat cable routing is a pain. For the drive recorder I mounted it near the rear view mirror and run the cable in the headlining, across the a pillar and then down the inside of the a pillar seal to the DS lower dash. From there it goes across and to one USB input for the unit. The second USB input is attached to the ECUtec OBD dongle and the 3rd goes to the USB bulkhead connected I added in the centre console. This is how the centre console looks "tidied" up Note I didn't install the provided speaker, didn't use the 2.5mm IPod in line or the piggyback loom for the Ipod or change any DIP switches; they seem to only be required if you need to use the Ipod input rather than the AUX input. That's it, install done, I'll follow up with a separate post on how the unit works, but in summary it retains all factory functions and inputs (so I still use my phone to the car for calls), reverse still works like factory etc.2 points
-
Place the new daughterboard in the case and mount it using the 3 small black rivets provided, and reconnect the 3 factory ribbon cables to the new board Then, use the 3 piggyback cables from the daughterboard into the factory board on top (there are stand offs in the case to keep them apart. and remember to reconnect the antenna and rear cover fan wires. 1 screw to hold the motherboard in place. Before closing the case, make a hole in the sticker covering a hole in the case and run the cable for the android unit into the plug there. The video forgot this step, so did I, so will you probably. Then redo the 4 screws on back, 2 each top and bottom, 3 each side and put the 2 brackets back on.....all ready to go and not that tricky really.2 points
-
Onto the android unit. You need to remove the top screen because there is a daughterboard to put inside the case. Each side vent pops out from clips; start at the bottom and carefully remove upwards (use a trim remover tool to avoid breaking anything). Then the lower screen and controls come out, 4 screws, a couple of clips (including 3 flimsy ones at the top) and 3 plugs on the rear. Then the upper screen, 4 screws and a bunch of plugs and she is out. From there, remove the mounting brackets (2 screws each), 4 screws on the rear, 2 screws top and bottom and 3 screws holding in the small plates on each side. When you remove the back cover (tight fit), watch out for the power cable for the fan, I removed it so I could put the back aside. The mainboard is held in by 1 screw in the middle, 1 aerial at the top and 3 ribbon cables. If you've ever done any laptop stuff the ribbon cables are OK to work with, just pop up the retainer and they slide out. If you are not familiar just grab a 12 year old from an iphone factory, they will know how it works The case should now look like this:2 points
-
Switching the console was tricky. First there were 6 screws to remove, and also the little adapter loom and its screws had to come out. Also don't forget to remove the 2 screws holding the central locking receiver. Then there are 4 clips on either side....these were very tight in this case and needed careful persuading with a long flat screw driver....some force required but not enough to break them...this was probably the fiddliest part of the whole job. In my case I needed both the wiring loom and the central locking receiver module to swap across to the new one. That was it for the console, so "assembly is the reverse of disassembly"2 points
-
But first....while I was there, I also swapped across the centre console box for the other style where the AV inputs don't intrude into the (very limited !) space. Part# was 96926-4GA0A, 284H3-4GA0B, 284H3-4GA0A. (I've already swapped the top 12v socket for a USB bulkhead in this pic, it fit the hole without modification:) Comparison of the 2: Basically to do the console you need to remove the DS and PS side console trim (they slide up and back, held in by clips only) Then remove the back half of the console top trim with the cupholders, pops up, all clips again but be careful at the front as it is pretty flimsy. Then slide the shifter boot down, remove the spring clip, loose it forever somewhere in the car the pull the shift knob off. Remove the tiny plastic piece on DS near "P" and use something thin and long (most screwdrivers won't fit) to push down the interlock and put the shifter down in D for space. There is one screw at the front, then the shifter surround and ashtray lift up. There are 3 or 4 plugs underneath and it is off. Next is the rear cover of the centre console; you need to open the console lid, pop off the trim covering the lid hinge and undo the 2rd screw from the driver's side (the rest all need to come out later so you can do them all now and remove the lid) Then the rear cover unclips (6 clips), start at the top with a trim tool pulling backwards. Once it is off there are 2 screws facing rearwards to remove (need a short phillips for these) and you are done with the rear of the console. There are 4 plugs at the A/V box to unclip Then there are 2 screws at the front of the console, and 2 clips (pull up and back) and the console will come out.2 points
-
So, a bit of a side trip, but one that might be interesting for people with JDM cars and japanese head units. I know @Pac previously posted about a carplay/android auto adapter he installed which used the AUX input, and @V35_Paul put in one of the Tesla style units that replace both screens. The option I went with was a Lsait LLT-YF-VER5.87_2 (https://www.alibaba.com/product-detail/Lsailt-8GB-Android-Multimedia-Interface-for_1601187633672.html). Price was $1,150 for a single unit although they are much cheaper if you are willing to buy 2....$857ea. Make you you get the version 2 not version 1, it is faster and has a better UI - this is the manufacturer listing: http://www.lsailt.com/product/348.html. BTW if you've never bought from Alibaba before, don't be concerned....these guys can't stay in business unless they are responsive, ship fast etc, they were excellent (probably faster shipping than most local places) So, this was my task for a lazy Sat afternoon....looks complex but was all done in a few hours (it probably helps that I had some of it apart before so it was a bit familiar). I also decided to add a HD USB drive recorded at the same time and the unit also supports an aftermarket reverse cam (if you don't want to retain factory) and also AV in and HDMI out It looks much worse than it is, in fact in was genuinely all plug and play (no custom wiring at all). This video was pretty good (skipped a few steps), unfortunately they are an Aussie seller but no longer sell this unit (I guess Carplay/AA adapters are easier to install and much cheaper) https://www.youtube.com/watch?v=T5hJfYOB8Dg2 points
-
Mixing things up - installed some leather recaros to match the leather seat covered rear seats. Interior looks pretty schmick now except for some slight wear on the steering wheel which I will monitor and address if it becomes worse or actually noticeable!2 points
-
Pads for R32 GTS-t, R32 GT-R non V-Spec (Sumitomo), R33 GTS-t and R34 GT-t are all interchangeable. R34 GT uses a 2x piston caliper, hence it didn't fit.2 points
-
More than anything, it sounds like its time to urgently change that transfer case fluid, it takes a good synthentic auto trans fluid like Castrol Transmax Z2 points
-
And R32 has none of that smart nonsense that the R34 has. It's all simpe stuff on the older car.2 points
-
haha don't worry I'm sue you've got more fun ahead buying a 30 year old turbo car....but at least you are in the right place to ask2 points
-
I have had too many of those over the years, my cars have a toolkit or at minimum a cheapy multi tool thing because its too easy to be snookered by some stupid plastic clip that stops you checking the battery terminal isn't loose.2 points
-
Basically, if there is a part# on the nissan catalogue, it is a genuine part. There is a thing called "new old stock" which is stuff made years ago but never sold (or landfilled), but it is super hit and miss what you can buy. Other than some expensive Nismo stuff there is nothing new being made that suits these cars. The only time to be a little careful is (mostly in the US I think, but maybe Japan too), Nissan started rebranding some cheap crap maintenance parts like oil filters as "Pitworks"; stay away from them, if you are buying cheap just buy whatever the local car parts shop carries The three part numbers have an explanation on Amayama: 0V005 is auto, base style 0V015 is manual 0V505 is auto, hectic momo branded ones, maximum F&F points there!2 points
-
You can trust Rezz!2 points
-
Funny story Heading to Sydney this morning on the HWY there was some slow traffic, so I gave it the beans and midway through my overtaking "power run" I lost all power It seems that I missed a hose clamp, and the MAF and filter went WiFi To make this more problematic, the little tool kit that lives in the boot, is sitting in the sun room at Goulburn......LOL Luckily for me I found a bit of steel on the side of the road that could be used like a rusty and bent flat head screw driver to tighten it up enough that it got me into Sydney, it is now all tight like a tiger with the aid of a 8mm socket Note to self: Use my brain and double check stuff, and always keep that little tool kit in the car for when I have a brain fart2 points
-
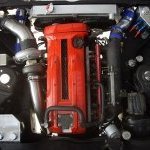
Version 1 aluminium airbox is.......not acceptable No pics as I "didn't like the look.....alot" Even after all my "CAD", and measurements, the leg near the fusebox just didn't sit right as it ended up about 10mm long and made the angle of the dangle look wrong, the height was a little short as well, meh, I wasn't that confident that Version 1 was going to be an instant winner I might give Version 2 another go, there's plenty of aluminium at work, but, after having in on and off a few times, and laying in the old OEM airbox without the new pod filter and MAF, there may be an option to modify the OEM air box and still use the Autoexe front cover and filter.... maybe This > Needs to fit in here, but using the panel, and not the pod, the MAF will need to fit in the airbox though> I'm thinking as the old OEM box and Autoexe cover that is sitting in the shed is just sitting around doing nothing, and they are relatively abundant and cheap to replace if I mess it up and need another, it may well fit with some modifications to how the Autoexe brackets mounts to the rad support, and some dremiling to move it get in there, should give me some more room for activities, as I don't want to move the MAF and affect the tune Sealing the hole it requires to stick it in the air box is simple, a tight fit and some pinch weld will seal it up tight I am calling this a later problem though2 points
-
Hang on. Let me get this straight. The desire is to have coilovers, BC in particular, to be MORE comfortable on Sydney roads than stock suspension? Well, that's obviously not right. BCs have crude damping design at the very best, and typically hard spring rates. BC stands for Billy Cart. And then, the desire is to put in some shitty old worn out stockers, to get it blue slipped and then put the BCs back in? And then.....what? Not worry about getting pulled up by the Plod? Because you seem to have raised a worry about paying for engineering (which actually does solve all your legality problems) and still getting pulled up.... but the only problem there is that if/when that happens you have to show your paperwork at the inspection station. Whereas, if you just swap in borrowed shitty old stockers to get it slipped now, and then you get defected in the future, you have to go find more shitty old stockers then too. You course of action looks like this set of options: Buy brand new stock type dampers, and springs. probably cost a bit more than $1k all up, but will last for the remaining life of the car. Put them in, pass inspection, drive on them forever more. Hell, they could even be really nice Bilsteins and Kings or other lower&stiffer springs if you wanted. Get the car engineered as is. ~$1k. Buy new Shockworks coilvers (or MCA) and also pay for engineering. You're spending a lot more here. But these will be the best things that you could drive around on.2 points
-
Take a couple of the big ones back to "work", leave them in the big bin. Will make a good boom when the garbage truck emptys it out... I've heard from another source about the boom when they had put I believe it was a 4cylinder engine in the big bins at Richmond base...2 points
-
Wow. Did you call the car a Nissan Skyline?2 points


1.thumb.png.36afd656b26d55f5d425fc76e21561f2.png)


This leaderboard is set to Sydney/GMT+10:00